Eyeon:Manual/Tool Reference/3D/Point Cloud 3D
From VFXPedia
Contents |
Onscreen Context Menu
Often, one or more of the points in the cloud will have been assigned by the 3D tracker to track a certain feature. These points may also have names that distinguish them from the rest of the points in the cloud.
Hold the mouse pointer over a point and a small popup will appear with the name of the point.
Find
To find a point with a specific name, right-click and select Find from the point cloud's context menu.
Rename
Rename one or more points by selecting Rename from the context menu. Type the new name into the dialog that appears and hit enter. The point will now have that name, with a four digit number added to the end. For example, the name window will be window0000 and multiple points would be window0000, window0001, etc.
Publish
Normally, the position of a point in the cloud is unavailable. To expose the position, publish the point so that other tools can connect to the point and read its value. To publish one or more points, select the points, right-click and choose Publish from the context menu. A set of controls for that point will appear in the tool controls, allowing to connect to the point by name.
Point Cloud 3D Controls Tab
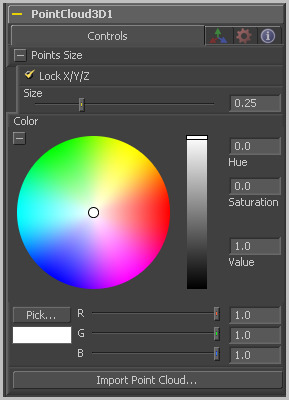
[Points Size] Deselect this checkbox to provide individual control over the size of the X, Y and Z arms of the points in the cloud.
[Points Size] These sliders can be used to increase the size of the onscreen crosshairs used to represent each point.
Use the standard Color control to set the color of onscreen crosshair controls.
The Import Point Cloud button displays a dialog to import a point cloud from another application. Supported filetypes are Alias's Maya .ma files, 3ds Max ASCII Scene Export, NewTek's LightWave .lws and Softimage XSI's .xsi.
3D Transformation Tab
On Screen : Transformation Widget
Most of the controls in this tab are represented in the display view by a Transformation Widget with modes for transformation, rotation and scaling. To change the mode of the widget, select one of the three buttons in the toolbar along the side of the view, or press the `q' key for translation mode, `w' for rotation and `e' for scaling. In all three modes, individual axes of the control may be dragged to affect just that axis, or the center of the control may be dragged to affect all three axes. Note: In order to scale in a single dimension, the Lock X/Y/Z Scale checkbox must be unchecked.
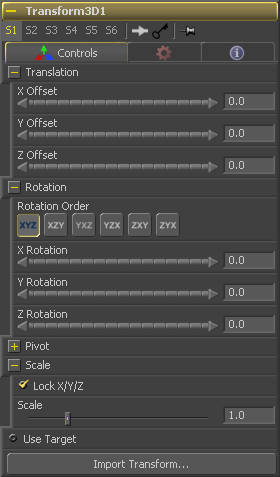
These controls can be used to position the 3D element.
Use these buttons to select which order is used to apply the Rotation along each axis of the object. For example, XYZ would apply the rotation to the X axis first, followed by the Y axis and then followed by the Z axis.
Use these control to rotate the object around its pivot point. If the Use Target checkbox is selected then the rotation is relative to the position of the target, otherwise the global axis is used.
A Pivot point is the point around which an object rotates. Normally, an object will rotate around its own center, which is considered to be a pivot of 0,0,0. These controls can be used to offset the pivot from the center.
If the Lock X/Y/Z checkbox is checked, a single Scale slider will be shown. This adjusts the overall size of the object. If the Lock checkbox is unchecked, individual X, Y and Z sliders will be displayed to allow scaling in any dimension. Note: If the Lock checkbox is checked, scaling of individual dimensions is not possible, even when dragging specific axes of the Transformation Widget in scale mode.
Selecting the Use Target checkbox enables a set of controls for positioning an XYZ target. When target is enabled, the object will always rotate to face the target. The rotation of the object becomes relative to the target.
| The contents of this page are copyright by eyeon Software. |


