Useful Scripts
From VFXPedia
The following scripts may be useful. See the snippets page for a collection of small code examples to solve specific tasks.
Contents |
Comp Scripts
These go into the Comp subfolder of the path map defined for Scripts: (usually C:\Users\Public\Documents\eyeon\Fusion\Scripts\)
Import and Export

Script to replace text inputs from CSV data in Spreadsheets and render each comp individually. Useful to render lower thirds and similar in one batch. Make sure to name the header row in the csv according to a text tool or input (e.g. Text1,LowerThirdMarco.TitleInput,Text3D1). The temp: can be replaced if you want to keep track of the autogenerated comps. All savers will get the current value of the first column as subfolder.
This script converts 2D tracks exported from FFI stabilizer as .ascii file. Writes .dfmo to the same direcrory, make sure it is writable. Can do all .ascii in directory with process all files option. Needs horizontal resolution of tracked image in pixels.
Just for the fun of it it tried to create a export script for fusion cameras to a maya ascii file. Most parts of it are just a copy of a maya ascii file i had as reference but for the small tests i did it worked. What we have so far:
- export of translation and rotation for a selected cam
- if the camera uses a target then this will also exported
- export of animated focal length
- a scale factor
Import .VPE file from Photoshop CS3 with corresponding .3ds and image. It creates a Projector3D, a FBXMesh3D and a loader (for the projected image, position the Projector and link it with the loader)

This script parses a ASC CDL CCC xml file and let the user choose which colorcorrection from the CCC should be loaded. Then it creates the corresponding tools for the grading. you can/should also use my macro for a ASC CDL UI (the script let you choose if you want to add a chain of tools or add the macro) Macros
--michael_v
Loaders and Savers
Similar to other version up scripts, but this one focuses on loaders. It finds the current version # of all loaders in your comp, and then looks for a valid path/filename with the version number increased.
- has only been tested with image sequences, and they must include a string _v#### in the path or filename
- sub-versions or decimal version #'s not tested.
- example fileName = c:\project\shots\Ep215\VFX-01\elements\VFX-01_v02\1920x1080\AC_Element_v02.0000.dpx
- written by Fred Pienkos, updated October 17, 2012
This script will do a recursive scan on a Directory and add all known Imagefiles as separate loaders to the comp.
Derived from the original "Create Bin From Directory" script.

- Checks all loaders for missing frames.
An updated version of the script that ships with Fusion. New features:
- option to remember search strings in global variables if you need to do many similar replacement operations.
- script no longer lowercases the whole path name in loaders and savers.
- "Trim In" and "Trim Out" numbers of loaders are preserved.
This script will generate a local proxy version of every/selected loader. To do so it generates a savernode and starts rendering it. So it will take some time to finish.
This script is a modification of the 'check for missing frames'-script and works like this:
LoaderTweaker allows for easy modification of the most-frequently used Loader-options. (Derived from the ChangeLoaderMissingFrame-script). Goes into Scripts\Comp.
Last revisited: January 9, 2008. Added Hold First/Last options.
Loaders that are not connected to any tool will be deleted. Goes into Scripts\Comp.
This custom script was written to rename the output files generated by the comp’s savers. The output clips are renamed based on the title of the comp. The file extension is created from a hard coded list of file extensions and determined based on the TOOLST_Clip_FormatName attribute of the saver.
To run this script ensure that the script is saved in the Fusion/Scripts/Comp directory. Select the savers to be affected by the script and run the script from the Scripts menu of Fusion.
This custom script was written to maintain the custom data (channels) created for an OpenEXR format clip loaded into a Fusion loader.
Existing scripts that allow the user to re-path loader files destroyed existing clip information (in the creation of a new clip). This script first collects the custom data, creates a new clip and repopulates the custom data. To run this script ensure that the script is saved in the Fusion/Scripts/Comp directory. Select the Loader to be affected by the script and run the script from the Scripts menu of Fusion.
This is a modification of the 'Save New Version' script in Fusion 5 that also updates clip names in savers. Use it if you intend to keep different version renders for comparison or other purposes. It will only update savers matching the composition name, so you have to explicitly enable 'versioning' of your savers.
This script helps managing comps with several savers. It will print a summary of all enabled savers which is helpful if you want to make sure only desired branches/savers are rendered. The script can be configured to automatically create missing output directories for all savers and to set the render range to the combined range of all active savers. It can also delete existing output movs for you if overwriting them creates file name issues on your server. If only one saver is enabled, that one will be highlighted in the flow view. Long story short: simply run this script before you hit render and it will make sure the range is set up correctly and no saver will fail due to missing directories. --Tilt
This script animates the range in which the saver is active. It builds a list of all savers in the comp and let the user deside which should be active and in which range. By default all savers are active (besides if the are in passthrough or not) and the renderange is the comp renderrange. Goes into Scripts\Comp.
--Michael_v
This script creates a Loader that points to a selected Saver's output sequence. If one or more Loaders are included in the selection, the saver's clip will be copied to those Loaders without a new one being created. --Tilt
Last revised 2013-03-23. bug fixes when using path maps or avi files.
Script will merge all selected loaders in order. In fact its like you put all these footages one by one in your editing application. Order is important! For example - if you throw "a.mov" then "b.avi" then "c.mov" to your comp and then apply script, you get a->b->c editing. Аnalogically if you throw "c.mov" then "b.avi" then "a.mov" to your comp and then apply script, you get c->b->a editing. Script change Global-In\Out properties for selected loaders and comp RenderTime. Script analyze all footages and searching for maximum width and height, so if yours footages with different resolutions, your final output would be with maximum width and height. Place it in Comp scripts folder . Video example: https://vimeo.com/44732039
--robocop
Creation
Creates a connected ColorMatrixTransform based on all selected 3D Transform Tools. Needs the ColorMatrixTransformFuse in order to work [1].
Written by Blazej Floch on May 2nd 2012
This script will generate a series of 3D planes slicing an image into rectangles, or arbitrary shapes from a greyscale image. From the right angle, it still looks like a solid image. Fly the camera around for some interesting transitions. This is a modified version of an original script by HuLaN, posted on VFXTalk.
Written by Christoffer Hulusjö, Daniel Koch. Last revised by Stefan Ihringer on November 2nd 2011 so tool connections work properly in Fusion 6+.
This custom script was written to create circular paint strokes at a location, frame number and with a radius defined by a text file.
The script generates an image that is used to simulate particles colliding with a plane. The initial version of this script expects that the user has manually added the paint tool and selected it.
To run this script ensure that the script is saved in the Fusion/Scripts/Comp directory. Select the paint tool to be affected by the script and run the script from the Scripts menu of Fusion. Sample data (CollisionShort.dat) has been included for download so the script can be tested.
Tool Management and Batch Parameter Editing
Change parameters in all selected tools at once, with SlayerK's Batch Changer script. Supports multiple choices for "FuID" inputs, and even simple expressions like +1, -2, *3, /4 for "Number" and "Point" inputs. Goes into Scripts\Comp.
This script can be used to replace the default tool rename dialog. It uses the short name of the tool as prefix.
This script comes in two versions. Version 1 uses the default AskUser dialog which is not handy because it does not highlight the textdialog and does not react to enter or escape. Version 2 uses iup as interfaces and does not have these problems.
To run this script ensure that the script is saved in the Fusion/Scripts/Comp directory. Select the tool you want to rename. Run the script.You may use the hotkey manager at File-Scripts-Hotkey Manager to apply a shortcut e.g. CRTL-F2 to this script.
Updated: CRTL-A for using the current name for all tools in selection & more (see header).
The Category Color Changer uses a hard-coded table of RGB color values to color-code every tool in a composite based on its category. This allows you to apply a standard color scheme to both newly created comps and older comps that had little or no color-coding. (Source)
Initially written by Casey Visco. Last revised Wednesday, December 20th, 2006
Intended as a replacement for Fusion's standard Ctrl-W hotkey, which swaps foreground and background inputs of all selected tools. This script, however, has an additional convenient feature: use it on a ColorSpace, Gamut or CineonLog to invert the conversion. Erode gets turned into dilate, and on masks or transforms the "invert" checkbox will be toggled. Place it in Comp or HotkeyScripts and attach a keyboard shortcut. --Tilt
This script renames the selected tools (or all if nothing is selected). Similar to the renamer of Total Commander: inserting/replacing strings, inserting counter, or tool type abbreviation. See more description : : and use in the script. Current version: 1.02
Written by Gabor L. Toth. Last revised Saturday, March 31st, 2007
PriorityPassthrough (de)activates user-definable sets of tools. The user has to put PL1, PL2, PL3 or PL4 into the comment-tab of the tool to assign the tool to a 'priority group'. Goes into Scripts\Comp.
Updated 15/05/07 as there was a little prob with animated tools.

Development
This script counts all (visible) nodes. It excludes invisible inputs for fusion 5.1 and 5.2 (compare to this)
Written by written by Blazej Floch. Last revised Monday, September 24th, 2007
This comp script will generate a list of all possible node input and output values. You can use this output (id, name and current value) for further script, expression and macro development. --Fry 04:21, 9 April 2010 (EDT)
Other
An extension of the Add Tool script that ships with Fusion. For an extensive description of the enhancements, please check out this thread. --sh4dow 13:14, 11 February 2012 (EST)
The reason I wrote "Add Anything" in the first place. A nice and small option for adding tools to your flow, basically combining the positive aspects of how it works in both Fusion and Nuke. As with "Add Anything", please check out this thread for an extensive description. --sh4dow 13:14, 11 February 2012 (EST)
A enhanced version of Fusion's Add Tool scsript based on Sh4dow's Add Anything (see above) that remembers your favorite tools and improves searches for even faster access. Here's an extended description. --Tilt
This script was made to automate creating of reference clips from firewire drives with film footage. It can be used to search folders recursive for footage in any file format that Fusion can load and convert it to any other file format fusion can write to. Creates comps for sequences and can submit them for render.
Based on the Save New Version script, this script allows you to set a range of frames and automatically export a sequence of Comps, one for every single frame of that range.
The reason why this script can be useful is that with rendering of comps (the ones that are very heavy on memory use particularly), Fusion sometimes renders a LOT faster if it purges its memory after each single frame. For the moment there is no option to do this automatically*, but this workaround has the same result.
When using, make sure to save the comp FIRST using the necessary suffix and padding, for example FileName_frame_0000.comp!
- *Update: there is! Thanks to Sean Konrad, here's a very elegant solution to this problem, using an event script:
Make a comp script called "Set Purge Cache on Render End.eyeonscript" with the following contents:
globals.ev = AddEventSuite("Composition")

function ev:OnEndRender(event)
        fusion.CacheManager:Purge()
end
or you could add it to the OnFrameRendered event if you're not doing it one frame at a time:
function ev:OnFrameRendered(event)
        fusion.CacheManager:Purge()
end
Simply run this script and then render the comp. It will purge the cache as it goes along! --Pieter Van Houte 05:13, 16 April 2008 (Central Daylight Time)
You can also add this snippet to a saver's Frame Rendered Script field. It needs to initialize the fusion variable first which isn't defined by default for InTool scripts. Be aware that using this script for multiple savers will probably have negative side-effects. The order in which savers are rendered is unpredictable so chances are high that the cache will be cleared prematurely.
fusion = eyeon.scriptapp("Fusion", "localhost")
fusion.CacheManager:Purge()
(Rename .eyeonscript to .rar to extract the archive)
I created a set of hotkeyscripts and a hotkey setting for adding tools to the flow.
If a tool is selected the new one will be inserted rigth next to it and remains all connections of the tool. It will be even inserted between. So main output of selected tool become main input of the new one and main output of the new one become input for downstream tools.
The polymask was altered by Stefan Ihringer, so that it will connect to the mask input of tools.
So, the hotkey settings look like this:
Flow = {
-- My own HotKeys
--***************************************************
M = "@Scripts:/HotkeyScripts/Merge.eyeonscript",
C = "@Scripts:/HotkeyScripts/BrightnessContrast.eyeonscript",
ALT_B = "@Scripts:/HotkeyScripts/Blur.eyeonscript",
R = "@Scripts:/HotkeyScripts/Loader.eyeonscript",
W = "@Scripts:/HotkeyScripts/Saver.eyeonscript",
B = "@Scripts:/HotkeyScripts/ChannelBoolean.eyeonscript",
ALT_C = "@Scripts:/HotkeyScripts/ColorCorrector.eyeonscript",
SHIFT_C = "@Scripts:/HotkeyScripts/ColorCurves.eyeonscript",
L = "@Scripts:/HotkeyScripts/CineonLog.eyeonscript",
A = "@Scripts:/HotkeyScripts/MatteControl.eyeonscript",
ALT_T = "@Scripts:/HotkeyScripts/Tracker.eyeonscript",
U = "@Scripts:/HotkeyScripts/UltraKeyer.eyeonscript",
K = "@Scripts:/HotkeyScripts/LumaKeyer.eyeonscript",
ALT_R = "@Scripts:/HotkeyScripts/PolylineMask.eyeonscript",
T = "@Scripts:/HotkeyScripts/Transform.eyeonscript",
S = "@Scripts:/HotkeyScripts/BetterResize.eyeonscript",
--ALT_U = "@Scripts:/HotkeyScripts/Underlay.eyeonscript",
X = "@Scripts:/HotkeyScripts/Background.eyeonscript",
ALT_P = "@Scripts:/HotkeyScripts/Photron.Primatte4.eyeonscript",
ALT_D = "@Scripts:/HotkeyScripts/ChangeDepth.eyeonscript",
ALT_G = "@Scripts:/HotkeyScripts/GamutConvert.eyeonscript",
P = "@Scripts:/HotkeyScripts/Paint.eyeonscript",
G = "@Scripts:/HotkeyScripts/ColorGain.eyeonscript",
--****************************************************
},
update: Fusion 6 had already improved the AddTool() function but it's only since 6.32 that the following shortcut can be used without occasional crashes. Instead of calling scripts from your hotkeys file, you can simply call AddTool to automatically create and connect any kind of tool:
Flow = {
B = "t = self:Composition():AddTool('Blur', true, -32768, -32768)",
},
This comp script allows you to track only one frame forward or reverse. --Fry 04:38, 9 April 2010 (EDT)
Event Scripts
- The Orphan Saver Check script is a Script Library that hooks the OnStartRender event and executes before the render dialog is displayed.
- It examines each saver in the composition and displays a warning if the saver's image input is not connected to any other tools.
- Save this script in the Fusion:\Scripts folder. It will be executed each time a new composition is created or an existing composition is loaded.
- Initially written by Isaac Guenard, eyeon Software. Last revised Friday, July 21st, 2006
- Note: Using this script or perhaps any scriptlib event script, will cause Deadline v2.6 to fail to load Fusion. --Drswoboda
- This workaround example shows how to implement a OnToolAdded script event. It makes uses of metadata for the loader and (new) compositions.
- The OnActivateTool event is used together with the metadata checks.
- Install to Script:Comp not to Script: in order to make the while loop finish.
- Initially written by Blazej Floch, eyeon Software. Last revised Friday, November 19th, 2011
- --bfloch
Tool Scripts
These go into the Tool subfolder of the path map defined for Scripts: (usually C:\Users\Public\Documents\eyeon\Fusion\Scripts\)
Import and Export

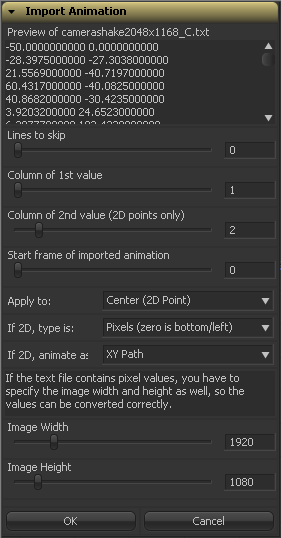
A powerful script to import keyframes from files where there is one line of data for each frame (space or comma-separated). View Screenshot. Can be used to animate 2D point controls or single value sliders. Regular paths as well as XY-Paths are supported. The file's values can be Fusion's normalized coordinates or they can denote pixels with the origin being at the bottom, top or center. You can also choose to skip a certain number of lines before the first line of data is read. --Tilt
Loaders and Savers
This tool script is meant to be used in conjunction with the "Save New Version" script. It will update a saver's path so that it matches the new comp name. It also takes into account situations where rendered image sequences are to be put into subfolders of the same name. --Tilt
This will add a BG and DX to your LD so that the LD will not fail a render if it is out-of-range. --Chad
Simple tool script that increases the version number in a loader or saver (best use as a hotkeyscript to easily switch between different versions of your source). Goes into Scripts\Tool. --Michael_v
Simple tool script that decreases the version number in a loader or saver (best use as a hotkeyscript to easily switch between different versions of your source). Goes into Scripts\Tool. --Michael_v
Changes the Filename field of selected savers to <CompName>_<Saver>_<YYYY.MM.DD>.0000.<ext>
Where
- CompName - your composition's name
- Saver - the part of a saver's name after "Saver_" (e.g. if your saver's name is "Saver_OutputA", it'll take OutputA)
- YYYY.MM.DD - current date
- .0000 - sequence padding (added only to sequences)
- ext - original extension that has to be set beforehand.
Based on Rocket_Science_Saver_Clip_Rename.eyeonscript by Brian Sinasac, reworked by Igor Kozitsyn, Dmitry Korshunov, Dmitry Slepichev and Gregory Chalenko.
You can easily modify the items included into the file name by editing the following line in the script: FileName = compName..fragment.."_"..os.date("%Y.%m.%d")
Assigns the output file name for savers from this template: <CompName>_<Saver>.0000.<ext> and sets the path to the project output folder relative to the composition. Options for this script such as naming template, padding, project's output folder can be set by editing corresponding section of the script with a text editor. --Gringo
Tracking and Transforms
This script will convert an input that has been animated with a path modifier to an XY path (optionally ignoring either the X or Y axis). It can bake the animation or just convert the path's keyframes, but it can't convert smooth bezier handles. Note: In older versions of Fusion (before 6), you shouldn't convert tracker paths directly as this will prevent the tracker from working properly. Instead, connect the stable or unstable inputs to a Xf or Merge node and then use this script. --Tilt
I updated this script to fix two issues. The first was a bug that would cause it to ignore some types of Path. It was also using 1 for the default Start Frame, when some compositions will start from 0. I updated the script on May 14th, 2008 to fix those two issues. --Izyk
As of Fusion 6.14, you can convert a spline from Polyline to XY Path and vice versa by using the right-click menu in the viewport.
Based on Destabilize Transform that is shipped with Fusion. This version is now capable of connecting trackers to any tool that has a center, size or angle input (not just Xf and Mrg anymore). It can also rename and/or color the tool. --Tilt

Run this tool script on a spline mask with published points, and it will set up a Tracker & connect all the points to it, ready for tracking. Place the script into Scripts\Tool. It is designed to work on spline masks and b-splines.
This script connects transform to selected tracer, bakes animation, and allows averaging keyframes or removing jitter. Also allows to change reference frame and scale transform values. Saves last settings to comp.
3D
This tool script allows you to create an image plane from three points of a point cloud. Use it to easily setup walls and floors for projection setups. Since there's no way for this script to know which points you have already selected in the viewer, you will have to launch the script and then hover your mouse over points in the 3D viewer to get each point's name as a tooltip. --Tilt
This tool script will export a baked version of a 3D tool's transforms to a space delimited ASCII text file. The first line of the file has three entries as follows :
id rotation_order target
- id
- The id of the current tool type, as returned by tool:GetID(). i.e. a Camera would be Camera3D
- rotation_order
- A string describing the current rotation order
- target
- Will be 1 if the Use Target checkbox was selected, otherwise it is 0
- The remaining lines have the following format
time x y z rot_x rot_y rot_z pivot_x pivot_y pivot_z target_x target_y target_z [angle_of_view]
- The angle of view will only appear if the tools id is Camera3D and the type of camera is not orthogonal.
This tool script creates a projection camera from a selected Camera3D tool, freezing its animation on the current frame. The frame number and source camera name will also be added to the tool's comments. If you insert the following block into your Fusion.menus file, you'll be able to quickly access this script by right-clicking on any camera tool. --Tilt
    Camera3D = {
        { "Freeze Projection", [[@Scripts:Tool\Freeze Cam.py]] },
    },
This script allows for adding imageplanes at PointCloud points, as well as setting up 4 3DLocators at selectable points of a PointCloud. A huge Timesaver when dealing with 3D-tracked scenes. It goes into scripts\tool and works on PointCloud3D only.
Activate any 3D tool's target and line it up with one of the cameras in the scene. It goes into scripts\tool and works on 3d tools only.
This script allows to switch renderer type of all (or selected) Renderer3D tools in composition to OpenGL or Software renderer.
Various Little Helpers

Run this ToolScript on the bottom-most mask of a Mask-Stack to connect the values of all upstream masks to the selected mask.
So now you can move and modify *all* the masks from just one tool. Especially useful on imported SVG shapes.
This Script will help to copy keys to another time. It shows a dialog with all keys at the current time and lets the user decide which of them should be copied. Enter a destination frame and hit okay, all selected keys will be copied to the destination frame. Goes into Scripts\Tool. --Michael_v
Now you can paint with the speed of multistrokes, and still be able to edit and animate them like single-strokes. These two scripts can convert a multistroke into a series of single-strokes, and vice-versa, with full undo. This allows you to easily edit, reposition, rearrange, retime or remove individual strokes, and to group, combine or re-combine single strokes for added render speed & stability. Essential tools for serious Fusion painters.
For Fusion 5.21 or later. Place the script into Scripts\Tool. Last revised 5th March 2008 by Daniel.
This script inverts a bezier spline by swapping time and value of each key frame. So for example a key at 10 with a value of 44 will end up as a key at frame 44 with a value of 10. --Tilt
These 2 Scripts will select other tools with the same color or from the same type. Goes into Scripts\Tool. --Michael_v
A little tool script that selects the source of a WirelessLink Fuse and moves the FlowView to it. Goes into Scripts\Tool. --Michael_v
How many times have you wanted to copy the settings from one Shader in Text+ to another for adding further elements? And how many times did you end up copying values back and forth manually? This little script helps you achieving this in just a mouseclick. For now it won't copy animated values, though. It goes into scripts\tool and works on Text+ only.

Script just rename all of WirelessLink tools in your comp, by rule: W_sourceToolName , where W_ - is prefix (you can change it inside script).
To install just place script to Fusion\script\comp\ dir, or any other dir, where fusion can see your script.
-robbi
A ToolScript that makes a preview and opens it in JefeCheck (http://jefecheck.jefecorp.com/) (quiet similar to the built-in "create preview on" feature). On Loader/Savers it will just open in jefeCheck with the footage of the loader/saver. on all other tools it will create a temporary saver, renders and opens jefeCheck with the new Footage User can specify path and name for the temporary footage User can select proxylevel of rendering (level 1 is HiQ on) Goes into Scripts\Tool.
--Michael_v
Development
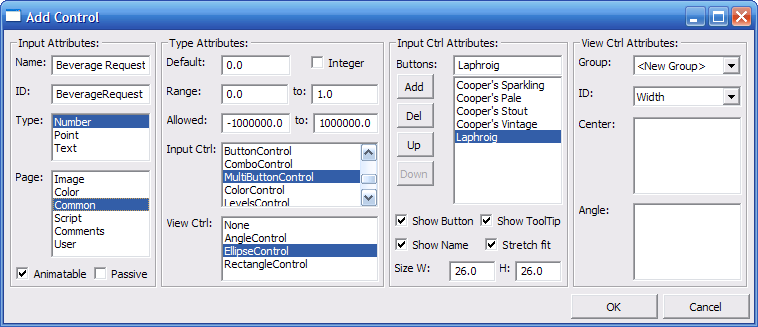
Building a fancy macro, or just customizing an existing tool? Want to hide built-in controls, customize them, or add a whole new control of your own to drive your expression wizardry? This is the script for you - check it out. Currently, you can hide most built-in controls, or add a variety of window- or view-controls, with many options. Added controls don't immediately do anything, of course, but expressions on other controls or even other tools can reference them, which can be particularly useful for macros.
For Fusion 5.21 or later. Place the script into Scripts\Tool. Last revised 7th Oct 2008 by Daniel.
This script is installed by default with current versions of Fusion. Watch a video on eyeon's youtube channel about how to use it to improve the interface of your macros.
The inputs and attributes you can select with this script are related to the SDK that is used for writing plugins and Fuses. Please refer to the page about input controls and their attributes.
Utility Scripts
This script was designed to help manage the logs generated by the Fusion Render Manager.
There are 2 tools available in this script, Split Render Log tool and the Log Analyzer tool. The Split Render Log tool allows the user divide their single large render log into a much more manageable daily log.
The Log Analyzer tool allows the user to view information for a specific day and broken down into specific jobs. The data is displayed in a series of tabs as follows:
- General Information – job title, requester, render status, start, end and render time as well as the list of machines used in the render.
- Errors – all errors found for the specified job
- Verbose – all log entries for the specified job
Additionally, the Log Analyzer allows the user to save the file in a printer friendly format. IUP was used to create the user interface.
To run this script ensure that the script is saved in the Fusion/Scripts/Utility directory. Run the script from the File->Scripts menu of Fusion.
Directly display help in SciTE console on selected eyeonscript objects and methods.
Scriptlibs
A scriptlib is an eyeonScript (LUA) file that is automatically executed whenever Fusion is launched. It needs to be saved directly to your Scripts: directory, not in one of the subdirectories (Tool/Comp/etc) and they are the perfect place to set up your pipeline.
This scriptlib will check for the existence of files and then set a global path map entry based on which file was accessible. This way, comps can use a path mapping (e.g. "Host:") in loaders that will always point to the footage. You can use this to share a comp between artists on different locations, take your comp and a copy of the footage with you on a laptop while travelling or use a virtual machine like Parallels on a Mac (where the Mac's hard drive is mapped to a virtual network share) without the need to search&replace path names.
Third-party Scripts
- These Fusion & Max scripts can import and export Fusion Camera animation to Max 9 and back again.
- Written by Ciril, www.silverwavestudios.com. Last revised 2007.
The package consists of three scripts: an advanced exporter for Syntheyes, a Python script for Syntheyes that is able to create and update tools from a matchmove (camera, point cloud, planar trackers) and a small tool script for Fusion that sets up a Syntheyes project from a selected Loader. Syntheyes Pro 2013.11 or later required for the Python scripts. Readme included.
The Fusion6 exporter is based on the Fusion5 script that ships with Syntheyes and has been updated in many ways:
- support for stereo camera pairs
- support for planar trackers (with or without planar export preparation script)
- work area (timeline) options
- Create locked cameras to prevent their accidental modifications
- Added project info to comp's comments tab and footage name to camera's comments
- various fixes like paths and obj meshes
- convert paths to a Windows format when running Syntheyes on Mac/Linux
More monitor than render manager, but hey.. you can monitor via web browser your render queue, to move comps up/down, to remove them from queue and save the queue itself.
- It has option to connect to any available QueueManager on the local network.
- Implemented simple ACL - access control list via remote IP adress, to control who can operate the queue.
- Tested with apache web server for Windows.
This script outputs a list of all loader images/sequences and saver files. Each line of a text file is read for a .comp filename. The script will open each comp in fusion and output the queried information. This is a modification of the original List Footage script for batch purposes.
Tips and Tricks
Code Snippets
Further code examples can be found on a separate page.
How to run Comp or Tool scripts from outside Fusion
The only difference that sets Utility, Comp & Tool scripts apart is that they're automatically given some local variables when they start up. All types are given fusion (& fu), referring to the Fusion object, Comp and Tool scripts also get composition (& comp), referring to the composition that the script was started from, and Tool scripts get tool, referring to the tool that was used to start the script.
You can easily convert any of these into scripts that can be run from outside Fusion (executing them with eyeonScript.exe), by adding the following code to the start:
--[[ For Utility scripts ]]---------
if not fusion then
  fusion = Fusion("localhost")
  fu = fusion
end

--[[ Add this for Comp scripts ]]---------
if fusion and not comp then
  composition = fusion:GetCurrentComp()
  comp = composition
end

--[[ Add this as well for Tool scripts ]]-----------
if comp and not tool then
  tool = comp.ActiveTool
end
This sets up the default variables from the local copy of Fusion (assuming it is already running), the current comp, and the currently active tool. Be aware that these variables may be nil (e.g. if no comp is open, or if no tool is currently active), and many scripts assume they are valid.
How to construct a group or macro from a script
Unfortunately, there's currently no trivial way to group tools from a script. However, it can be done by assembling a series of nested tables containing the tools to be grouped, with a few extras describing the rest of the group. These nested tables mirror the tables found in .setting files. You can then paste those tables directly into the comp, or save them as a setting file etc.
Take a look at the differences between a tool and a grouped tool to see what has to be done: Copy the tool (from the flow view) & paste it into SciTE to see its table structure. Now group the tool & copy/paste that into a different SciTE window. See how the original tool is now contained within an outer GroupOperator table, with extra tables describing which inputs/outputs are externally available?
You'll need a table containing the tools to be grouped. This can be done manually, by loading a .setting file, or by using the comp:CopySettings() function. Then, create the GroupOperator tables and plug the tools table into that. Here's an example script fragment that assumes you have a single ColorGain1 tool that you want to make a group out of.
-- Create a group table called Group1
gt = { Tools = { Group1 = { __ctor = "GroupOperator" } }
gt.Tools.Group1.ViewInfo = { __ctor = "GroupInfo" }
gt.Tools.Group1.Inputs = {}
gt.Tools.Group1.Outputs = {}

-- Add an external input, referencing ColorGain1's Input
gt.Tools.Group1.Inputs.Input1 = { __ctor = "InstanceInput", SourceOp = "ColorGain1", Source = "Input" }

-- Add an external output, referencing ColorGain1's Output
gt.Tools.Group1.Outputs.Output1 = { __ctor = "InstanceOutput", SourceOp = "ColorGain1", Source = "Output" }

-- get a table of settings for the actual tools to go in our new group
t = comp:CopySettings(ColorGain1)
gt.Tools.Group1.Tools = t.Tools

-- paste it back into the comp
comp:Paste(gt)
Creating macros is actually fairly similar, except you'd use __ctor = "MacroOperator" instead of "GroupOperator", and the external inputs/outputs should be named "MainInput1"/"MainOutput1" etc, while exposed controls are just called "Input1" etc. You can also use extra values in those Input tables, such as Name, Default, MinScale and MaxScale. Have a look at an existing macro setting file for examples.
How can I find the location of a tool in the flow?
Works in v 5.2 & up
Help "FlowView:GetPos"
Help "FlowView:SetPos"
Example:
-- LUA
x,y = comp.CurrentFrame.FlowView:GetPos(Background1)
comp.CurrentFrame.FlowView:SetPos(Background1, x + 0.5, y)
# Python: use GetPosTable instead
pos = comp.CurrentFrame.FlowView.GetPosTable(Background1)
comp.CurrentFrame.FlowView.SetPos(Background1, pos[1] + 0.5, pos[2])
How to write multiline code in Fusion Console in Python?
(Stolen from Blazej message in mailing-list :b)
It is still Lua. Multi line Lua works with square brackets. So you can do that :
   comp:Execute([[!Py: print "hello"
   print "Whats up"
   import os
   print os.path.isdir("C:\\temp")
   ]])
How to run code automatically
- If you want to run code every time Fusion is started or a composition is opened/created, have a look at scriptlibs.
- You can execute functions on certain events (like opening or saving a comp) using event suites.
- Fusion will run any script automatically which sits in the same folder as the (template) comp and has the same name. So if you e.g. have TheTemplate.comp and TheTemplate.eyeonscript living in the same location, the script will be executed each time you load the comp. (by Eric Westphal, fusion-l mailing list)
External Links
http://www.svenneve.com/?page_id=383 - scripts by Sven Neve
