Eyeon:Manual/Tool Reference/3D/Locator 3D
From VFXPedia
Contents |
The scene provided to Locator's input must contain the camera through which the co-ordinates are projected. As a result, the best practice is to place the locator after the merge that introduces the camera to the scene.
If an object is connected to the Locator tool's second input, the locator will be positioned at the object's center, and the Transformation tab's Offset XYZ sliders will function in the object's local co-ordinate space rather than Global scene space. This is useful for tracking an object's position regardless of any additional transformations applied further downstream.
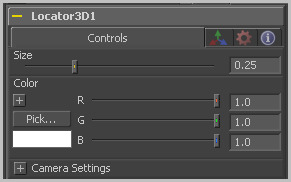
Locator 3D Controls Tab
The Size slider is used to set the size of the locator's onscreen crosshair.
A basic Color control is used to set the color of the locator's onscreen crosshair.
The SubID slider can be used to select an individual sub-element of certain geometry, such as an individual character produced by a Text 3D tool, or a specific copy created by a Duplicate 3D tool.
[Camera Settings] This drop down control is used to select the camera that defines the screen space used for 3D to 2D co-ordinate transformation.
[Camera Settings] Select this checkbox to override the Width, Height and Pixel Aspect controls, and force them to use the values defined in the compositions Frame Format preferences instead.
[Camera Settings] In order for the locator to generate a correct 2D transformation, it must know the dimensions and aspect of the image. These controls should be set to the same dimensions as the image produced by a renderer associated with the camera specified above.
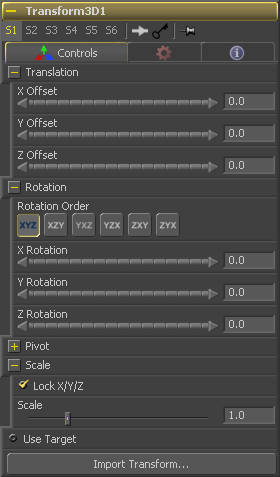
3D Transformation Tab
On Screen : Transformation Widget
Most of the controls in this tab are represented in the display view by a Transformation Widget with modes for transformation, rotation and scaling. To change the mode of the widget, select one of the three buttons in the toolbar along the side of the view, or press the `q' key for translation mode, `w' for rotation and `e' for scaling. In all three modes, individual axes of the control may be dragged to affect just that axis, or the center of the control may be dragged to affect all three axes. Note: In order to scale in a single dimension, the Lock X/Y/Z Scale checkbox must be unchecked.
These controls can be used to position the 3D element.
Use these buttons to select which order is used to apply the Rotation along each axis of the object. For example, XYZ would apply the rotation to the X axis first, followed by the Y axis and then followed by the Z axis.
Use these control to rotate the object around its pivot point. If the Use Target checkbox is selected then the rotation is relative to the position of the target, otherwise the global axis is used.
A Pivot point is the point around which an object rotates. Normally, an object will rotate around its own center, which is considered to be a pivot of 0,0,0. These controls can be used to offset the pivot from the center.
If the Lock X/Y/Z checkbox is checked, a single Scale slider will be shown. This adjusts the overall size of the object. If the Lock checkbox is unchecked, individual X, Y and Z sliders will be displayed to allow scaling in any dimension. Note: If the Lock checkbox is checked, scaling of individual dimensions is not possible, even when dragging specific axes of the Transformation Widget in scale mode.
Selecting the Use Target checkbox enables a set of controls for positioning an XYZ target. When target is enabled, the object will always rotate to face the target. The rotation of the object becomes relative to the target.
| The contents of this page are copyright by eyeon Software. |


