Eyeon:Manual/Fusion 6/Common Mask Controls
From VFXPedia
[ Main Manual Page ]
- Common Mask Controls
- Bitmap
- BSpline
- Ellipse
- Mask Paint
- Polygon
- Ranges
- Rectangle
- Triangle
- Wand
- Leathery Gimp
Common Mask Controls [cmc] | |
|
Common Controls can be found in every Mask tool. This chapter is therefore valid for all Mask tools. | |
Contents |
Common Mask Controls
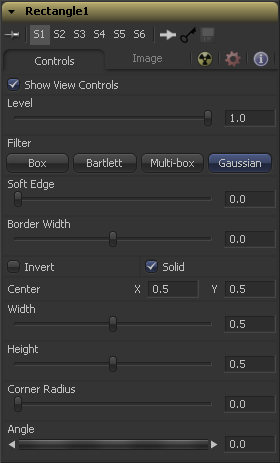
Although each mask has its own set of controls unique to that mask type, several of the controls shown are common for all types of masks. The controls listed here are generally found on all masks.
Use the Show View Controls checkbox to disable the display of the mask controls in the display view. Polylines, centers, angles and other controls will not be displayed, even when the tool is selected.
The Level control designates the transparency level of the pixels in the mask channel. When the value is 1.0, the effect mask is completely opaque (unless it has a soft edge). Lower values will cause the mask to be partially transparent. The result is identical to lowering the blend control of an effect.
Note
Lowering the level of a mask will lower the values of all pixels covered by the mask in the mask channel. For example, if a circle mask is placed over a rectangle mask, lowering the level of the circle mask will lower the values of all of the pixels in the mask channel, regardless of the fact that the rectangle mask beneath it is still opaque.
This control selects the filtering algorithm to be used when applying Soft Edge to the mask.
This is the fastest method, but at reduced quality. This is best suited for very small amounts of blur.
Otherwise known as a pyramid filter, Bartlett makes a good compromise between speed and quality.
When selecting this filter, the Num Passes slider appears, to let you control the quality. At 1 and 2 passes, results are identical to Box and Bartlett, respectively. At 4 and above, results are usually as good as Gaussian, in less time and with no edge 'ringing'.
The default filter, this uses a true Gaussian approximation and gives excellent results, but is a little slower than the other filters. In some cases it can produce extremely slight edge 'ringing' on floating point pixels.
Use the Soft Edge slider to blur (feather) the edges of the mask, using the selected Filter. Higher values will cause the edge to fade off well beyond the boundaries of the mask. A value of 0.0 will create a crisp, well-defined edge.
The Border Width control adjusts the thickness of the mask's edge. When the solid checkbox is toggled on, the border thickens or narrows the mask. When the mask is not solid, an outline of the mask shape is drawn and the thickness of the outline is handled with this control.
Paint Mode
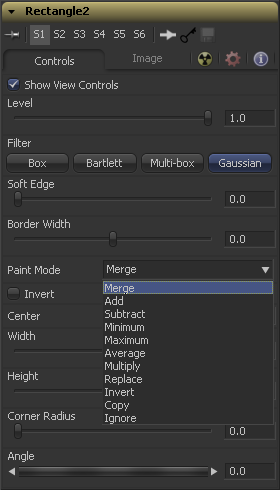
The different Paint Modes determine how the new mask is combined with other masks. This affects what happens to the intersecting area when one mask shape overlaps another.
This control only appears when another, input mask is connected to this mask's Effect Mask input. In other words, the control appears when masks are 'daisy-chained' together. The Paint Mode control will be hidden in the first mask tool in the chain, but will be visible in the other, connected masks.
Merge is the default for all masks. The new mask is merged together with the input mask.
The mask's values are added to the input mask's values.
In the intersecting areas, the new mask values are subtracted from the input mask's values.
The input mask's values are compared to the new mask, and the lowest (minimum) value is taken.
The input mask's values are compared to the new mask, and the highest (maximum) value is taken.
This calculates the average (half the sum) of the new mask and the input mask.
This multiplies the values of the input mask by the new mask's values.
The new mask completely replaces the input mask wherever they intersect. Areas that are zero (completely black) in the new mask do not affect the input mask.
Areas of the input mask that are covered by the new mask are inverted - white becomes black, and vice versa. Grey areas in the new mask are partially inverted.
This mode completely discards the input mask, and uses the new mask for all values.
This mode completely discards the new mask, and uses the input mask for all values.
Selecting this checkbox inverts the entire mask. This differs from the Invert Paint Mode in that it affects all pixels, regardless of whether they are covered by the new mask or not.
When the Solid checkbox is enabled, all areas completely enclosed by the mask will be filled solid white. Turning off the checkbox will treat the mask as an outline, with the width of the outline determined by the Border Width control. This checkbox is enabled by default.
All masks have a center, with the exception of the Paint and Triangle masks. The Center control allows the center coordinates for the effect mask to be entered manually by clicking in the value box and typing in a new position. The center position of a mask can also be manipulated using the crosshair control displayed in the views.
Image Tab
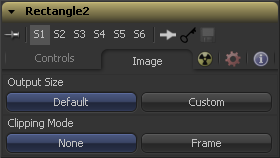
The Image tab is only visible if nothing is connected to the mask's Effect Mask input. When a tool is connected to this input, the entire Image tab is hidden, and the mask will always match its size to that of the upstream connected tool. Otherwise, the controls on the Image tab are used to determine the output size of the mask.
When the mask is connected to a tool's (blue-grey) Mask input, the mask is always automatically created at the same size of the tool it is connected to. The controls below are only relevant for masks that are connected to the Image input of ordinary tools, or that are unconnected and viewed on their own.
This control determines the dimensions of the resulting mask. For most masks, the initial setting is Default, which gives almost identical behaviour to earlier versions of Fusion. This setting will affect unconnected masks and masks being used for purposes other than masking.
Masks connectected to an image tool's Mask input may temporarily use this setting, until the masked image tool (the 'host' tool) first renders and the mask is able to determine the size it should be.
This is the default for most masks. The mask will look for the size of the tool it is masking and match that size. If it is not connected to an image tool's Mask input (or the image tool has not yet rendered), it will render at the dimensions currently specified in the comp's Frame Format preferences. If it is later forced to a different size (by being used to mask an image tool), it will then continue to render at the new size, even if disconnected.
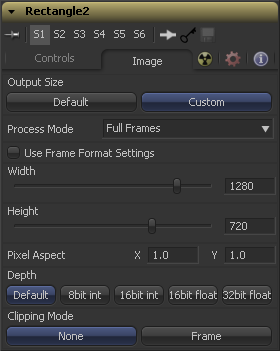
This setting causes additional controls to appear, and allows the size, aspect and depth of the mask to be specified precisely. These settings will be used for any masks not required for masking an image tool.
The Source option is only visible on some masks with an extra image input, such as Bitmap and Ranges. It is the default on those masks, and matches the size of the output mask to the size of the input image.
These radiobuttons define how the edges of image should be treated. This can also be called source image clipping.
They default to Frame, which will provide the same behaviour as previous versions of Fusion. Since this option will clip to the parts of the image visible within its visible dimensions, it will break any infinite-workspace behaviour. If the upstream DOD is smaller than the frame, the remaining area in the frame will be treated as black/transparent.
None does not perform any source image clipping at all. This means that any data that would normally be needed outside the upstream DOD will be treated as black/transparent. Be aware that this might create humongous images which can consume a huge amount of diskspace. So you should use this option only if really needed.
For more information about ROI, DOD and Infinite Workspace please see the dedicated chapter.
Note that masks that show the Source option will usually have a Fit Input control as well. If the output mask is forced to the size of an image tool (by connecting it to a Mask input), the source image may optionally be automatically rescaled to the new output size by means of the mask's Fit Input control.
The remaining controls listed below are only visible when Output Size is set to Custom. These are very similar to the Common controls found on Creator tools, such as Background and Fast Noise.
Use this menu control to select the fields processing mode used by Fusion to render changes to the mask. The default option is determined by the Has Fields checkbox control in the Frame Format Preferences. For more information on fields processing, consult the Frame Formats chapter.
When this checkbox is selected, the width, height and pixel aspect of the mask created will be locked to values defined in the composition's Frame Format preferences. If the Frame Format preferences change, the resolution of the mask produced will change to match. Disabling this option can be useful to build a composition at a different resolution than the eventual target resolution for the final render.
This pair of controls is used to set the Width and Height dimensions of the mask to be created.
This controls is used to specify the Pixel Aspect ratio of the created mask. An aspect ratio of 11 would generate a square pixel with the same dimensions on either side (like a computer display monitor) and an aspect of 0.91 would create a slightly rectangular pixel (like an NTSC monitor).
The Depth button array is used to set the pixel color depth of the image created by the mask. 32bit pixels require 4 times the memory of 8bit pixels, but have far greater accuracy. Float pixels allow high dynamic range values outside the normal 0..1 range, for representing colours that are brighter than white or darker than black. See the Frame Format chapter for more details.
Note
Right-click on the Width,Height or Pixel Aspect controls to display a menu listing the file formats defined in the preferences Frame Format tab. Selecting any of the listed options will set the width, height and pixel aspect to the values for that format.
Tips for Common Mask Controls (edit)
EyeonTips:Manual/Fusion 6/Common Mask Controls
| The contents of this page are copyright by eyeon Software. |


