Eyeon:Manual/Fusion 6/Glow
From VFXPedia
[ Main Manual Page ]
Contents |
Controls
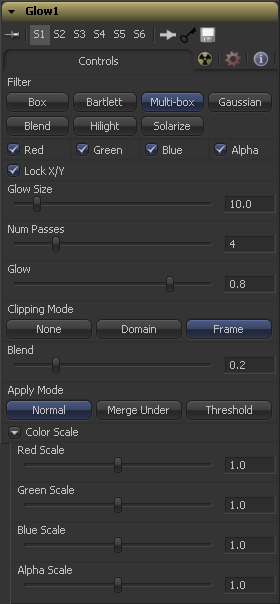
Use these buttons to select the method of Blur used in the filter. The selections are described below.
A simple but very fast Box filter.
Bartlett adds a softer, subtler glow with a smoother drop off, but may take longer to render than Box.
Multi-Box uses a box filter layered in multiple passes to approximate a Gaussian shape. With a moderate number of passes (e.g. 4), a high quality blur can be obtained, often faster than the Gaussian filter, and without any ringing.
Gaussian adds a soft glow, blurred by the gaussian algorithm. This is the default method.
Blend adds a non-linear glow that is evenly visible in the whites and blacks.
Hilight adds a glow without creating a halo in the surrounding pixels.
Solarize adds a glow and solarizes the image.
The filter defaults to operating on R, G, B and A channels. Selective channel filtering is possible by clicking the checkboxes beside each channel to make them active or inactive.
This is not the same as the RGBA checkboxes found under the common controls. The tool takes these controls into account before it processes. Deselecting a channel will cause the tool to skip that channel when processing, speeding up the rendering of the effect.
In contrast, the channel controls under the common controls tab are applied after the tool has processed.
When Lock X/Y is checked, both the horizontal and vertical glow amounts will be locked. Otherwise, separate amounts of blur may be applied to each axis.
Glow Size determines the size of the glow effect. Larger values expand the size of the glowing highlights of the image.
Only available in Multi Box mode. Larger values result in a smoother distribution of the effect but also increase render times. Good to find that thin line between desired quality and acceptable render times.
The Glow slider determines the intensity of the glow effect. Larger values tend to completely blow the image out to white.
This option sets the mode used to handle the edges of the image when performing domain of definition rendering. This is profoundly important for tools like Blur which may require samples from portions of the image outside the current domain.
The default option is Frame, which automatically sets the tools domain of definition to use the full frame of the image, effectively ignoring the current domain of definition. This is identical to the way Fusion worked in versions prior to 6.0.
If the upstream DOD is smaller than the frame, the remaining area in the frame will be treated as black/transparent.
Setting this option to Domain will respect the upstream domain of definition when applying the tools effect. This can have adverse clipping effects in situations where the tool employs a large filter.
Setting this option to None will not perform any source image clipping at all. This means that any data required to process the tools effect which would normally be outside the upstream DOD will be treated as black/transparent.
This is a cloned instance of the Blend slider in the common controls tab. Changes made to this control are simultaneously made to the one in the common controls.
The blend slider mixes the result of the tool with its input, blending back the effect at any value less than 1.0.
Three Apply Modes are available when it comes to applying the glow to the image.
Normal Default. This mode simply adds the glow directly over top of the original image.
Merge Under Merge Under places the glow beneath the image, based on the alpha channel. Threshold mode permits clipping of the threshold values.
Threshold This control clips the effect of the glow. A new range slider will appear. Pixels in the glowed areas with values below the low value will be pushed to black. Pixels with values greater than high will be pushed to white.
High-Low Range Control Only available in Threshold mode. Pixels in the glowed areas with values below the low value will be pushed to black. Pixels with values greater than high will be pushed to white.
These Scale sliders are normally a reveal control labelled Color Scale. They can be used to adjust the amount of glow applied to each color channel individually, thereby tinting the glow.
Glow Pre Mask
The glow tool supports premasking using the glow mask. A Glow Pre Mask filters the image before applying the glow. The glow is then merged back over the original image. This is different from a regular effect mask that clips the rendered result.
The glow mask allows the glow to extend beyond the borders of the mask, while restricting the source of the glow to only those pixels within the mask.
To apply a glow mask, select Glow Mask instead of Effect Mask from the context menu when a glow tool is active. Glow masks are identical to effects masks in every other respect.
Tips for Glow (edit)
EyeonTips:Manual/Fusion 6/Glow
| The contents of this page are copyright by eyeon Software. |

