Eyeon:Manual/Fusion 6/Hue Curves
From VFXPedia
[ Main Manual Page ]
Contents |
Controls
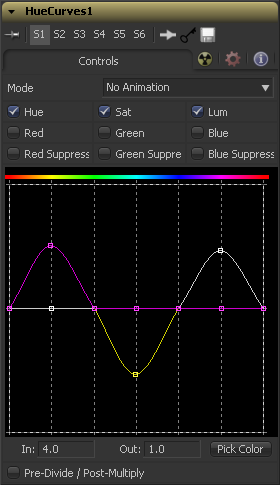
The Mode options changes between animated and dissolve modes. The default mode is static, where adjustments to the curves are applied consistently over time. Setting the Mode to Animate or Dissolve allows for the color curve to be animated over time.
Dissolve mode is essentially obsolete and is included for compatibility reasons only.
These checkboxes define which Splines are editable and are included in the Pick Color process. Any number of activated splines can be edited simultaneously, however in most cases it's more convenient to have only the currently modified spline active to avoid unwanted changes to other splines.
When using the Pick Color button a point will be created on all active splines, representing the selected color.
This Look Up Table (LUT) control is the main interface element of the Hue Curves tool which hosts the various splines. In appearance the tool is very similar to the Color Curves tool, but in this case the horizontal axis represents the images Hue, while the vertical axis represents the degree of adjustment.The Spline Window shows the curves for the individual channels. It is basically a miniature spline editor. In fact, the curves shown in this window can also be found and edited in the spline editor.
The spline curves for all components are initially flat, with key points placed horizontally at each of the primary colors. From left to right these are; Red, Yellow, Green, Cyan, Blue, and Magenta. Due to the cyclical nature of the Hue gradient, the leftmost key point in each curve is connected to the rightmost key point of the curve.
Right clicking in the LUT Control will display a context menu containing options for resetting the curves, importing external curves, adjusting the smoothness of the selected key points and more.
For detailed information of how a Spline Control works in general, please consult the Tool Controls chapter of the manual.
Use the In and Out controls to manipulate the precise values of a selected point. To change a value, select a point and enter the in/out values desired.
Left clicking and dragging from the Pick Color button will change the current mouse cursor to an eyedropper. While still holding down the left mouse button, drag the cursor to a display view to pick a pixel from a displayed image. This will cause key points which are locked on the horizontal axis to appear on the currently active curves. The key points will represent the position of the selected color on the curve. Use the context menu's 'Lock Selected Points' toggle to unlock points and restore the option of horizontal movement.
Points are only added to enabled splines. To add points only on a specific channel, disable the other channels before making the selection.
Selecting this checkbox will cause the image's pixel values to be divided by the alpha values prior to the color correction, and then re-multiplied by the alpha value after the correction. This helps to avoid the creation of illegally additive images, particularly around the edges of a blue/green key or when working with 3D rendered objects.
Tips for Hue Curves (edit)
Fusion ToolTorial - HUE Curves http://www.youtube.com/watch?v=om84-3ZkwsQ
| The contents of this page are copyright by eyeon Software. |

