Eyeon:Manual/Fusion 6/Network Rendering
From VFXPedia
NETWORK RENDERING
INTRODUCTION
Fusion is capable of distributing a variety of rendering tasks to other machines on a network, allowing multiple licensed computers to assist with creating network rendered previews, disk caches, clusters and final renders.
Fusion can submit compositions to be rendered by other copies of Fusion, as well as to the Fusion Render Node, which is a non-interactive license of Fusion available at a reduced cost from eyeon Software.
DFX+ cannot participate in a network render, although it can submit compositions to a render master for network distribution.
TCP/IP AND FUSION
Fusion relies on the presence of the TCP/IP network protocol to control network rendering across multiple machines. The TCP/IP protocol must be installed correctly and set up on all of the systems that will be a part of the rendering group. TCP/IP is a default part of the modern Windows networking setup.
Refer to the Windows reference documentation or the network administrator for help to install TCP/IP on the network.
ENSURING THAT THE NETWORK FUNCTIONS CORRECTLY
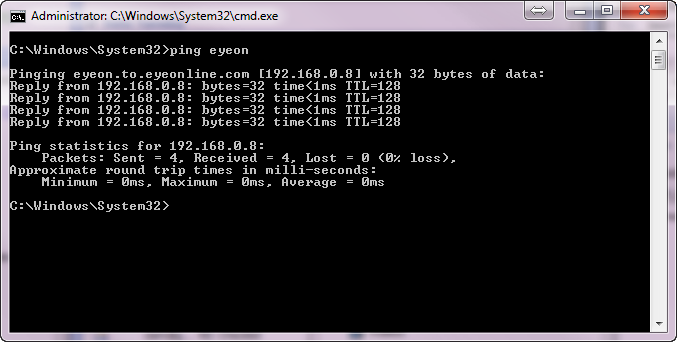
Launch a command prompt for the render Master station and use the ping command to test the connection to each Slave:
ping <slave IP address>
The response should look like this:
Pinging 192.168.0.10 with 32 bytes of data:
Reply from 192.168.0.10: bytes=32 time<10ms TTL=128
Reply from 192.168.0.10: bytes=32 time<10ms TTL=128
Reply from 192.168.0.10: bytes=32 time<10ms TTL=128
Reply from 192.168.0.10: bytes=32 time<10ms TTL=128
When there is a response from a Slave, the network link to that machine is functioning correctly and Fusion should be able to use it to network render.
USING A THIRD-PARTY RENDER MANAGER
Many studios make use of a Third-Party Render Manager to control render farms. This allows for efficient sharing of the farm’s resources between the many applications that make up a studio’s pipeline.
Examples of such managers are Smedge, Spider, Rush and Deadline. Several facilities also use render managers developed in-house. Generally, these render managers expect to find a command line renderer. eyeon provides a script called RenderTool.eyeonscript to integrate Fusion with third-party render managers.
Instructions for using the script in the Fusion>Scripts>Utility folder are found in a text file in the same folder. Alternately, the instructions are available by opening the script using a text editor and reading the comments at the top.
The script is required because the Fusion render slave is a GUI application. When launched from the command line, Fusion will detach from the command line session. This interferes with the method most managers use to monitor the progress of a render.
Keep in mind that using a third-party render manager will prevent the use of some of Fusion’s more interesting network rendering features, such as the ability to create net rendered flipbook previews, disk caches, and clustering.
SETTING UP NETWORK RENDERING
What Is The Render Master?
The Render Master manages the list of compositions to be rendered (the queue) and allocates frames to slaves for rendering. The render manager is also used to maintain the slave list and to push updates to the various slaves when needed. At least one computer in the render farm must be configured to act as the render master.
Any copy of Fusion or the Render Node can act as a render master. The rendermanager.exe program can also be used as a standalone render master. DFX+ cannot act as a render manager.
Run a standalone render manager to use a dedicated render manager without consuming a license of Fusion or the Render node.
Rendermanager
Acting as a render master has no significant impact on render performance. The system resources consumed are insignificant. Many smaller facilities use one of the render nodes as a render master. Freelancers with just one license often use their own interactive license of Fusion as a render master. The larger and more complex a render farm gets, the more likely it is that a standalone render master will be required.
The standalone render manager is available at www.eyeonline.com or in a folder on the original Fusion installation disk. To run the manager, simply copy rendermanager.exe and eyeonScript.dll into a directory and run rendermanager. It is usually a good idea to make the rendermanager a startup application for the chosen computer.
Setting Up The Render Master
Select the computer to be used as a render master and either install the rendermanager or a copy of Fusion or the Render Node.
For Fusion
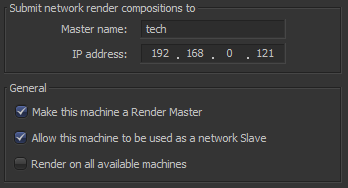
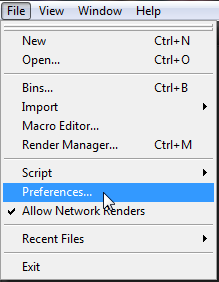
Select File>Preferences and open the Global Network Preferences window.
Locate and enable the checkbox marked Make This Machine A Render Master.
If this machine is to participate in rendering compositions, enable the Allow This Machine To Be Used As A Network Slave checkbox as well.
For Render Node And Rendermanager
Right-click on the Node icon in the system tray and select Preferences from the context menu. Open the Global Network preference dialog and enable the checkbox marked Make This Machine A Render Master. If this machine is to participate in rendering compositions, enable the Allow This Machine To Be Used As A Network Slave checkbox as well.
Once a computer to is enabled act as the master, add the slaves it will manage in the Render Manager dialog. The Render manager dialog is described in detail later in this chapter.
Preparing Render Slaves
It is important to ensure that the render slaves will accept instructions from the render master.
For Fusion
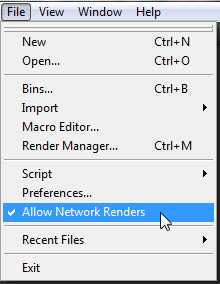
Select Allow Network Renders from the File menu, or enable the Allow This Machine To Be Used As A Network Slave in the Global Network Preferences.
For Render Node
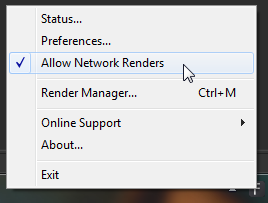
Right-click on the icon for the render node in the system tray and select Allow Network Renders from the context menu, or enable the Allow This Machine To Be Used As A Network Slave in the Global Network Preferences.
Choosing The Render Master Used By Slaves
To submit a composition to a render master from a workstation or node, tell Fusion which master will manage the render queue.
Open the global preferences page and locate the Network tab. Type the name of the render master in the Master Name field or enter the IP address of the master. Fusion will automatically try to fill in the alternate field by performing a lookup on the local network. Workstations that are not configured as slaves can only set the render master with this preference option.
THE RENDER MANAGER
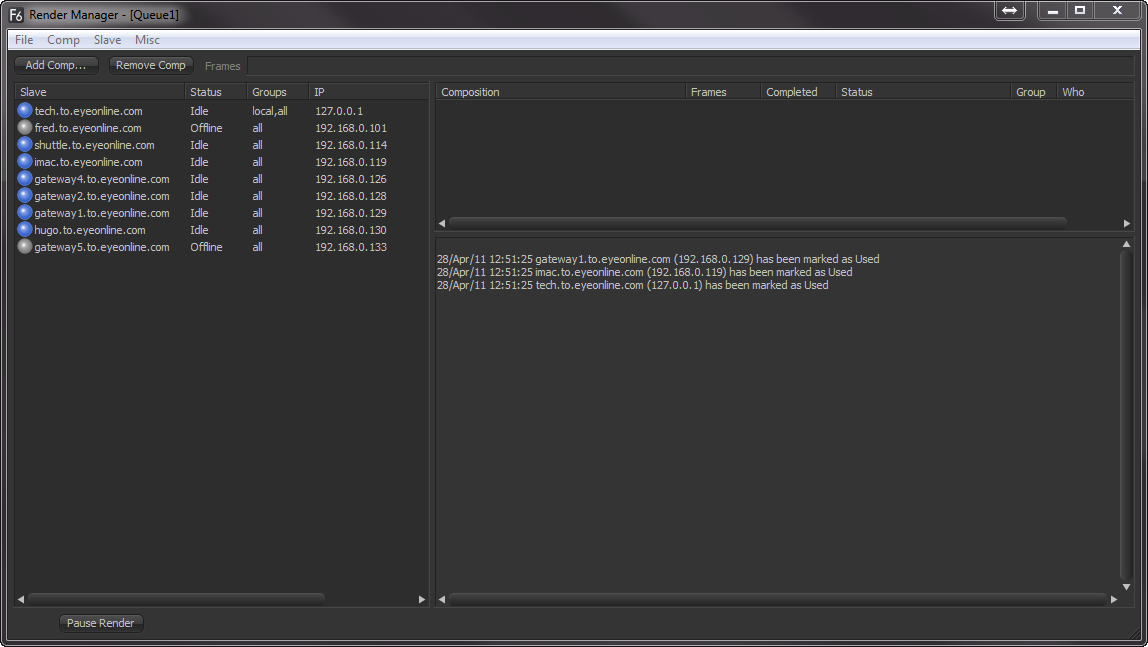
The Render Manager dialog is used to monitor the progress of rendering to re-order, add or remove compositions from a queue and to manage the list of slaves used for rendering.
Before a render master can be useful, add the slaves it will manage to the slave list, as described below.
Opening The Render Manager Dialog
For Fusion
Select Render Manager from the File menu or Ctrl-M to open the Render Manager Dialog.
For Render Node And Rendermanager
Right-click on the icon for the Render Node in the system tray and select Render Manager from the context menu.
Adding Computers To The Slave List
The render manager always starts with one slave in the Slave List, which is itself. This allows the render manager to render local queues without using the network. For the render master to control additional slaves, add them to the slave list.
Add slaves into the slave list by entering the slave’s name or IP manually, or scan for slaves on the local network.
Scanning For Slaves
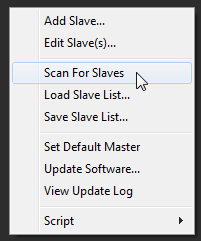
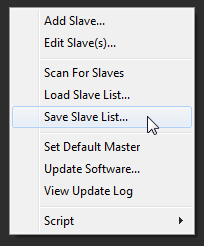
Select Scan For Slaves from the Slave menu at the top of the dialog. Alternately, right-click in the slave list and select this option from the context menu.
Scanning looks through all IP addresses in the subnet to determine if any other computers in the local network are actively responding on the port Fusion uses for network rendering. A copy of Fusion or the Fusion Render Node must be running on the remote machine in order for it to be detected by the scanning.
Manually Adding Slaves
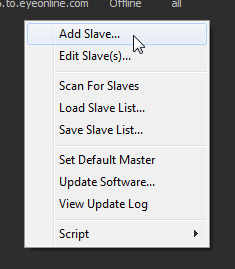
To manually add a slave to the slave list, select Add Slave from the Slave menu, or from the slave list context menu.
Enter the name or the IP address of the remote slave in the dialog box that appears. The manager will attempt to resolve names into IP addresses and IP addresses into names automatically. Use this method to add slaves to the list, slaves that are not currently running or available on the network.
Removing Computers From The Slave List
To remove a computer from the slave list, select the slave or slaves to be removed from the list and choose Remove Slave(s) from the Slave menu. Use Ctrl-Shift to select multiple slaves for deletion.
Loading And Saving Slave Lists
The list of slaves is automatically saved in the file Slaves.slv in the Fusion>Queue folder when the render manager is exited. In addition, save and load other, alternate slave lists by selecting Save Slave List and Load Slave List from the Slave menu at the top of the dialog.
THE RENDER QUEUE
The Render Queue is a list of compositions to be rendered, in the order in which they are to be rendered. The top entry in a queue list will be rendered first, followed by the next down, and so on. Multiple entries in a queue may render at the same time, depending on the slave group and priority of the composition.
Adding Compositions To The Queue
To add a composition to the queue, use one of the following methods:
From The Render Manager
To add a composition to the queue from within the Render Manager dialog, click on the Add Comp button near the top left of the dialog or right-click in the queue list and select Add Comp from the menu.
From The Composition
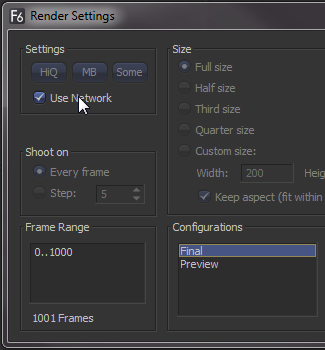
When starting a preview or final render, selecting the Use Network checkbox from the render settings dialog will add the composition to the end of the current queue in the render master’s queue manager.
The render master used is the one configured in the network preferences of the Fusion that is submitting the composition.
From The File Explorer
Add one or more compositions to the queue by drag-dropping the .comp file into the render manager’s queuelist from the File Explorer.
From The Command Line
Also add compositions to the queue using the Renderslave.exe utility, which can be found in Fusion>Utils. A sample Command Line might be FRender localhost c:\compname.comp queue. This would submit the composition compname.comp to the render manager on the local machine.
Removing Compositions From The Queue
To remove a composition from the queuelist, select the composition and press the Del key, or right-click on the entry in the Queuelist and select Remove Composition from the context menu. If the composition is currently rendering, the render will be automatically halted and the next composition in the list will immediately begin rendering.
Saving And Loading Queues
It may be useful to save a queuelist for later re-use. The current queuelist is normally saved as queue.slv in the Fusion>Queue directory. To save the current Queue with a new name, select Save Queue from the File menu. To load a queue from disk, select Load Queue from the File menu.
Re-Ordering The Queue
While building or rendering a queue, priorities for a composition may change. Shifting deadlines may require that a composition further down the queuelist be rendered sooner. Click-drag an entry to a new position in the list to re-arrange the order of the compositions within the queue.
If a composition that is already complete (status is done) is re-ordered so that it is below the currently rendering compositions, that composition will not re-render. Reset the status by right-clicking on the composition in the list and selecting Clear Completed Frames from the context menu.
GROUPS
Slaves can be configured into Groups, which are then used when submitting compositions. For example, imagine that there are five render slaves. All of the slaves are members of the group All, but two of them have more memory then the other slaves so these two slaves are added to a group called Hi-Mem as well. By default, new slaves and compositions in the queue are automatically assigned to All.
When a render is submitted to the network, choose to submit it to the All group, or the Hi-Mem group. When a render is submitted to the hi-mem group, only the two machines that are part of that group will be used to render the composition. If a composition is then submitted to the all group, the remaining three machines will start rendering the new composition. When the two slaves in the render master group stop rendering the first composition, they will then join the render in progress on the all group.
Groups are optional and don’t have to be used. Managing large render farms across an installation will become easier if they are used.
Assigning Slaves To Groups
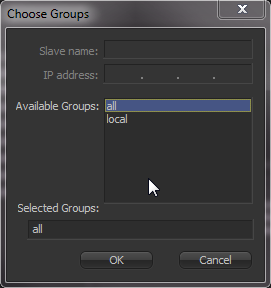
To Assign a Slave to a specific Group, right-click on the slave and select Assign Group from the context menu. Type the name of the group in the dialog that appears. If the slave is to be a part of multiple groups, separate the name of each group with a comma (i.e. all, local, hi-mem).
The order of the groups determines the priority. See Using Multiple Groups below for details.
Assigning Compositions To Groups
When a composition is added to the render queue, assign it to a group using one of the following methods:
From Render Settings Dialog
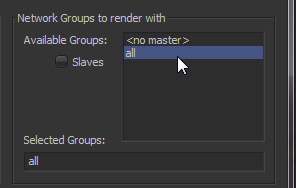
Select the Use Network checkbox in the render Settings Dialog and a section of the dialog will become available to select a group or groups from a list. The list is filled with whatever groups are currently configured for the render master. If the render master is not the local machine, the list will be filled by querying the remote machine. Use Ctrl-Shift to select multiple groups for the submitted composition.
Alternately, select individual slaves using the method of bypassing the group system entirely.
From The Render Manager
When a composition is added to the queue from the Render Manager, the composition is automatically submitted to the group All. To change the group assigned to the composition, right-click on the composition’s entry in the Queuelist and select Assign Group from the context menu.
Using Multiple Groups
A single slave can be a member of Multiple Groups. A single composition can also be submitted to multiple groups. Submitting a composition to multiple groups has a relatively straightforward effect. The composition will render on all slaves in the listed groups.
When a slave is a member of multiple groups, the ordering of the groups becomes important because the order defines the priority of the group for that slave.
For example, imagine that a slave is a member of two groups, All and Hi- Mem. If the groups are assigned to the slave as all, hi-mem renders submitted to the all group will take priority, overriding any renders in progress that were submitted to the hi-mem group.
If the order is changed to hi-mem and all, the priority reverses. The render slave will participate in rendering compositions submitted to the all group as long as no hi-mem renders are in the queue. When no hi-mem renders are waiting to be completed in the queue, that slave will render any composition submitted to the all group.
THE RENDER LOG
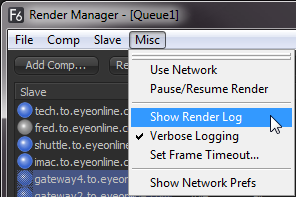
The Render Log is displayed beneath the queuelist in the render manager. The text shown in this window displays the render manager’s activities, including which frame is assigned to what slave, which slaves have loaded the compositions in the queue, together with statistics for each render after completion.
There are two modes for the render log, a Verbose mode and a Brief mode. Verbose logging logs all events from the render manager, while brief mode logs only which frames are assigned to each slave and when they are completed. Toggle between Verbose and Brief logging in the Misc menu of the render manager.
Verbose mode is on by default.
PREPARING A COMPOSITION FOR NETWORK RENDERING
Paths
The Paths that are used to load a composition and its footage, and to save the composition’s results, are critical to the operation of network rendering. Ensure that loaders use filenames for footage that will be valid for all slaves expected to render the composition. Savers should save to folders that all slaves can see and to which all slaves have write access. The composition should be saved in a folder accessible to all slaves and added to the queue list using a path visible to all slaves.
For example, imagine that the composition c:\compositions\nettest1.comp is loaded. Click on Network Render in the File menu to add the composition to the queue. The render manager detects the new entry in the queue and sends a message to each slave to load the composition and render it.
The problem in the above scenario is that each computer is likely to have its own C:\ drive already. It is extremely unlikely that the composition will be present on each node and, if by some strange chance it is, it is unlikely to be up to date. In most cases, the nodes will report that they are unable to load the composition and quickly fail to join the render.
This will also affect the slave’s ability to make use of any pre-rendered disk caches in the composition. If the path to the disk cache is not valid for the slave, the slave will not be able to load the cached frame and will be forced to re-render the cached tools.
The solution is to use UNC or mapped paths when loading and saving footage and compositions to disk. These two methods are described below.
Using UNC Names
\\file_server\shared_drive\Project6\clipC\ clipC_0001.tga
Use UNC (Universal Naming Convention) names when loading or saving compositions and when adding compositions to the render manager’s queue. UNC names always start with a double backslash (\\), rather than the usual drive letter (for example, c:\).
For more information, see UNC names in the Windows documentation.
Using Mapped Drives
Mapped Drives assign a shared network resource to a letter of the alphabet. For example, the file server’s drives could appear as the letter Z: on each of the slaves. This requires more setup effort but may allow flexibility when changing to which machine or shared directory the drive letters are mapped, without requiring the compositions themselves to be changed.
Fonts
All Fonts used by text tools in the composition must be available to all nodes participating in the render. The render will otherwise fail on the slaves that do not have the font installed.
Plugins
All third-party plugins and tools used by a composition must be installed in the plugins directory of the slaves. A slave that attempts to render a composition that contains a plugin it does not have installed will fail to render.
Beware of plugins that have a demo mode. For example, imagine a composition that uses a plugin but the nodes used as slaves in the render farm also require a license and do not have one. In certain cases, the comp will fail to load on those slaves. In certain cases, the plugins are installed in the slaves but not licensed, the comp will load without complaint and produce frames that contain a watermark.
SUBMITTING A COMPOSITION
Once the render master is set up and some machines have been added to the master’s slave list, start using the network to render compositions, previews and disk caches.
The start render dialog used for flipbook previews and final renders contains a Use Network checkbox. When this checkbox is enabled, the render task will be submitted to the render manager configured in Global>Network Preferences instead of rendered locally.
Select the Use Network checkbox to enable the controls for choosing what group will be used.
FLIPBOOK PREVIEWS
Fusion is able to use slaves to accelerate the production of Flipbook Previews, allowing for lightning fast previews. Frames for previews that are not network rendered are rendered directly into memory. Select the Use Network checkbox and the slaves will render the preview frames to the directory set in the Preferences Global>Path>Preview Renders.
This directory should be valid for all slaves that will participate in the network render. The default value is Temp:\, which is a virtual path pointing to the system’s default temp folder. This will need to be changed before network rendered previews can function.
Once the preview render is completed, the frames that are produced by each slave are spooled into memory on the local workstation. As each frame is copied into memory, it is deleted from disk.
DISK CACHE
The dialog used to create Disk Caches for a tool provides a use network checkbox. If this option is selected, click on the Pre-Render button to submit the disk cache to the network.
CLUSTERING
Clustering is a feature that allows the memory cache for a tool to be filled by remote workstations during an interactive session. When the cluster mode is enabled on a tool, Fusion will attempt to maintain a cache for the tool in memory, using remote slaves on the network to assist with filling the cache.
By default, the clustering slaves will attempt to fill the cache by rendering the frames to either side of the current time. For example, if the current frame is 20, the slaves will fill the RAM cache for that tool between frames 10 and 30 in the background.
If a value for one of the controls on the clustered tool or one of its sources is changed, the cache will invalidate and the slaves will re-fill the cache.
Configuring Slaves For Clustering
Select the slaves to be used for clustering in the render master’s slave list and add them to a new group. Generally, the clustering group is called cluster for clarity, although any group can be used for clustering.
Once the group is created and slaves are assigned to that group, close the Render Manager on the master and open Preferences on the workstation from which the compositions will be clustered. Locate the Cluster panel in the Global preferences. Select the Slave group or groups to be used to render cluster jobs.
Select from the other options in this dialog to choose whether clustering will fill the cache for side frames around the current time or whether it will render the entire render range.
Enabling Clustering On A Tool
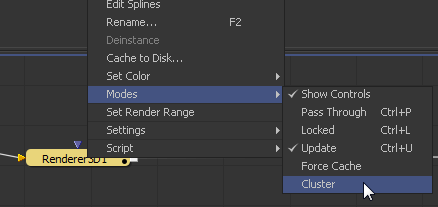
To enable clustering for a tool, right-click on the tool and select Modes>Cluster from the context menu that appears.
If the cluster does not start working immediately, change the current frame or modify a setting on the tool, or one of its source tools, to trigger the cluster for the first time. Once the cluster has been triggered, it will always work to keep the cache filled. The cluster will detect changes that affect the cache of the clustered tool and fill the cache automatically, whether or not that tool is currently selected or viewed.
Removing Clustering From A Tool
To stop clustering for a tool, right-click on the tool and select Modes>Cluster again from the context menu.
REMOTE ADMINISTRATION
Managing a large farm of render slaves can become a time-consuming task. Several capabilities are available from the render master to assist with Remote Administration of render slaves.
Installing Updates Remotely
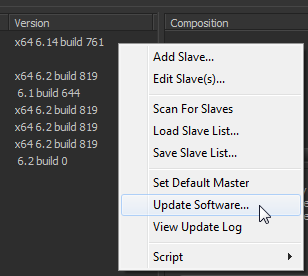
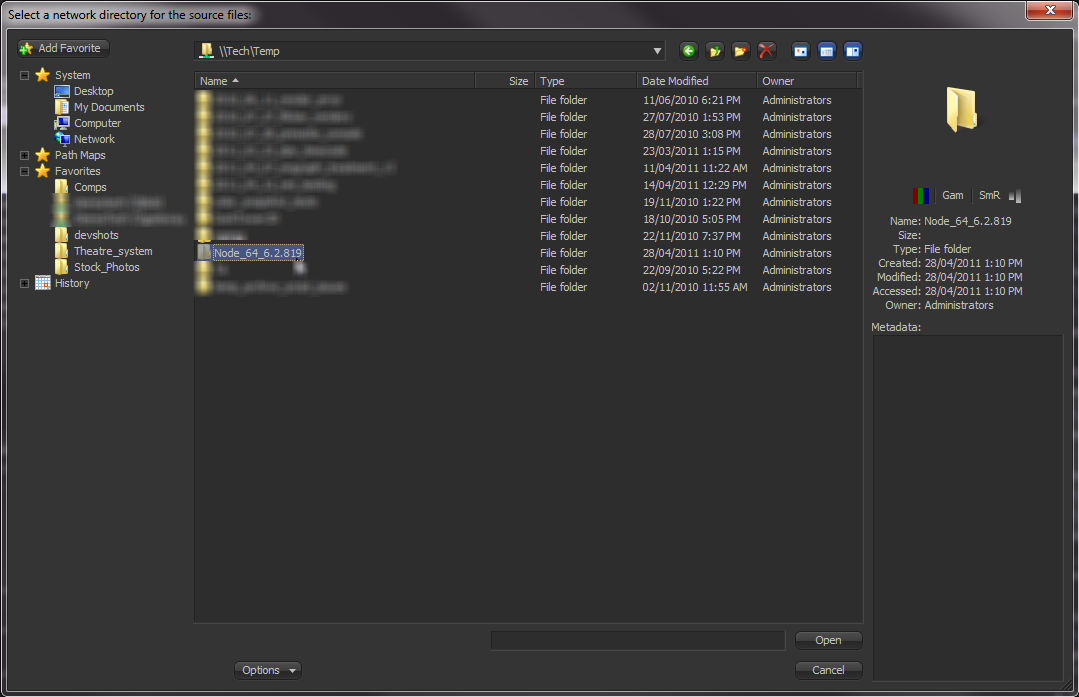
It is possible to update one or more slaves from the render manager. To update remote slaves with a new version of Fusion, select the slaves to be updated and display the slave’s context menu. Choose Update Software from the menu that appears and select the network directory that contains the files required for the update.
Before an update is applied remotely, create a directory with the update files. The update directory should be an uncompressed copy of a standard installation for either Fusion or the Render Node. Often, the easiest way to accomplish this is to download the archive version of the update and extract it into an empty directory.
The update directory should be created in a directory accessible to all slaves via UNC or mapped drives paths, or the update will fail.
The master will instruct the remote slave to run Overseer.exe, which must be installed in the Fusion directory of the remote machine. Overseer will shutdown the slave to prevent any errors with files in use. Once the slave has shutdown, the overseer will copy the files from the update directory. The directory structure of the update directory will be duplicated on the slave. New files will be copied over and existing files will be overwritten.
When the copy is complete, the overseer will restart the slave. This will allow the slave to participate in network renders once more, completing the update.
If the update fails for any of the slaves, view an update log by right-clicking on the Slave and selecting View Update Log from the context menu. The update log describes the history of updates for that node, with the most recent update appended to the end of the log file. Any errors that may have occurred will be detailed in the log.
Updates do not have to be complete updates. Use an update directory to copy new plugins, scripts and macros to other systems on the network.
Notes
- Fusion will not allow itself to be updated by update directories containing renderslave.exe. Nodes will not allow themselves to be updated with Fusion.exe.
- Read only files in the update directory may not allow themselves to be copied over the network using this technique. Ensure that all files in the update directory are set with the read only flag disabled.
- The user who is logged into the render master workstation must have permission to write to each of the updated directories.
Setting The Render Master Remotely
Set the render master used by one or more slaves remotely, which can assist with remote administration. Open the Render Manager on the Master and select the slave(s) to be configured in the slave list. Right-click and select Set Render Master from the context menu. Each selected slave will be set to use the current machine as their render master.
WHEN RENDERS FAIL
It is a fact of life that render queues occasionally fail. Software crashes, the power goes out or a computer is accidentally disconnected from the network. These are only a few of the things that can happen in a network. The more complex the topology of the network and the larger the compositions, the more likely some failure or another will interrupt the render in progress.
If someone is monitoring the render as it progresses, this may not be too catastrophic. If no one is available to monitor the render, the risk that an entire queue may sit inactive for several hours may become a serious problem.
Fusion employs a variety of measures to protect the queue and ensure that the render continues even under some of the worst conditions.
Automatic Rejoining Of The Queue
A slave can become unavailable to the render master for several reasons. The computer on which the slave operates may lose power or become disconnected from the network. Perhaps the Allow Network Rendering option is disabled. If something like this occurs, the slave will no longer respond to the regular queries sent by the master. Frames assigned to that slave will be reassigned among the remaining slaves in the list.
When the slave is restarted, reconnected to the network or becomes available for rendering again, it will signal the render master that it is ready to render again and new frames will be assigned to that slave.
This is why it is important to set the render master in the network preferences of the slave. If the master is not set, the slave will not know what master to contact when it becomes available.
Select Last Slave Restart Timeout in the Network Preferences to set how long Fusion will wait after the last slave goes offline before aborting that queue and waiting for direct intervention.
eyeonServer
eyeonServer.exe is a small utility installed with Fusion and the Render Node. The application is silently launched by each Fusion/slave when started.
eyeonServer monitors the slave to ensure that the slave is still running during a render. It consumes almost no CPU cycles and very little RAM. If the monitored executable disappears from the system’s process list without issuing a proper shutdown signal, as can happen after a crash, the eyeonServer will relaunch the slave after a short delay, allowing the slave to rejoin the render.
eyeonServer will only detect situations where the slave has exited abnormally. If the slave is still in the process list but has become unresponsive for some reason, the eyeonServer can not detect the problem. Hung processes like this are detected and handled by frame timeouts, as described below.
Frame Timeout
Frame timeouts are a failsafe method of canceling a slave’s render if a frame takes longer than the specified time (default 60 minutes or one hour). The Frame Timeout ensures that an overnight render will continue if a composition hangs or begins swapping excessively and fails to complete its assigned frame.
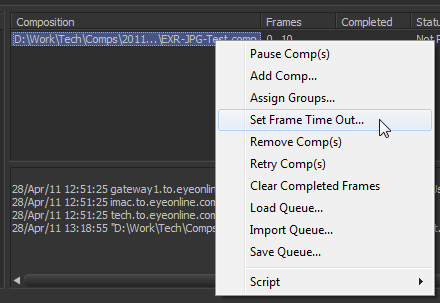
The timeout is set per composition in the queue. To change the timeout value for a composition from the default of 60 minutes, right-click on the composition in the Render Manager’s Queue list and select Set Frame Timeout from the context menu.
If it is expected to never have a single frame take longer than 10 minutes (for example, film or HD-sized footage is never rendered), reduce the timeout to 10 minutes instead. To change the frame timeout value, select Set Frame Timeout from the Render Manager’s Misc menu.
Heartbeats
The render master regularly sends out Heartbeat signals to each node, awaiting the node’s reply. A heartbeat is basically a message from the manager to the node asking if the node is still responsive and healthy. If the slave fails to respond to several consecutive heartbeats, Fusion will assume the slave is no longer available. The frames assigned to that slave will be reassigned to other slaves in the list.
The number of heartbeats in a row that must be missed before a slave is removed from the list by the manager, as well as the interval of time between heartbeats, can be configured in the network preferences panel of the master. The default settings for these options is fine for 90% of cases.
If the compositions that are rendered tend to use more memory than is physically installed, this will cause swapping of memory to disk. It may be preferred to increase these two settings somewhat to compensate for the sluggish response time until more RAM can be added to the slave.
MANAGING MEMORY USE
Often, the network environment is made up of computers with a variety of CPU and memory configurations. The memory settings used on the workstation that created a composition may not be appropriate for all of the render slaves in the network.
Fusion Render Node offers the ability to override the memory settings stored in the composition and use custom settings more suited to the system configuration of a specific slave.
To access preferences for a node, right-click on the icon in the taskbar and select Show Network and Memory Preferences.
Override Composition Settings
Enable this option to use the slave’s local settings to render any incoming compositions. Disable it to use the default settings that are saved into the composition.
Render Several Frames At Once
Fusion has the ability to render multiple frames at once for increased render throughput. This slider controls how many frames are rendered simultaneously. The value displayed multiplies the memory usage (a setting of 3 requires three times as much memory as a setting of 1). Normal values are 2 or 3, although machines with a lot of memory may benefit from higher values, whereas machines with less memory may require the value to be 1.
Simultaneous Branching
Enable this option to render every layer in parallel. This can offer substantial gains in throughput but may also use considerably more memory, especially if many layers are used in the composition. Machines with limited memory may need to have Simultaneous Branching disabled when rendering compositions with many layers.
THINGS YOU NEED TO KNOW
There are a few important issues to remember while setting up compositions and rendering over a network.
Time Stretching
Compositions using the Time Stretcher and Time Speed tools may encounter difficulties when rendered over the network. Speeding up or slowing down compositions and clips requires fetching multiple frames before and after the current frame that is being rendered, resulting in increased I/O to the file server. This may worsen bottlenecks over the network and lead to inefficient rendering. If the composition uses the time stretcher or time speed tools, make certain that the network is up to the load or pre-render that part of the composition before network rendering.
Linear Tools
Certain tools cannot be network rendered properly. Particle systems from third-party vendors, such as Speedsix’s Smoke and Rain, and eyeon’s own Trails tool are the only ones that cannot render properly over the network, although there may also be AE Plugin adapter tools with this limitation.
These tools generally store the previously rendered result and use it as part of the next frame’s render; every frame is dependent on the one rendered before it. This data is local to the tool so these tools do not render correctly over a network.
Saving To Multiframe Formats
Multiple machines cannot render a single AVI or QuickTime file due to the limitations of the file format itself. AVI and QuickTime movies are formats that are a single stream containing multiple frames. These frames must be written one after the other and not in the out-of-order sequence typically produced by network rendering.
Always render to separate sequential file formats like Targa, Cineon, JPEG and so on. Once the render is complete, a single workstation can load the image sequence in order and save to the desired compiled format.
Note
The above does not apply to network rendered previews, which are previews created over the network that employ spooling to allow multiframe formats to render successfully. Only final renders are affected by this limitation.
Video Hardware
Like AVI and QuickTime video, hardware boards, such as the Leitch Altitude, Matrox DigiSuite and NewTek Video Toaster, do not normally have the ability to directly accept rendered frames from a rendering network. As with AVI and QuickTime movies, these boards usually require frames to arrive in order.
Always render to separate sequential file formats like Targa, Cineon, JPEG, and so on, and spool the images to the desired hardware format afterwards.
Currently, the only widely used DDR’s that can be used as a destination for network rendering is Leitch’s line of products. Specifically, the dpsReality, Quattrus and Altitude boards can all accept network rendered files using the Virtual Tape File System. Consult the board’s documentation for details on how this is done.
TROUBLESHOOTING
There are some common pitfalls when rendering across a network. If some difficulties are encountered, try these steps. If the problem is still not resolved, contact eyeon Software’s technical support. Ideally, email a copy of the render.log file to tech@eyeonline.com to help resolve the problem.
Virtually all problems with network rendering have to do with path names or plug-ins. Verify that all slaves can load the compositions and the footage, and that all slaves have the plug-ins used in the composition installed.
Check The Render Log
The log file shown in the render manager dialog displays messages that can assist with diagnosing why a render or slave has failed. The Render Log shows a step-by-step account of what happened (or didn't happen) during a render. If a slave cannot be found, fails to load a composition or render a frame or simply stops responding, it will be recorded here.
Check The Composition
The Render Manager’s Status field in the Render Log indicates if a composition fails to render. Some possible causes of this are as follows:
No Slaves Could Be Found
On the Preferences Network tab, make sure that there is at least one slave available, running and enabled. If all slaves are listed as Offline when they are not, check the network.
The Composition Could Not Be Loaded
Some slaves may not be able to load a composition while others can. This could be because the slave could not find the composition (check that the path name of the composition is valid for that slave) or because the composition uses plug-ins that the slave does not recognize.
The Slave(s) Stop Responding
If a network link fails, or a slave goes down for some reason, the slave will be removed from the active list and its frames will be reassigned. If no more slaves are available, the composition will fail after a short delay (configurable in network preferences). If this happens, check the Render Log for clues as to which slaves failed and why.
The Slave(s) Failed To Render A Frame
Sometimes a slave simply cannot render a particular frame. This could be because the slave could not find all of the source frames it needed, or the disk it was saving to became full or because of any other reason that Fusion might normally be unable to render a frame. In this case, the render manager will attempt to reassign that failed frame to a different slave. If no slave can render the frame, the render will fail. Try manually rendering that frame on a single machine and observe what happens.
Check The Slaves
Fusion’s render manager incorporates a number of methods to ensure the reliability of network renders. Heartbeats are used to detect network or machine failures. In this event, failed slave’s outstanding frames are reassigned to other slaves where possible. In rare cases, a slave may fail in a way that the heartbeat continues even though the slave is no longer processing.
If a slave may have failed (although the render master may not have detected it) and you do not want to wait for the Frame Timeout, simply restart the Fusion workstation or Fusion Render Node that has hung. This triggers the heartbeat check, reassigns the frames on which that slave was working, and the render should continue.
Heartbeats may fail if the system that is performing the render is making extremely heavy use of the swap file or is spending an extraordinary amount of time waiting for images to become available over a badly lagged network. The solution is to provide the node with more RAM, adjust memory settings for that node or upgrade the network bandwidth.
Check The Network
At the Render Master, bring up the Network tab of the Preferences dialog box and click Scan. If a slave is not listed as running, the render master will not be able to contact it for network rendering. Alternatively, bring up a command prompt and ping the slaves manually. If the remote systems do not respond when they are up and running, the network is not functioning and should be examined further.
