Eyeon:Manual/Tool Reference/Modifiers/Perturb
From VFXPedia
[ Main Manual Page ]
- [B-Spline]
- [BezierSpline]
- [Calculation]
- [Character Level Styling]
- [Circle]
- [CloneMultistroke]
- [CompName]
- [Coordinate Transform 3D]
- [CopyEllipse]
- [CopyPolyLine]
- [CopyRectangle]
- [Cubic Spline]
- [Expression]
- [Fill]
- [Follower]
- [From Image]
- [GradientColorModifier]
- [MIDI Extractor]
- [Multistroke]
- [Natural Cubic Spline]
- [Offset]
- [PaintGroup]
- [Path]
- [Perturb]
- [PolylineStroke]
- [Probe]
- [Publish]
- [Rectangle]
- [Shake]
- [Stroke]
- [TextScramble]
- [TextTimer]
- [TimeCode]
- [Track]
- [Vector]
- [XY Path]
Perturb [-/-] | |
|
The Perturb modifier generates smoothly varying random values for several input types, based on Perlin noise. It can be used to add jitter, shake or wobble to any animatable control, even if the control is already animated. Its results are similar to those of the Shake modifier, though it uses a different set of controls that may be more suitable to the artists needs. Unlike other random modifiers the Perturb modifier can also be applied to polylines, shapes, grid meshes and even color gradients. For example, to add camera shake to an existing path, right-click on the crosshair and choose Insert -> Perturb, then adjust the Strength down to suit. Alternatively, right-click on the path's Shape Animation control, and apply the wobble to the path's polyline itself (this works best if the polyline has many points, e.g. if it has been tracked, or hand-drawn with the Draw Append pencil tool). A third option is to insert the modifier onto the Displacement control, which will cause the motion along the path to jitter back and forth without actually leaving the line of the path. Note that Perturb can only add jitter; it cannot smooth out existing animation curves. | |
Contents |
Controls Tab
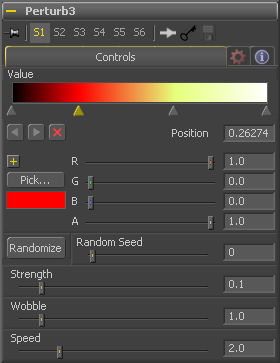
The actual contents of this control will depend on what type of control the modifier was applied to. If the Perturb modifier was added to a basic slider control, the Value will be a slider. If it was added to a gradient control, then a gradient control will be displayed here. Use the control to set the default, or center value for the Perturb modifier to work on.
(Polylines, Meshes only) This allows you to increase the amount of variation along the length of the polyline or mesh, rather than over time. Increasing this will give a "squigglier" polyline or more tangled mesh, independently of its movement.
(Polylines, Meshes only) Animating this can be used to move the ripple of a polyline or mesh along itself, from end to end. The effect can be most clearly seen when Speed is set to 0.0.
The Random Seed is used to 'seed' the amount of jitter applied by the modifier. Two Perturb modifiers with identical settings but different random seeds will produce two completely different results. Click on the Randomize button to assign a random seed value.
Use this control to adjust the strength of the Perturb modifier's output, or its maximum variation from the primary value specified above.
Use the Wobble control to determine how smooth the resulting values are. Less wobble implies a smoother transition between values, while more wobble produces less predictable results.
Increasing the Speed slider value will speed up the rate at which the value changes. This can increase the apparent "wobbliness" in a more predictable fashion than the Wobble control, and make the jitter more frantic or languorous in nature.
Tips for Perturb (edit)
EyeonTips:Manual/Tool Reference/Modifiers/Perturb
| The contents of this page are copyright by eyeon Software. |

