Eyeon:Manual/Fusion 6/Matte Control
From VFXPedia
[ Main Manual Page ]
- Alpha Divide
- Alpha Multiply
- Chroma Keyer
- Difference Keyer
- Luma Keyer
- Matte Control
- Ultra Keyer
Contents |
Controls Tab
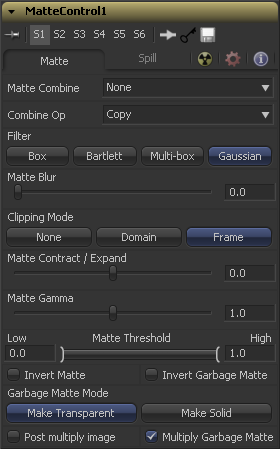
The matte control tool can combine alpha or color channels from an image in the foreground input with the background image. Use this menu to select which operation is applied. The default is set to None for no operation.
This causes the foreground image to be ignored.
This combines the FG red channel to the BG alpha channel.
This combines the FG green channel to the BG alpha channel.
This combines the FG blue channel with the BG alpha channel.
This combines the FG alpha channel with the BG alpha channel.
This causes the BG alpha channel to become completely opaque.
This causes the BG alpha channel to become completely transparent.
Use this menu to select the method used to combine the foreground channel with the background.
This copies the foreground source over the background alpha, overwriting any existing alpha in the background.
This adds the foreground source to the background alpha.
This subtracts foreground source from the background alpha.
This subtracts the background alpha from the foreground source.
This compares the foreground source and the background alpha and takes the value from the pixel with the highest value.
This compares the foreground source and the background alpha and takes the value from the pixel with the lowest value.
This performs a logical AND on the two values.
This performs a logical OR on the values.
This merges the foreground source channel over the background alpha channel.
This merges the foreground source channel under the background alpha channel.
Selection of the Filter that is used when blurring the matte.
This option applies a Box Blur effect to the whole image. This method is faster than the Gaussian blur but produces a lower quality result.
Bartlett applies a more subtle, anti-aliased blur filter.
Multi-Box uses a box filter layered in multiple passes to approximate a Gaussian shape. With a moderate number of passes (e.g. 4), a high quality blur can be obtained, often faster than the Gaussian filter, and without any ringing.
Gaussian applies a smooth, symmetrical blur filter, using a sophisticated constant-time Gaussian approximation algorithm. In extreme cases, this algorithm may exhibit ringing; see below for a discussion of this. This mode is the default filter method.
This blurs the edge of the matte using a standard constant speed gaussian blur. A value of zero results in a sharp, cutout-like hard edge. The higher the value, the more blur applied to the matte.
This shrinks or grows the matte to exclude some of the keyed image or include some of its surrounding area. Values above 0.0 expand the matte and values below 0.0 contract it.
This raises or lowers the values of the matte in the semi-transparent areas. Higher values cause the gray areas to become more opaque and lower values cause the gray areas to become more transparent. Completely black or white regions of the matte remain unaffected.
Any value below the lower threshold becomes black or transparent in the matte. Any value above the upper threshold becomes white or opaque in the matte. All values within the range maintain their relative transparency values.
When this checkbox is selected, the alpha channel of the image is inverted, causing all transparent areas to be opaque and all opaque areas to be transparent.
Garbage mattes are mask tools or images connected to the Garbage Matte input on the tools tile. The garbage matte is applied directly to the alpha channel of the image. Generally, garbage mattes are used to remove unwanted elements that cannot be keyed, such as microphones and booms. They are also used to fill in areas that contain the color being keyed, but that the artist wishes to maintain.
Garbage mattes of different modes cannot be mixed within a single tool. A Matte Control tool is often used after a keyer tool to add a garbage matte with the opposite effect of the matte applied to the keyer.
Select this button to make the Garbage Matte transparent.
Select this button to make the Garbage Matte solid.
Select this option to cause the keyer to multiply the color channels of the image against the alpha channel it creates for the image. This option is usually enabled, and is on by default.
Deselect this checkbox and the image can no longer be considered pre-multiplied for purposes of merging it with other images. Use the Subtractive option of the Merge tool instead of the Additive option.
For more information, see the Merge tools documentation.
When selected, the values of the image's red, green and blue channels will be multiplied against the garbage matte input.
Spill Tab
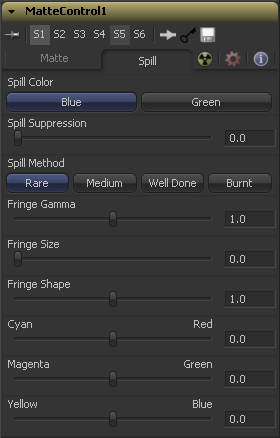
Use these buttons to select the color used as the base for all spill suppression techniques.
Spill is generally caused by the transmission of the color of the background through the semitransparent areas of the alpha channel. In the case of blue or green screen keying, this usually causes the color of the background to become apparent in the fringe of the foreground element.
Spill suppression attempts to remove color from the fringe. The process used is optimized for either Blue or Green screens, and you select which color is used as the base from the control above.
When this slider is set to 0, no spill suppression is applied to the image.
This selects the strength of the algorithm used to apply spill suppression to the image.
None is selected when no spill suppression is required.
This removes very little of the spill color, the lightest of all methods.
This works best for green screens.
This medium works best for blue screens
This works best for blue. Use this mode only for very troublesome shots.
This control can be used to adjust the brightness of the fringe or halo that surrounds the keyed image.
Use these three controls to color correct the fringe of the image. This is useful for correcting semi-transparent pixels that still contain color from the original background to match the new background.
This expands and contracts the size of the fringe or halo surrounding the keyed image.
Fringe Shape forces the fringe to be pressed toward the external edge of the image or pulled toward the inner edge of the fringe. Its effect is most noticeable while the Fringe Size sliders value is large.
Tips for Matte Control (edit)
Despill Math
In literature and tutorials you will encounter formulas to despill blue and green screens that can be implemented using a custom tool or channel booleans. The most common formulas, however, are already implemented in Fusion's matte tools:
- Rare: limits green or blue to the maximum of the other two channels: g = min(g , max(r, b))
- Medium: the exact formula is unknown but it seems like it limits a channel to the average of the other two only if it is larger than the maximum of the other two. This often creates a visible fringe in the middle of the despilled area.
- Well-Done: limits green or blue to the average of the other two channels: g = min(g, (r + b) / 2)
- Burnt: limits green or blue to the smaller one of the other two channels: g = min(g, min(r, b))
| The contents of this page are copyright by eyeon Software. |


