Eyeon:Manual/Tool Reference/3D/Renderer 3D
From VFXPedia
Contents |
Renderer 3D Controls Tab
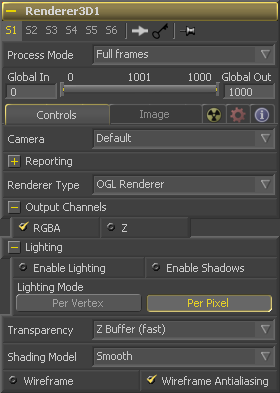
The Camera drop-down list is used to select which camera from the scene is used when rendering. The default option is Default, which will use the first camera found in the scene, or a default perspective view.
The Renderer 3D tool supports two native Renderer Types, although others may be added as plugins.
- Software Renderer
- The Software Renderer produces consistent results on all machines, regardless of hardware configuration. It is generally more suitable for final renders. Use the software renderer for proper lighting or soft shadows. Generally, the software renderer produces higher quality images but takes longer and consumes more memory.
- OGL Renderer
- The OpenGL Renderer uses the hardware on the graphics card to produce the final rendered result. The output may vary slightly from system to system, depending on the capabilities of the graphics hardware installed. Generally, OpenGL is used only for previews and interactive performance. The OpenGL renderer in Fusion 5.0 uses vertex lighting and does not support soft shadows. As of 5.1, the OpenGL renderer supports per pixel lighting.
The OpenGL renderer reveals this control for selecting which ordering method to use when calculating transparency. Z Buffer mode is fast, and is adequate for opaque objects, but semitransparent objects may not be shown correctly, depending on their ordering within the scene.
Sorted mode will sort all objects in the scene (at the expense of speed) before rendering, giving correct transparency.
These controls are used to determine which image channels are rendered into the image. The Z channel is useful for the Deep Pixel tools such as Depth Blur, Fog, and depth merging using the Merge tool. The software renderer can also produce Coverage and BgColor channels, which can be used by some depth tools to significantly improve edge anti-aliasing.
When the Enable Lighting checkbox is selected, objects will be lit by any lights in the scene. If no lights are present, all objects will be black.
When the Enable Shadows checkbox is selected, the renderer will produce shadows, at the cost of some speed.
(OpenGL renderer only) The OpenGL renderer in Fusion 5.1 provides the artist with a choice of two different lighting models. The per-vertex lighting model calculates lighting at each vertex of the scenes geometry. This produces a fast approximation of the scene's lighting, but tends to produce blocky lighting on poorly tesselated objects. The per-pixel method uses a different method that does not rely on the amount of detail in the scenes geometry for lighting, so generally produces superior results.
While using per-pixel lighting in the OpenGL renderer produces results closer to that produced by the more accurate software renderer, it still has some disadvantages. Even with per-pixel lighting, the OpenGL renderer is less capable of dealing correctly with semi transparency, soft shadows and colored shadows. There is also little to no antialiasing, and the color depth of the rendering will be limited by the capabilities of the graphics card in the system.
As a result of these differences the OpenGL renderer should generally be used for previews and previsualization, and the software renderer should be used for producing final results.
Use this menu to select a Shading Model to use for materials in the scene. Smooth is the shading model employed in the views and Flat produces a simpler and faster shading model.
The checkboxes under Reporting reveal the amount of information the renderer reports via the console.
Image Tab
The Image Tab controls are used to set the resolution of the image produced by the Renderer 3D tool. See Common Creator Controls for details.
Motion Blur and Depth of Field
As with 2D tools in Fusion, motion blur is enabled from within the Fusion tab. You may set Quality, Shutter Angle, Sample Centre and Bias, and blur will be applied to all moving 3D objects in the scene, in both the Software and OpenGL renderers. Note: motion blur on 3D particles also requires that identical motion blur settings are applied to the particle system's pRender tool.
Depth of field is not yet supported by Fusion's 3D system. However, you can achieve similar results by applying the Spinning Camera trick. This works best if your camera is not otherwise moving. Alternatively, you can enable Z channel output in the renderer, and use the Depth Blur tool to simulate depth of field.
| The contents of this page are copyright by eyeon Software. |
Tips for Renderer 3D (edit)
In certain situations the 3d render will produce strange aliasing or "jaggies" to prevent this effect set the 3drender nodes image size to at least double your needed resolution then directly after the render node pipe in a ResizeResize tool and scale down to your need size.
For example if your resulting comp is 720 by 486 you would set the render node image size to at least 1440 by 972.
Limitations
Currently the Renderer can not render particles using the Line style in software mode. They do render using OpenGL.

