Eyeon:Manual/Fusion 6/Display Views/Panning and Scaling the Image
From VFXPedia
[ Main Manual Page ]
- Introduction
- Types of Display Views
- Context Menu
- Displaying an Image
- Position and Layout
- Panning and Scaling the Image
- Previews
- Onscreen Controls
- Toolbars
- A and B Buffers
- Subviews
- View Types
- Choosing Color Channels
- The 3D View
- Quad Display Mode
- Effects Masks
- Guides
- Look Up Tables (LUTS)
- View Options and Preferences
- Status Bar Information
- General Display Options
- Display View Label
Contents |
Panning and Scaling the Image
Both Panning and Scaling work the same way as in all other parts of Fusion. Also see the Scaling the Flow chapter in this manual.
Panning
To pan in any display view, place the mouse pointer in the view and hold the middle mouse button down. Drag the mouse in the desired direction. If the mouse does not possess a middle mouse button, hold Ctrl+Shift and click-drag the view (with the left mouse button) for the same effect.
When viewing a 3D scene, panning will change the point of view (and thus the center point for scaling and rotation too). A combination of panning and rotation will allow you to move the point of view anywhere in the scene.
Note that zooming in will decrease the sensitivity of panning, to allow finer control when navigating around small images and scenes. Correspondingly, pan sensitivity will increase when zooming out. If you need to move the point of view faster, zoom out first or reset the scale with Ctrl+1.
Scaling
The following methods can be used to scale an image or 3D scene once it has been displayed in a view.
Note that there is a lower limit to the scale of a 3D scene. Continuing to zoom in past this limit will instead move ("dolly") the point of view forwards. The mouse wheel will move forward slowly, and the keyboard will move more quickly.
Using the Mouse
- Mouse Drag
- Place the mouse pointer over the view, then hold the middle and left mouse buttons down while dragging the mouse to the left and right to scale smoothly in and out. The scaling is centered around the starting position of the pointer.
- Mouse Click
- Place the mouse pointer over the view, then hold down the middle mouse button. While holding down the middle mouse button, click once on the left mouse button to increase the scale or the right button to decrease the scale by a fixed amount. The scaling is centered around the position of the pointer.
- Mouse Wheel
- Place the mouse pointer over the active view, hold down the Ctrl key, and roll the mouse wheel up or down. Each step on the wheel increases or decreases the scale by a fixed amount, centered around the pointer.
Using the Keyboard
- Keyboard
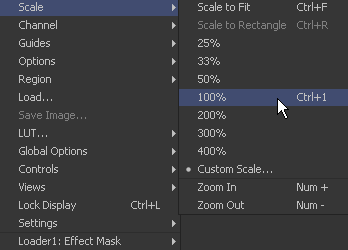
- To change the scale by a fixed value, press the + or - keys on the numeric keypad while the display view is active. Ctrl+1 will set the image or scene back to its default of 100% scale, and will recenter it as well. Ctrl+F will fit the image or scene into the visible region.
Using the Context Menu
Press the right mouse button while the pointer is positioned over the display view and select Scale from the display view's context menu.
Using the View Toolbar
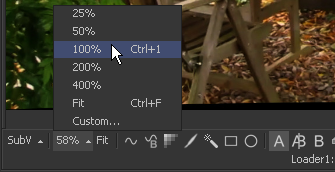
The scale button in the Display View Toolbar can also be used to adjust the scale of the view. Click anywhere on the scale button to bring up a menu of several preset scales to choose from, or click on the Fit button beside it to fit the image or scene to the view window.
Rotating
When viewing a 3D scene or 3D histogram, the display view can also be rotated. This can be done with the mouse.
Normally, view rotation "orbits" the point of view, to allow easy viewing from any angle. When viewing through a camera in the scene however, this changes to rotate (pitch and yaw) the camera instead. For more information about working in 3D you might want to have a look at the 3D Chapter of this manual.
Using the Mouse
- Mouse Drag
- Place the mouse pointer over the view, then hold the middle and right mouse buttons down (alternately, Alt key and middle button) while dragging the mouse to the left and right to rotate the view. The rotation is centered around the middle of the view.
| The contents of this page are copyright by eyeon Software. |


