Eyeon:Manual/Fusion 6/Hot Spot
From VFXPedia
[ Main Manual Page ]
Contents |
Hot Spot Tab
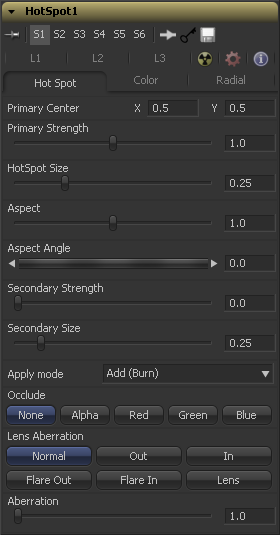
This is the position of the Primary Hot Spot within the scene. Secondary lens elements and reflections are positioned relative to the position of the primary.
This control determines the brightness of the primary hotspot.
This control determines the diameter of the primary Hotspot. A value of 1.0 represents a circle the full width of the image.
This controls the Aspect of the spot. A value of 1.0 produces a perfectly circular hotspot. Values above 1.0 will elongate the circle horizontally and values below 1.0 will elongate the circle vertically.
This control can be used to rotate the primary hotspot.
This control determines the strength, which is to say the brightness, of the secondary hotspot. The secondary hotspot is a reflection of the primary hotspot. It will always be positioned on the opposite side of the image from the primary hotspot.
This determines the size of the secondary hotspot.
This control determines how the hotspot affects the underlying image.
This causes the spots created to brighten the image.
This causes the spots created to dim the image.
This causes the spots created to isolate a portion of the image with light and to darken the remainder of the image.
Use this button array to select which channel of the image connected to the HotSpot tool's occlusion input is used to provide the occlusion matte.
Occlusion happens when the source of the hotspot is blocked by something between it and the camera. When the source of a hotspot is occluded, the hotspot simply winks out.
Occlusion can be controlled from Alpha or R ,G or B channels of any image connected to the occlusion input on the tool's tile. The white pixels in the image will occlude the hotspot. Grey pixels will partially suppress the hotspot.
Aberration changes the shape and behavior of the primary and secondary hotspots.
Elongate the shape of the hotspot into a flare. The hotspot stretches toward the center of the image when in In mode, stretching toward the corners when in Out mode.
This option is a lens distortion effect that is controlled by the movement of the lens effect. Flare In will cause the effect to become more severe the closer the hotspot gets to the center. Flare Out causes the effect to increase as the hotspot gets closer to the edges of the image.
This mode emulates a round, ringed lens effect.
The Aberration slider controls the overall strength of the lens aberration effect.
Color Tab
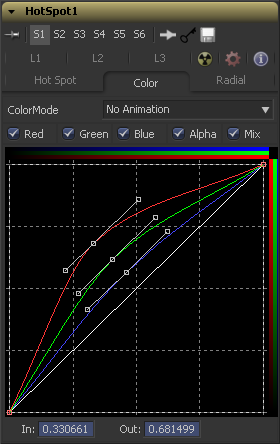
This tab contains a Look Up Table (LUT) that controls the disbursement, brightness and radial influence (mix) of the spot colors. The bottom left corner represents the outer edge of the spot, while the top right corner represents the center of the spot.
When selected, these checkbox controls enable the editing of the chosen splines in the LUT below.
The Red, Green, Blue and Alpha splines are used to adjust the color of the spotlight along the radius of the hotspot.
The vertical axis represents the intensity or strength of the color channel, from a value of 0 at the bottom to 1 at the top. The horizontal axis represents the position along the radius of the hotspot, from the outside edge on the left to the inside on the right.
So the default curve of the tool indicates that the red, green, blue and alpha channels all have a linear falloff from the outside edge of the curve to the inside edge.
The Mix spline is used to determine the influence of the controls that the Radial tab will have along the radius of the hotspot. The horizontal axis represents the position along the circle's circumference, with 0 being 0 degrees and 1.0 being 360 degrees. The vertical axis represents the amount of the radial hotspot to blend with the color hotspot. A value of 0 is all radial hotspot, while a value of 1.0 is all color hotspot.
Right-clicking in the LUT will display a context menu with options related to modifying spline curves.
A complete description of LUT editor controls and options can be found in the Tool Controls chapter of this manual.
Radial Tab
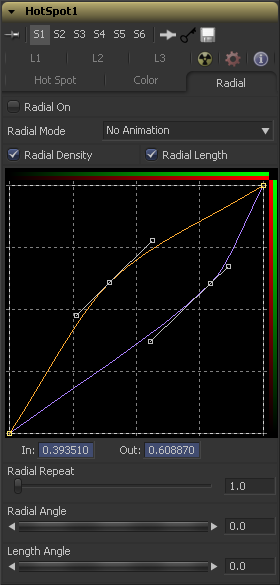
By default, the Hot Spot is rendered as a circle or ellipse and the radial controls are disabled. The radial splines provide a way of generating rays of light, or non uniform density in the hotspot along the circumference of the hotspot. A classic example would be that you could use the radial splines to create a star shape.
When selected this control enables the Radial splines. Otherwise the radial matte created by the splines is not applied to the hotspot, and theMix spline in the color controls will have no affect on the hotspot.
The key to these splines is realizing that the LUT editor's horizontal axis represents a position around the circumference of the hotspot. A value of 0.0 is 0 degrees and 1.0 is 360 degrees. With that in mind, the length determines the radius of the light making up the hotspot along the circumference, and the density represents how bright the light is along the circumference.
This control will repeat the effect of the radial splines by X number of times. For example, a repeat of 2.0 causes the spline to take effect between 0 and 180 degrees instead of 0 and 360, repeating the spline again between 180 and 360.
This control will rotate the effect of the Radial Length spline around the circumference of the hotspot.
This control will rotate the effect of the Radial Density spline around the circumference of the hotspot.
Right-clicking in the spline area will display a context menu containing options related to modifying spline curves
A complete description of LUT editor controls and options can be found in the Tool Controls chapter of this manual.
L1, L2 And L3 Tab
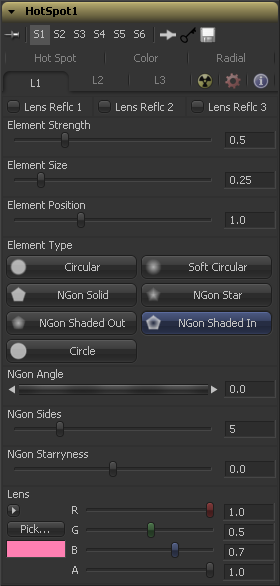
Each tab contains identical settings and can be used to create additional reflection elements above and beyond the primary and secondary hot spots.
When selected, the reflection caused by the element is enabled.
This determines the brightness of element reflections.
This determines the size of element reflections.
This determines the distance of element reflections from the axis. The axis is calculated as a line between the hotspot position and the center of the image.
Use this array of buttons to choose the shape and density of the element reflections. The presets available are described below.
This creates slightly soft-edged circular shaped reflections.
This creates very soft-edged circular shaped reflections.
This creates a hard-edged circle shape.
This creates a filled polygon with a variable number of sides.
This creates a very soft-edged star shape with a variable number of sides.
This creates soft-edged circular shapes.
This creates a polygon with a variable number of sides, which has a very soft reversed (dark center, bright radius) circle.
This control is used to determine the angle of the NGon shapes.
This control is used to determine the amount of sides used when the Element Type is set to Ngon Star, Ngon Shaded Out, and Ngon Shaded In.
This control is used to bend polygons into star shapes. The higher the value the more star-like the shape.
These controls determine the color of the lens that affects the colors of the reflections. To choose a lens color, pick one from a displayed image, or enter RGBA values using the sliders or input boxes.
Tips for Hot Spot (edit)
EyeonTips:Manual/Fusion 6/Hot Spot
| The contents of this page are copyright by eyeon Software. |


