Eyeon:Manual/Fusion 6/Changes since Fusion 6.0
From VFXPedia
[ Main Manual Page ]
This chapter summarizes new features and changed behavior between Fusion 6.0 and Fusion 6.1. Where applicable, links are provided to further documentation.
Contents |
Compatibility
Fusion 6.1 is able to load and render compositions from previous versions of Fusion, though it is possible that the results of that render may change due to improvements in the performance and quality of many of the tools within Fusion. As usual, we strongly recommend against mixed renders, where some frames in a render are produced different versions of Fusion. If you use network rendering, make sure your render slaves are running a matching version of Fusion. Fusion 6.1 is API compatible with Fusion 6.0, so all publicly released and in-house plug-ins should work as expected. This includes native fusion plug-ins, as well as OFX and AFX plug-ins. Please report any issues with plug-ins arising from Fusion 6.1 to both eyeon and the plug-in vendor simultaneously. Compositions saved in Fusion 6.1 can still be opened in Fusion 6.0, with a few caveats. Compositions that contain or use tools new to this version will not load correctly in previous version. Additionally, some tools may have been improved such that the results no longer perfectly match the results from previous versions. In these rare cases, a note will appear here in this documentation. For example, the Loader's R3D (Red Camera) format options have been changed quite a bit, and as such they will need to be re-configured when opening a Fusion 6.1 composition containing R3D files into a previous version.
Core and Major Changes
- Python
Python 3.1 is now embedded inside Fusion 6.1. As a result, Fusion now supports use of the Python scripting language for Utility, Comp, Tool, Bin and Job and Slave scripts. Any file inside the Fusion:\Scripts folders with the .py extension will be executed as a python script, and will appear in the appropriate menu within the interface.
In addition, the Console can now interpret input as either Python or eyeonscript (Lua), by selecting the desired language using the bottoms at the top of the Console. All objects exposed by Fusion are accessible via Python. Functions which expect tables as arguments or which would return tables as part of their output will instead return Dictionary objects. The following is an example Comp script written in Python. This script will write (and then open) a text file to c:\listfootage.txt containing a list of all footage used by the Loaders in the composition.
import io
import os

filename = 'c:\listfootage.txt'

f = io.open(filename, mode='w')
f.write(comp.GetAttrs()['COMPS_FileName'] + '\n\n')

lds = comp.GetToolList(False, "Loader")

for k, ld in lds.items():
   attrs = ld.GetAttrs()

for k, clip in attrs['TOOLST_Clip_Name'].items():
   f.write(clip + '\n')

f.close()

os.popen("notepad " + filename)
- File Caching
Fusion 6.1 provides a File Caching option, which allows the artist to select a folder where files held in remote locations can be cached to reduce the time and bandwidth used to load large frames over slow or congested networks. When this option is enabled, if a frame exists in the local cache and the date stamp matched the date stamp of the original remote file, then it will load the cached frame instead of the original frame. If the date stamp does not match, the remote file will be used and the frame will be re-cached. Caching is enabled and disabled in the composition preferences. This preference can also be overridden using a control found on the Import tab of each Loaders control window. Additional preferences are provided to determine how Fusion handles cached frames which are missing from the remote location, large multi-frame files, and maximum file sizes for cached frames.
- Setting the Loader Cache location
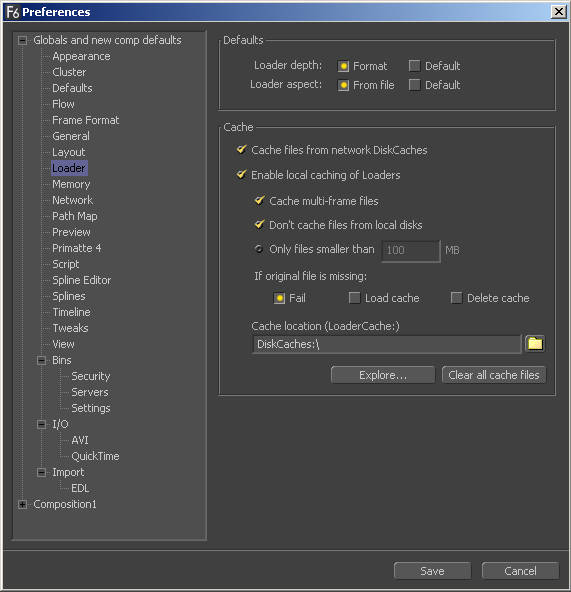
To set the folder where the cached frames will be stored, open File / Preferences and select the Global / Loader panel. The panel pictured below will appear.
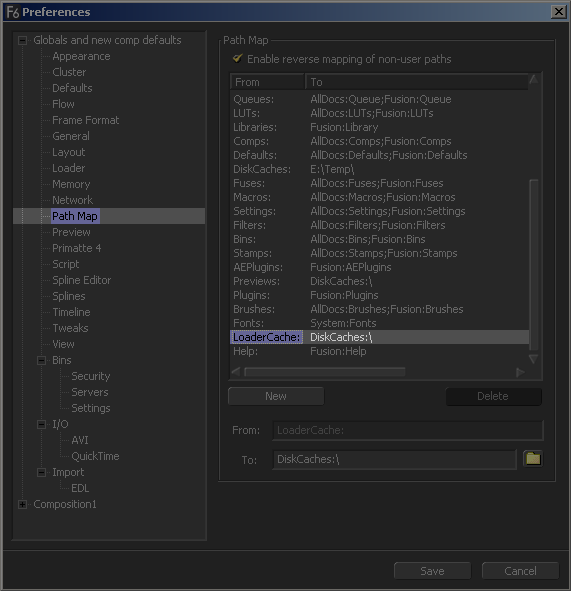
Click on the yellow browse button next to the 'Cache location' preference, and select a folder which should host all of the cached files. Generally you will wish to select a folder which is local to the current computer, and not stored on a remote file-system. Fusion will create the folder(s) required to cache a frame if the folder does not already exist. This preference is actually a clone of the Global / Path Map / LoaderCache path map, and can be set or changed from either location.
- Enabling or Disabling File Caching
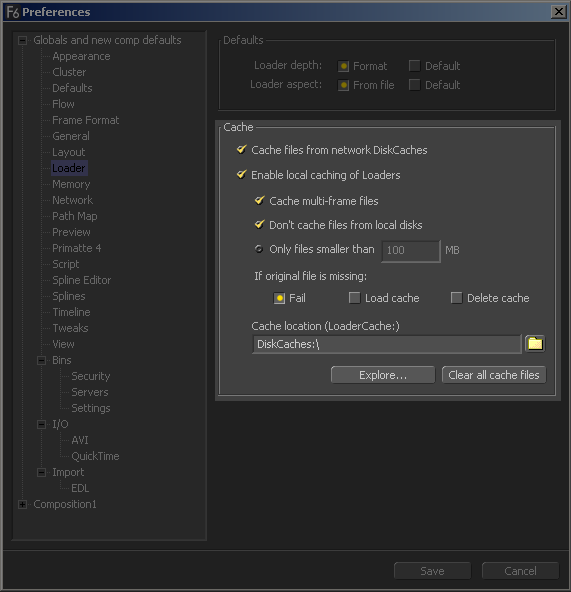
To enable or disable file caching for the current composition, open File / Preferences and display the current compositions Loader panel. Select the 'Enable Local caching' check-box, then click on the Save button to close the preferences.
To enable caching by default for all newly created compositions, select the 'Enable Local caching' check-box in the Global / Loader preferences panel. Note that this will only affect new compositions created after the change is made. Compositions created before this option is enabled will retain their original settings.
- Loader Specific Options
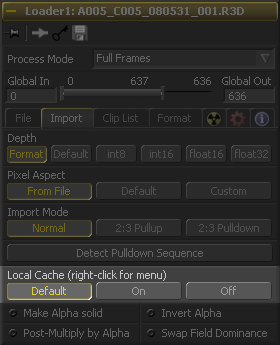
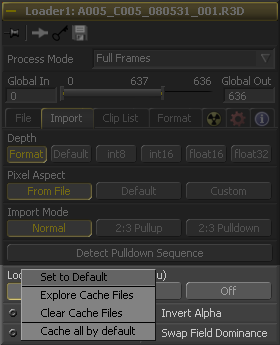
The Import tab in the Loader tools control window can be used to enable and disable caching for that specific Loader, on a per tool basis. The 'Local Cache' control presents three options:
- Default
The compositions preferences determine whether the Loader will be cached or not.
- On
Select this option to force file caching on for this Loader, regardless of the preferences setting.
- Off
Select this option to force file caching off for this Loader, regardless of the preferences setting.
Right clicking on the label of the control will display a context menu with the following options
- Set to Default
Reset this controls selection to match the current compositions preferences.
- Explore Cache Files
Open a file browser to the folder containing the cached files for this Loader.
- Clear Cache Files
Delete all currently cached frames for this Loader.
- Cache All by Default
Reset this control on all Loaders in the composition to enable file caching.
- Additional Cache Handling Options
- Missing Frames
Before Fusion loads a cached frame it first checks to see if the original frame still exists on the remote server. The compositions preferences can be used to set how the cache handles situations where the current frame is no longer present in the original location. The available options are :
- Fail
Fail the loader and do not load the cached copy of the frame.
- Load Cache
Ignore the missing frame and load the cached copy of the frame.
- Delete Cache
Fail the Loader and delete the cached copy of the frame.
- Multi-Frame Files
When the File Cache is enabled but the frame's source is a multi-frame format, such as a Quick Time, Windows Media or AVI movie, Fusion must cache the entire movie file. This can take a significant amount of time, and in situations where the composition is only using a few frames from a very long multi-frame file, this could be undesirable. As a result, Fusion defaults to ignoring multi-frame files when creating file caches. Selecting the 'Cache multi-frame files' check-box in the Loader preferences panel will override this behavior and cause Fusion to cache multi-frame formats.
RenderMan® Support
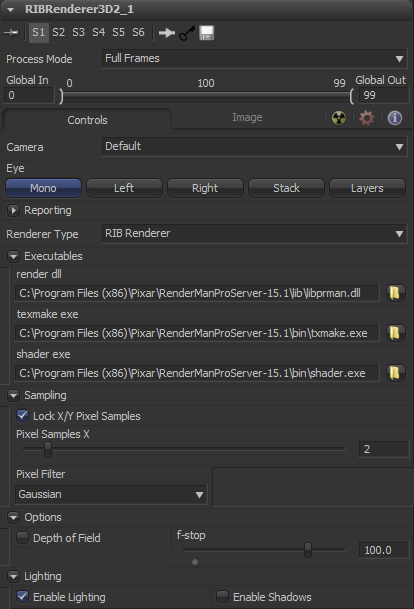
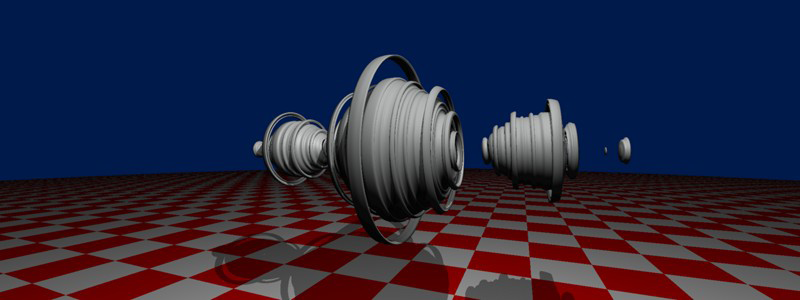
Fusion 6.1 now support the Renderman renderer directly as open source in the 3D SDK for studios to modify and integrate.
OpenCL Supercomputing
Part of Fusion's future road map involves accelerating much of Fusion's rendering and processing via the supercomputer hidden within on every artists workstation – namely, the GPU or Graphics Processing Unit. As part of that effort, Fusion 6.1 now provides experimental support for the OpenCL specification. Currently that support has been tested only with NVIDIA graphics cards running very recent drivers. Future plans include expanding OpenCL support to include ATI graphics cards.
- What is OpenCL
OpenCL (Open Computing Language) is a framework for distributing general purpose processing tasks to CPU's, GPU's and other OpenCL compliant devices. OpenCL makes it possible to use the Graphical Processing Unit for non-graphical computing. When OpenCL support is enabled and a supported graphics card is detected, Fusion will use the OpenCL code path instead of rendering on the GPU. Tools that render via OpenCL see enormous performance improvements.
- About OpenCL in Fusion
Because OpenCL support in the publicly available drivers is quite new, this feature is still undergoing a lot of internal testing at eyeon. To gather more data about OpenCL performance and support in production environments this version of Fusion currently contains only one OpenCL enhanced tool, and support for OpenCL fragments in Fuse scripted tools. Additional tools will likely be added as throughout the next few releases. Currently the Defocus tool will attempt to use OpenCL to accelerate rendering while in Lens Mode. Internal tests have shown performance increases from 30% to 1000%, depending on graphics hardware and bus speeds.
- nVidia Drivers
To use OpenCL, you must have a relatively recent NVIDIA graphics card installed (GeForce 8xxx and later, most Quaddro boards), and at least version 196 of the drivers installed.
- Enabling OpenCL
To enable OpenCL, enter the following command into the Lua console. fusion:SetPrefs("Global.Tweaks.OpenCL.Enable", true) To enable writing of performance data into the images metadata, enter the following command into the Lua console. fusion:SetPrefs("Global.Tweaks.OpenCL.ShowPerf", true) To disable OpenCL, simply enter the commands above using false as the second argument.
- OpenCL Fuses
In addition to making Fusion's native tools OpenCL aware, Fusion 6.1 also allows the use of OpenCL code fragments within Fuse tools. Several examples have been provided with this release. You can find them under the OpenCL tool sub-menu. These examples show how OpenCL can be embedded into a Fuse, but they should not be considered to be production tools and will likely disappear in the near future. The currently available Fuses are:
- NoiseFuse
An example implementation of a basic noise generator.
- MandelbrotFuse
An example implementation of the Mandelbrot fractal set
- JuliaFuse
An example implementation of the Julia fractal set, complete with ray-traced shadows and lighting.
Documentation for OpenCL fuses will be appearing in the near future, but for now technically inclined artists can use these Fuse examples to see how their own OpenCL code can be quickly embedded into Fusion.
3D Tools
This section describes the various changes made to 3D environment in Fusion 6.1.
- Control Pinning
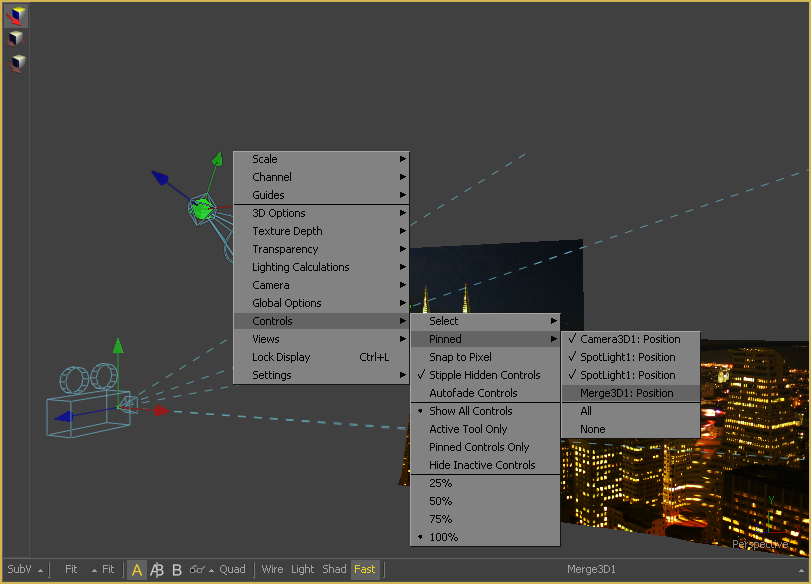
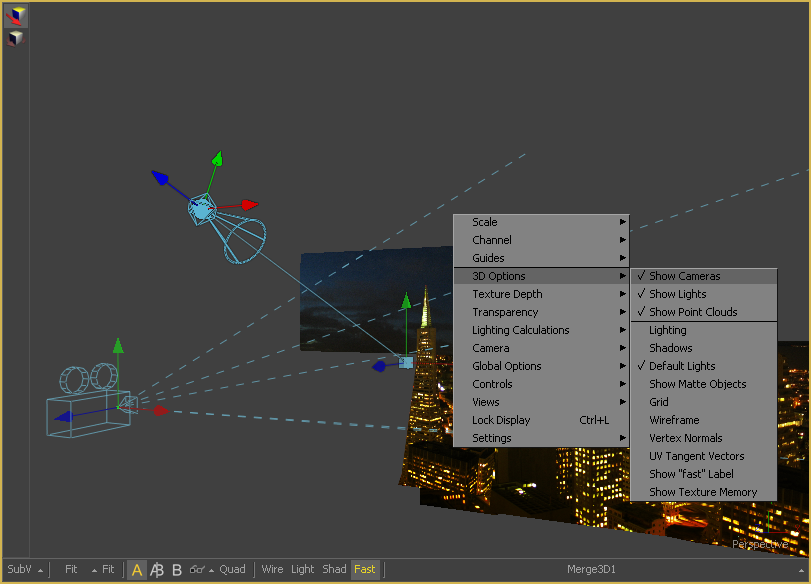
It is now possible to pin preview controls so that they are always visible in the display view, regardless of the selected status of the tool that provides that control. Cameras, lights and point clouds in the scene default to 'pinned', though any preview control can be added or removed from the pinned list.
To pin or unpin a preview control, right click in the 3D viewer and select the Controls sub-menu. Open the Pinned sub-menu and a list of all controls currently available to the view will appear. A check-mark will appear next to the control if it is currently pinned. Select the control to toggle it's current status.
The 3D display views context menu contains an 'Options' sub-menu that can be used to determine which classes of controls are always pinned. Select the 'Show Cameras', 'Show Lights' or 'Show Point Clouds' items in the menu to toggle pinning of preview controls for tools of these types.
- Improved FBX Mesh Importing
Several improvements have been made to the way Fusion imports FBX scenes, particularly with regards to materials and textures, as described below.
- A Blinn material is created for each material in the file and connected to the FBX meshes that
use it. For example, a scene which contains a car will also create the relevant tire material and textures and automatically connect that material to all 4 wheels.
- Loaders are now created for each bump-map, diffuse, specular, specular intensity, specular
exponent, opacity, reflection, and emission texture in the composition (as well as a few others). If the Blinn material has a matching input the loader is connected to that input. If Blinn doesn't have a matching input for it, the loader will be placed on the flow, but remains unconnected.
- A Texture2D tool is now created and configured for any texture where the wrap mode is set to
'repeat' in the FBX scene.
- Loaders for single frame textures are now created with the Loop option enabled, preventing
Fusion from treating textures with names like wood1.jpg, wood2.jpg, wood3.jpg as sequences when they should not be.
- A Bump-map tool is created and connected up the Blinn material if a bump-map is specified in
the FBX
- If a mesh in the FBX has multiple materials assigned to it, then multiple inputs will be created
on the FBX Mesh tool, one for each of those materials. Previously Fusion would only recognize the first material listed.
- A scale slider has been added to the FBX import dialog and FBX Export tool controls to adjust
for unit conversions.
- Object positions now take into account any hidden offsets within the FBX file. This may change
the way some meshes are imported when using the hierarchy mode option in the import dialog.
- Co-ordinate Transform Modifier
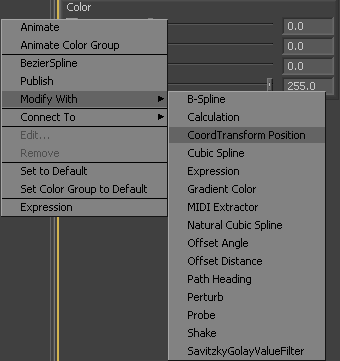
Because of the hierarchical nature of the Fusion 3D flow, the original position of an object in the 3D scene often fails to indicate the current position of the object. For example, an image plane might initially have a position at 1, 2, 1, but then be scaled, offset, and rotated by other tools further downstream in the 3D scene, ending up with an absolute location of 10, 20, 5. This can complicate connecting an object further downstream in the composition directly to the position of an upstream object. The Co-ordinate Transform modifier can be added to any set of XYZ co-ordinate controls, and will calculate the current position of a given object at any point in the scene hierarchy. To add a Co-ordinate Transform Modifier, simply right click on the a numeric input on any tool, and select 'Modify With / CoordTransform Position' from the controls context menu, as pictured below.
The controls for the new modifier will appear in the Modifiers tab of the Control Window.
Please see the Coordinate Transform 3D chapter of the Modifier section for further explanation.
- Projector 3D and Camera 3D
The Projector3D and Camera3D tools now support blending (additive merge) of multiple projectors. Each projector can be assigned a Projector ID and a Priority. The priority determines which projector is considered to be foreground, and the ID can be used to restrict the Catcher material to a specific Projector.
- Catcher
The Catcher Material can now be restricted by Projector ID.
- Displace 3D
Added an RGB displacement mode that allows the red green and blue channels of a 2D image to be used as the X, Y and Z displacement vectors.
- Gradient 3D
The Gradient 3D texture now supports floating point values.
Color Tools
- Hue Curves
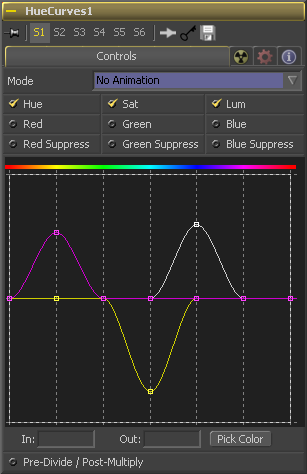
The new Hue Curves tool allows the artist to adjust the color in an image using a series of spline curves. Splines are provided to control the images Hue, Saturation and Luminance as well as each individual color channel. An additional set of curves allow the artist to apply suppression to individual color channels. The advantage of the Hue Curves tool over other color correction tools in Fusion is that the splines can be manipulated to restrict the tools effect to a very narrow portion of the image, or expanded to include a wide ranging portion of the image. Additionally, these curves can be animated to follow changes in the image over time. Since the primary axis of the spline is defined by the images Hue, it is much easier to isolate a specific color from the image for adjustment. The main interface element of the Hue Curves tool is a Look Up Table control which hosts the various splines. In appearance the tool is very similar to the Color Curves tool, but in this case the horizontal axis represents the images Hue, while the vertical axis represents the degree of adjustment. Please see the HUE Curves chapter of the Color Tools section for further explanation.
- Gamut
The Gamut tool has been updated with several new features. First, there is now a Pre-Divide / Post- Multiply option. Fusion 6.1 also adds the DCI-P3 color space, and provides the option to create a custom color space by manually setting the color primaries, white point, gamma as well as the linear slope and limit.
- DCI-P3
The DCI-P3 color space is most commonly used in association with DLP projectors and is frequently provided as a color space available with 2K DLP projectors, and as an emulation mode for 10 bit LCD monitors such as the HP Dreamcolor. This color space is defined in the SMPTE-431-2 standard.
- Custom
The custom gamut allows the artist to describe the color space according to CIE 1931 primaries and white point, which are expressed as x\y co-ordinates, as well as by gamma, limit and slope. For example, the DCI-P3 gamut mentioned above would have the following values if described as a Custom color space. Red Primary : 0.68, 0.32 Green Primary : 0.265, 0.69 Blue Primary : 0.15, 0.06 White Point : 0.314, 0.351 Gamma : 2.6
Please see the Gamut chapter of the Color Tools section for further explanation.
Film Tools
- Film Grain (Tool)
The Film Grain tool in Fusion 6 takes a new approach to grain, which should be more closely aligned with the grain profiles of modern film stocks. This provides the artist with more control over the final appearance of the grain. Note that the Film Grain tool does not replace the original Grain tool, which is still provided to allow older compositions to load and render, but in almost every case, use of the new Film Grain tool is now encouraged. Please see the Film Grain chapter of the Film Tools section for further explanation.
- CineonLog
The CineonLog tool's controls can now be animated, or have expressions applied to them.
Creators and Savers
- Loader
Updated Red R3D Support Fusion 6.1 includes the updated v3.0 SDK from Red, which provides support for the new MysteriumX color science. The Loaders R3D format options provide a button for switching between the the older color science and the more recent color science. However. When loading clips recorded with cameras running newer firmware and sensors, Fusion will use only the new color science, in order to ensure correct results.
New options include "Shadow" and "FLUT" controls. There are also new options in the Gamma ("RED gamma") and Color Space ("RED color") controls. These options are only valid when using the new colour science, and while they will appear as options when the old colour science is selected, selecting them will actually use "RED space" in both cases.
Note: This required some changes to the formats control types, which means that comps using R3D files saved in Fusion 6.1 may not load as expected in previous versions of Fusion.
- Instancing Loader Warning
Attempts to instance Loader tools will now display a dialog which allows the artist to choose whether to skip the Loaders, or to paste them without instancing.
- Multithreaded I/O
In an effort to prevent performance penalties associated with multiple concurrent reads and writes to a hard drive or network resource (drive thrashing) Fusion generally limits the number of simultaneous reads and writes so that only operation at a time takes place on a single I/O resource. In Windows, all UNC pathed reads and writes are actually considered by the operating system to be one resource, which further limits the number of simultaneous operations that can occur.
While this limit has historically avoided common IO bottlenecks, as bandwidth, processor speeds, and drive performance all continue to improve, it has become increasingly possible that these limits are preventing the complete utilization of system resources, causing the systems processor cores to idle while waiting for files to arrive for processing.
While Fusion 6.1 has not yet changed the default behavior for concurrent I/O to a single drive, the limitations on UNC paths have been relaxed somewhat. Additionally, environment variables that allow disabling the drive limit have been made available for testing. We would be very interested to hear feedback from testers about the performance and stability of Fusion when these options are enabled. Create and set the FUSION_DRIVELOCKING environment variable to 'false' to allow more than one IO operation at a time from any local or mapped drive. If the variable is not present or set to 'true' Fusion will operate as it has for the past 11 years.
Create and set the FUSION_NETLOCKING environment variable to 'true', and Fusion will once again limit reads and writes to UNC paths to allow only one operation at a time. If this environment variable is missing or set to 'false', there will be no limit.
Miscellaneous Tools
- Custom Tool
The Custom tool now provides 4 LUT splines (lut1, lut2, lut3, lut4) which can be accessed within expressions using the getlut# function. For example, setting the r, g, b and a expressions to getlut1(r1), getlut2(g1), getlut3(b1), and getlut4(a1) respectively would cause the Custom tool to mimic the Color Curves tool.
Please see the Custom Tool chapter of the Miscellaneous Tools section for further explanation.
Particle Tools
The Particle system in Fusion 6.1 has been subjected to quite a few improvements. Many of these are related to accuracy, such as improved handling of region collisions, which reduce the likelihood that particles will 'leak' out of a region without being affected by the tool. New features include the ability to use mesh geometry as regions, and support for particles in Disk Caches, allowing complex calculations to be cached to disk.
- Particle Mesh Regions
In addition, many particle tools are now able to take advantage of Mesh regions, which allow 3D geometry within a scene to act as a region in tools like the pEmitter, pBounce, pFriction, pVortex, etc. When the Region is set to Mesh a new input will appear on the tools tile. This input can be connected to the output of any 3D tool in the composition. All of the geometry in the scene can be used as a region, or the ObjectID property can be used as a filter. Please see the Particle Mesh Regions chapter of the Particles Tools section for further explanation.
- pCustom
pCustom now only evaluates expressions when they are non-default, which improves performance on simple tasks.
- pChangeStyle
Sets can now be set to 'No Change' using a tri-state check-box.
- Particle Disk Caching
The standard fusion Disk Cache can now be used to cache particle solutions to disk. This methods used to create the disk cache are identical to those used for image caches, using the same dialogs and following the same rules. The cached files use the .part extension instead or the .raw extension. Unlike image caches, it is not possible to change the extension used for the particle cache.
Other Changes
- Tool Controls
- Holding down the CTRL key while dragging a slider or screw control will reduce the sensitivity of the control by 1/10, allowing for much finer adjustments.
- The control context menu now provides an option to reset any control to it's default value. A small marker can be found below slider and screw controls, which indicates the position of the default value on the control. Clicking on the marker will restore the control to the default value.
- The visibility of key points on Blue curves in LUT controls has been improved
- Controls which change color when animated (i.e. text edit controls on sliders) now also show as green when the current frame is a keyframe for that animation.
- The Connect To context menu now sorts its options alphabetically.
- Pick-whip (The + symbol next to a simple expression) can now flip tabs and expand tool control windows by hovering over them, and the control views can now be scrolled vertically. Active tab and scroll position will be reverted enough that the original expression edit is visible again after picking is done.
- Added a multi-frames mode to LUT controls, which can be accessed from the LUT controls context menu. When the multi-frames mode is enabled adjustments to animated key points on the LUT spline will be applied equally to all key-frames, applied as an offset from the points position at that time.
- Polyline and Spline
- Improved conversion of polylines from Bezier to B-Spline and B-Spline to Bezier.
- Splines can now have key points 'tagged' using shortcut Shift+T for setting/resetting point tags.
- Enabled setting/resetting point tags in multiple polylines. Currently this makes the point larger, so that important points are easier to identify.
- Added a multi-frames mode, which can be accessed from the polyline's toolbar or context menu. When the multi-frames mode is enabled adjustments to key points on the polyline will be applied equally to all key-frames, applied as an offset from the points position at that time.
- A script for exporting polyline / double - polylines to Shake format .ssf files is now available.
- Flow View
- Scale-to-fit in the Flow only re-positions if a single tool is selected. Previously if a tool was active it would just position, even if other tools were also selected.
- Display View
- The text for colour values in the colour inspector are drawn in pink (desaturated red) if the value is out-of-range ( above 1, or below 0 ).
- Added the Gamut View LUT, which is a GPU accelerated version of the Gamut tool.
- Other
- The render dialog now restores the original state of the Motion Blur option to the composition after a render, instead of leaving it set to whatever the last render did.
- Fusion compositions now appear in Windows 7's jump list for Fusion.
| The contents of this page are copyright by eyeon Software. |

