Eyeon:Manual/Display View/General Display Options
From VFXPedia
General Display Options
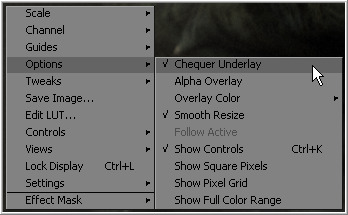
Display Options Sub Context Menu
The Display Options Sub Context Menu contains several options to display the views. All of the options listed here can be found in the context menu. Several of them have a button in the view toolbar as well.
- Locking The Display
- Default: Off
- A display can be prevented from updating when it is locked. The display will not update the image from the viewed tool until the view is unlocked. The tool still processes and the new image is queued for display in the view. Toggle this option using the Ctrl-L keyboard shortcut, or by clicking on the Lock button in the view toolbar when viewing a 2D image.
- Alpha Overlay
- Default: Off
- When this option is enabled, the view will show the Alpha channel overlaid on top of the color channels.
- Overlay Color
- Default: White
- Change the color used for the alpha Overlay from the default white using the options in this menu.
- Checker Underlay
- Default: On
- The Checker Underlay shows a checkerboard beneath transparent pixels instead of black. This is the default option for 2D views. Toggle this option by clicking on the Checker button in the 2D view toolbar.
- Smooth Resize
- Default: On
- The Smooth Resize option causes the display view to use a smoother interpolated resizing method when zooming into an image in the views. When smooth resize is disabled, scaling uses the faster nearest neighbor method. This option is enabled by default and can also be toggled by clicking on the SmR button in the view toolbar.
- Follow Active
- Default: Off
- Enabling the Follow Active option will cause the view to always display the currently active tool in the flow.
- Show Controls
- Default: On
- The Show Controls option shows or hides onscreen tool controls in the view. This option is handy when the controls are not necessary or are getting in the way of evaluating the image. This option is toggled using the Ctrl-K keyboard shortcut or by clicking on the Show Controls button in the view toolbar.
- Show Square Pixels
- Default: Off
- Depending on the frame format preferences and the type of footage loaded, many images may have pixels that are rectangular instead of square. Both the NTSC and PAL video standards, as well as some film formats, use rectangular pixels. A computer monitor uses perfectly square pixels.
- Fusion will automatically perform aspect correction when viewing non-square images so that the image seen in the views does not appear squashed or stretched. Although this aspect correction helps to correct the shape of the objects in the image, it can also cause aliasing in the image. Fusion uses a relatively fast resize algorithm to make the correction in the views. This aliasing does not affect the final result. It is an artifact of the display view only. Regardless, its presence can obscure real problems in the image.
- Enabling the Show Square Pixels option will override the aspect correction in the view to confirm that this `tearing' is an artifact of aspect correction and not a problem with the composite.
- Show square pixels can also be toggled on and off using the 1:1 button in the view toolbar.
- For more information on the effect of aspect on the composite and how Fusion handles aspect ratio, see the Frame Formats chapter in this manual.
- Pixel Grid
- Default: Off
- Enabling this option will show a light black grid that outlines the exact boundaries of pixels in the image when the image is scaled in past a certain threshold. Toggle this option with the Grid toolbar button.
- Show Full Color Range
- Default: Off
- Enabling the Show Full Color Range option causes Fusion to automatically normalize any image displayed in the view. Normalization causes the brightest pixel in a color channel to be mapped to a value of 1.0 (white) and the darkest pixel to be mapped to a value of 0.0 (black). Midrange values are scaled appropriately to fit within that range.
- This allows for the visualization of values outside of the normal viewing range, particularly when working with floating point images. It is also useful when viewing Z-buffer or other auxiliary channels, which often use value ranges far different from those in the color channels.
- Toggle this option with the Related View toolbar button.

