Eyeon:Manual/Changes Between Fusion 5 and 5.1/Display Views
From VFXPedia
Display Views
Contents |
Look Up Tables
Exporting LUT's
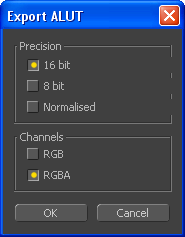
Exporting a LUT to a file now presents a single dialog box That contains all of the options. This simplifies the maze of context menu options that needed to be set before exporting a LUT to a file in previous versions. Additionally, the interface that is used to save and load ASCII LUT files (.alut) is now identical to the interface that is used to export native LUT (.lut) files. As a result these two options have been combined into one set of options.
Now use the 'Import LUT...' option in the context menu to import a LUT from a file and the 'Export LUT...' option to save one to disk.
When exporting a LUT the first dialog to appear is a file browser. Use the dialog to specify a name, path and type for the exported LUT. Choose between exporting a LUT or ASCII LUT by selecting the appropriate file type from the drop down menu. If no file type is selected, the type of export will be determined from the files extension.
File based LUT's
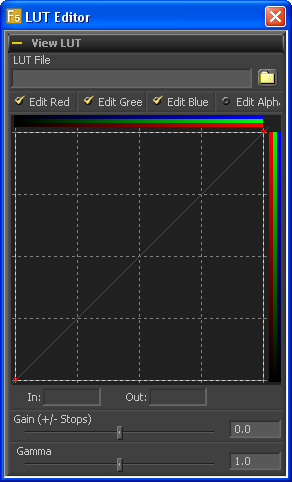
It is now possible to apply a LUT to a Display View that references an ALUT file on disk directly. This approach is similar to the Color Curves tool, except that just a filename is saved in the doc, not huge 64K entry tables. To add a file based LUT right-click in the Display View and select 'LUT\Edit LUT' from the context menu. Click on the file browse icon in the top of the dialog that appears and browse to the ALUT file to be used. See also the documentation for the new File LUT tool.
Macro LUT's
It is possible to create custom lookup tables using any tool present in Fusion by using a regular macro as a LUT. This allows an artist to apply a much wider range of color corrections and treatments to the image in the display view. It should be noted that the results of Macro LUT's are not cached to RAM for playback, so the processing time of a LUT based on a macro will affect the playback performance of the composition.
Creating a Macro LUT
Any macro can be used as a LUT, provided that a single image input and a single image output are exposed in the macro. Create the macro normally as described in the Fusion manual. Once the macro has been created and tested, copy the macro tools .setting file from Fusion:\Macros to the Fusion:\LUTs folder. The macro will automatically appear in the list of Macros available to the Display View. Any tool controls exposed when creating the macro will be available for adjustment when the artist chooses to edit the macro.
Enabling a Macro LUT
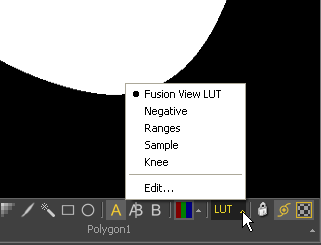
To enable a Macro LUT click on the small arrow to the right of the LUT button in the Display View toolbar, then select the desired macro from the list that appears. The macro LUT can be enabled or disabled by clicking on the LUT button as usual.
Editing a Macro LUT
To edit a Macro LUT click on the small arrow to the right of the LUT button in the Display View toolbar, then select Edit. Any controls exposed when creating the macro will be available for adjustment in the dialog that appears.
Other 2D Display View Changes
An 'Edit...' option was added to the context menu on the display view toolbars LUT button.
New Tweaks preferences related to the texture depth used in image views was added. 'Auto' provides current behavior (effectively float images are uploaded as 8bit int for ATI, and left native for NVidia). The other 2 options force the view one way or the other.
3D Display Changes
Dynamic Clipping
The 3D Display View now automatically adjusts the clipping planes to encompass the entire scene. This eliminates the need for the artist to manually adjust the clipping plane for the display views in the preferences.
Per Pixel Lighting
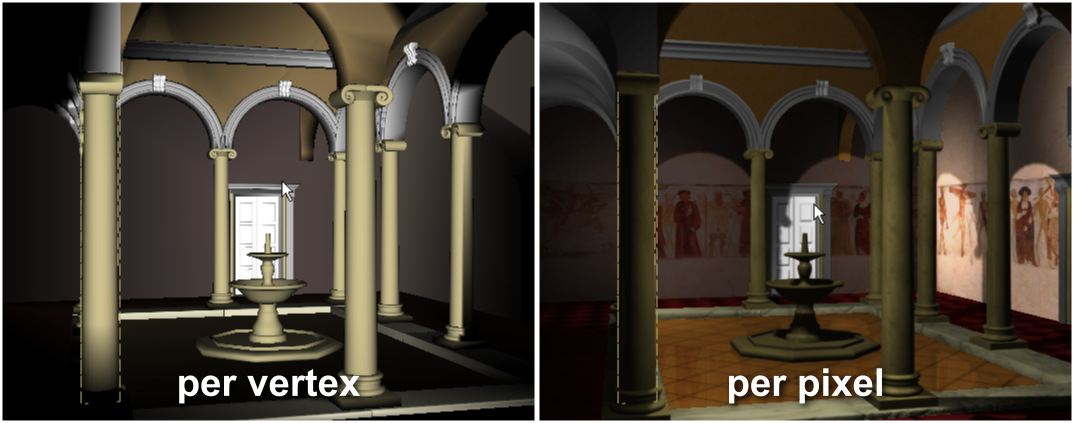
In previous versions of Fusion, lighting in the OpenGL display views was calculated for each vertex of the geometry. This was fast, but could produce results that were blocky, and significantly different from the results produced by the software renderer. Fusion 5.1's 3D display views now default to the 'per-pixel' lighting model, which provides a more accurate approximation of the lighting in the scene. One of the major advantages to per-pixel lighting is that it is capable of showing the actual lighting cast by projections correctly, where the per-vertex model will show only white light. Per-pixel lighting also shows a more accurate depiction of the falloff from spotlights in the scene.
To switch from the default per-vertex back to the slightly faster per-pixel lighting model, right-click in the 3D Display View and select 'Lighting Calculations/Per-Vertex' from the context menu that appears.
Scale to Fit
It is now possible to use the CTRL-F keyboard shortcut in the 3D display view to scale the view to fit the current scene.
Default Lighting
The 3D Display View now uses a default directional light when no lights are present in the scene.


