Eyeon:Manual/Fusion 6/Camera Shake
From VFXPedia
[ Main Manual Page ]
Contents |
Controls Tab
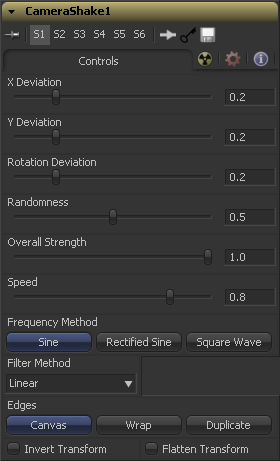
These controls determine the amount of shake that is applied to the image along the horizontal (X) and vertical (Y) axis. Values between 0.0 and 1.0 are permitted. A value of 1.0 generates shake positions anywhere within the boundaries of the image.
This determines the amount of shake that is applied to the rotational axis. Values between 0.0 and 1.0 are permitted.
Higher values in this control cause the movement of the shake to be more irregular or random. Smaller values cause the movement to be more predictable.
This adjusts the general amplitude of all the parameters and blends that affect in and out. A value of 1.0 applies the effect as described by the remainder of the controls.
Speed controls the frequency, or rate, of the shake.
This selects the overall shape of the shake. Available frequencies are Sine, Rectified Sine and Square Wave. A Square Wave will generate a much more mechanical looking motion than a Sine.
This determines how the Edges of the image are treated.
This causes the edges that are revealed by the shake to be black.
This causes the edges to wrap around (the top is wrapped to the bottom, the left is wrapped to the right, etc.).
This causes the Edges to be duplicated causing a slight smearing effect at the edges.
Select this control to Invert any position, rotation or scaling transformation. This option might be useful to exactly removing the motion produced in an upstream Camera Shake.
The Flatten Transform option prevents this tool from concatenating its transformation with adjacent tools. The tool may still concatenate transforms from its input but it will not concatenate its transformation with the tool at its output. See the Transformations chapter earlier in this manual for details on concatenated transformation.
Filter Modes
This skips or duplicates pixels as needed. This produces the fastest but crudest results.
This is a simple interpolation resize of the image.
This uses a simplistic filter, which produces relatively clean and fast results.
This filter produces a nominal result. It offers a good compromise between speed and quality.
This produces better results with continuous tone images but is slower than Bi-Cubic. If the images have fine detail in them, the results may be blurrier than desired.
This produces good results with continuous tone images which are resized down. Produces sharp results with finely detailed images.
This is very similar in speed and quality to Bi-Cubic.
This is similar to Catmull-Rom but produces better results with finely detailed images. It is slower than Catmull-Rom.
This is very similar to Mitchell and Catmull-Rom but is a little cleaner and also slower.
This is an advanced filter that produces very sharp, detailed results, however, it may produce visible `ringing' in some situations.
This is similar to the Sinc filter but may be slightly faster.
Some filters, such as Sinc and Bessel, require an infinite number of pixels to calculate exactly. To speed up this operation, a windowing function is used to approximate the filter and limit the number of pixels required. This control appears when a filter that requires windowing is selected.
This is a simple tapered window.
Hamming is a slightly tweaked version of Hanning.
A window with a more sharply tapered falloff.
A more complex window, with results between Hamming and Blackman.
Most of these filters are useful only when making an image larger. When shrinking images, it is common to use the Bi-Linear filter, however, the Catmull-Rom filter will apply some sharpening to the results and may be useful for preserving detail when scaling down an image.
Example
Tips for Camera Shake (edit)
Shaky Text with Camera Shake
Below is a simple example of how to achieve the `shaky text' effect using the Camera Shake tool.
- Start a new composition and add a Text+ tool with medium size text.
- Connect the output of the Text tool to the input of a Camera Shake tool (located in the main Tools>Transform menu).
- Display the tool in one of the views and expand the Camera Shake tool's controls.
- The default settings are quite good as a starting point, so leave the controls alone for now.
- Set the Current Frame to frame 0.
- Animate the Overall Strength slider by right-clicking on the control and selecting the Animate option.
- Set the Overall Strength value to 0.0.
- Advance to frame 9 and set the Overall Strength value to 0.75.
- Advance to frame 49 and set a key frame for the Overall Strength to 0.75.
- Advance to frame 59 and set the Overall Strength value to 0.0.
- Open the Camera Shake tool's common controls Tab by clicking on the nuclear symbol in the controls.
- Enable the tool's Directional Blur by checking (clicking on) the Directional Blur checkbox.
- Set the Directional Blur Quality value to 5 for smoother results.
- Set the Render Range to start at 0 and end at 59.
- Create a Flipbook preview (note the size available according to available memory).
- Remember that all of the nice details will only show up when the Hi-Q Preview option is enabled. Experimenting with the various parameters will produce different results. Increasing the Randomness and Deviation values can create some pretty violent results.
See also the Shake Modifier
| The contents of this page are copyright by eyeon Software. |


