Eyeon:Manual/Fusion 6/Trails
From VFXPedia
[ Main Manual Page ]
Contents |
This tool is unique within Fusion, in that it makes use of an image buffer to create a feedback loop. This feedback loop takes the output of the trails tool from the previous frame and performs a merge of the current frame over top of it. The various controls of the trails tool are used to modify this frame prior to the merge.
An image buffer is used to store this image until the next frame. This helps to avoid several issues, including the need to re-render the frames multiple times, such as the time stretcher or directional blur effects. The interactive and rendering speed of the tool is, therefore, greatly increased.
It is often necessary to clear the buffer, as changes made interactively in previous frames will remain in the buffer. This tool is not well suited to jumping frames in large increments, which is often done interactively. Each frame will tend to stick in the buffer. When this occurs, simply click the Restart button in order to clear the view.
Once the Trails tool is configured, it may be useful to pass through the effect of this tool until it is time to render a preview or final version.
Due to the way the trails tool operates, this tool cannot be network rendered.
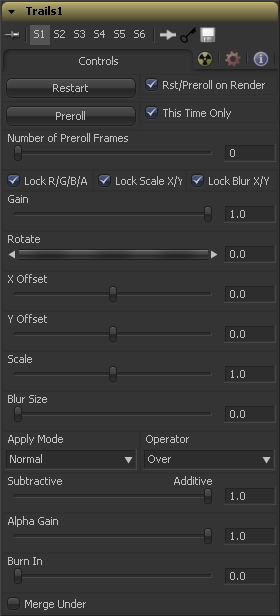
Controls
This control clears the image buffer and displays a clean frame, without any of the ghosting effect.
This will make the trails tool pre-render the effect by the number of frames on the slider.
When this checkbox is enabled, the trails tool will reset itself when a preview or final render is initiated. It will Preroll the designated number of frames.
Selecting this checkbox will make the pre-roll use this current frame only, and not the previous frames.
This determines the number of frames to Preroll.
When selected, this checkbox allow the Gain of the color channels to be controlled independently. This allows for tinting of the trails effect.
When selected, this checkbox allows the X and Y axis scaling of the image buffer to be manipulated separately for each axis.
When selected, this checkbox allows the blurring of the image buffer to be controlled separately for each axis.
The Gain control affects the overall intensity and brightness of the image in the buffer. Lower values in this parameter will create a much shorter, fainter trail, whereas higher values will create a longer, more solid trail.
The Rotate control rotates the image in the buffer before the current frame is merged into the effect.
These controls offset the image in the buffer before the current frame is merged into the effect. Control is given over each axis independently.
The Scale control resizes the image in the buffer before the current frame is merged into the effect.
The Blur Size control applies a blur to the image in the buffer before the current frame is merged into the effect.
This menu is used to determine the method used by the trails tool when merging one sample over another. The methods in this menu are documented more completely in the Merge tool's documentation in the Composite Tools chapter of this manual.
This menu is used to select the operation mode of the merge. Changing the Operation Mode changes how the foreground and background are combined to produce a result. The menu will only be visible when the merge tool's Apply mode is set to Normal.
Versions earlier than Fusion5 would always use the Over operation.
For an excellent description of the math underlying the operation modes, read Compositing Digital Images, Porter, T., and T. Duff, SIGGRAPH 84 proceedings, pages 253-259. Essentially, the math is as described below. Note that some modes not listed in the Operator dropdown (under, in, held in, below) are easily obtained by swapping the foreground and background inputs (with Ctrl+W) and choosing a corresponding mode.
The formula used to combine pixels in the merge is always fg * x + bg * y. The different operations determine exactly what x and y are, as shown in the description for each mode.
- Over
- The Over mode adds the FG layer to the BG layer by replacing the pixels in the BG with the pixels from the Z wherever the FG's alpha channel is greater than 1.
- x = 1, y = 1-[foreground alpha]
- In
- The In mode multiplies the alpha channel of the BG input against the pixels in the FG. The color channels of the FG input are ignored. Only pixels from the FG are seen in the final output. This essentially clips the FG using the mask from the BG.
- x = [background alpha], y = 0
- Held Out
- Held Out is essentially the opposite of the In operation. The pixels in the FG image are multiplied against the inverted alpha channel of the BG image. Accomplish exactly the same result using the In operation and a Matte Control tool to invert the matte channel of the BG image.
- x = 1-[background alpha], y = 0
- ATop
- ATop places the FG over the BG only where the BG has a matte.
- x = [background alpha], y = 1-[foreground alpha]
- XOr
- XOr combines the FG with the BG wherever either the FG or the BG have a matte, but never where both have a matte.
- x = 1-[background alpha], y = 1-[foreground alpha]
For details on these controls and their effect, consult the documentation for the Merge tool in the Composite Tools chapter.
This merges the current image under the generated trail, rather than the usual, over top operation.
Tips for Trails (edit)
EyeonTips:Manual/Fusion 6/Trails
| The contents of this page are copyright by eyeon Software. |

