Eyeon:Manual/Fusion 6/VolumeFog
From VFXPedia
[ Main Manual Page ]
- Position Pass Concept
- Volume Fog
- Volume Mask
- Z to World
The Volume Fog tool is used to create sophisticated volumetric fog on images containing XYZ Position channels.
As opposed to 3D-rendered volumetric Fog it works on 2D images and delivers much faster results and interactive feedback when setting up the fog.
See the Position Pass Concepts page for further explanation on how this technology works and to learn about the required imagery.
External Inputs
The following inputs appear on the tool's tile in the Flow Editor.
- VolumeFog.Image
- [ orange, required ] This input expects an image containing a World Position Pass in the XYZ Position Channels.
- VolumeFog.FogImage
- [ green, optional ] For creating volumetric fog with varying depth and extent, an image sequence can be connected here.
- VolumeFog.EffectMask
- [ blue, optional ] The standard Effect Mask input as found on other Fusion tools.
- VolumeFog.SceneInput
- [ pink, optional ] This input expects a 3D scene containing a 3D Camera.
Shape Tab
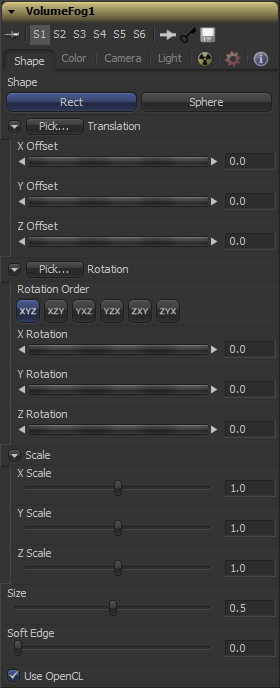
Toggle between a basic spherical or rectangular volume to be placed in your image. These Volumes can then be further refined by means of the MaskImage or MaskImage sequence.
Left-Click and hold on this button allows dragging to pick XYZ-Coordinates from any 3D Scene or 2D image containing XYZ values, such as a rendered worldpass, to position the center of the Volume object. When picking from a 2D image, make sure it's rendered in 32bit float to get full precision.
These controls can be used to position the center of the fog volume manually or can be animated or connected to other controls in Fusion.
Left-Click and hold on this button allows to pick rotational values from any 3D Scene or 2D image containing those values like a XYZ-Normal-Pass to re-orient the volume. When picking from a 2D image like an XYZ-Normal-pass, make sure it's rendered in 32bit float to get full precision and accurate rotational values.
Use these controls to rotate the Volume around its center.
Scale the Volume in any direction from its center to further refine the overall Size value specified below.
The overall size of the volume created.
Controls how much the Volume is faded towards the center from its perimeter to achieve a softer look.
Introduced with Fusion's OpenCL Supercomputing this option renders the effect on the GPU rather than on the CPU. Depending on the graphics card used in the computer this can boost the speed of the tool by a factor of 30 and more.
Color Tab
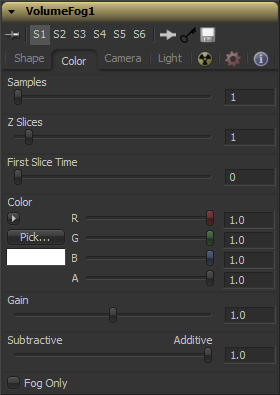
Determines how many times a "ray" shot into the volume will be evaluated before the final image is created. Not unlike raytracing, higher values lead to more detail inside the volume but also increase render times.
The higher this value the more images from the connected MaskImage sequence will be used to form the depth of the Volume. You can e.g. use a FastNoise with a high Seethe Rate to create such a sequence of images. Be careful with the resolution of the images though. Higher resolutions can require a large amount of memory. As a rule of thumb, a resolution of 256 x 256 pixels with 256 Z Slices (i.e. forming a 256 x 256 x 256 cubic volume, which will use up to 256MB for full colour 32bit float data) should give you a good starting point.
Determines which frame of the Global Range is used to deliver the first slice from the connected MaskImage sequence. Make sure that that both GlobalIn and GlobalOut as well as the valid range of your source tool fall within the range of FirstSliceTime + Z Slices.
Allows you to modify the color of the Fog generated. This will multiply over any color provided by the connected MaskImage.
Increases or decreases intensity of the Fog created. More Gain will lead to a stronger Glow and less transparency in the Fog. Lower values let the fog appear less dense.
Similar to the Merge tool this value controls if the Fog is composed onto the image in additive or subtractive mode, leading to brighter or dimmer appearance of the fog.
Outputs the generated fog on a black background which then can be composited manually, or used as a mask on a Color Corrector for further refinement.
Camera Tab
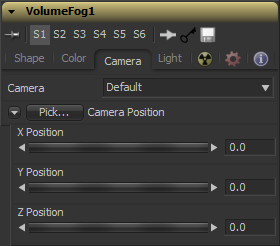
For a perfect evaluation of a Volume, a Camera or 3D Scene can be connected to the Scene input of the tool.
If multiple Cameras are available in the connected Scene Input, this dropdown allows to choose the correct Camera needed to evaluate the Volume. Instead of connecting a Camera, position values can be provided manually or by connecting the XYZ values to other controls.
Left-Click and hold on this button allows to pick XYZ-Coordinates from any 3D Scene or 2D image containing XYZ values like a rendered worldpass to define the center of the Camera. When picking from a 2D image, make sure it's rendered in 32bit float to get full precision.
These controls can be used to define the center of the Camera manually or can be animated or connected to other controls in Fusion.
Light Tab
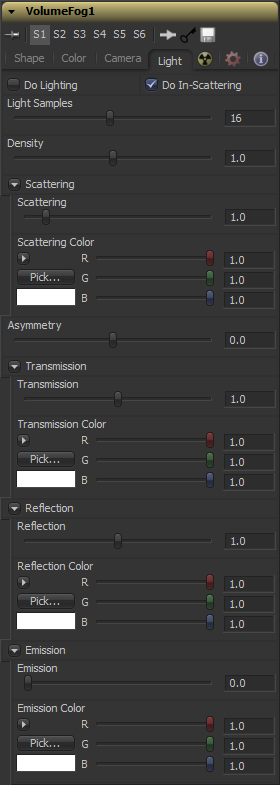
To utilize this feature you need to have actual lights in your 3DScene. Connect that scene, including Camera and Lights, to the 3D input of the tool
Enables or disables lighting calculations. Keep in mind that when not using OpenCL, i.e. rendering on the CPU, these calculations may become a bit slow.
Enables or disables light scattering calculations. The volume will still be lit according to the state of the Do Lighting checkbox, but scattering will not be performed.
Determines how accurate the lighting is calculated. Higher values mean more accurate calculation at the expense of higher render times.
This is similar to Scattering in that it makes the fog to appear thicker. With a high amount of scattering though, the light will be scattered out of the volume before it has had much chance to travel through the fog, meaning it won’t pick up the transmission colour a lot. With a high density instead, the fog still appears thicker, but the light gets a chance to be transmitted, thus picking up the transmission colour before it gets scattered out. Scattering is affected by the light direction when Asymmetry is not 0.0. Density is not affected by light direction at all.
Determines how much of the light bouncing around in the volume ends up scattering the light out of the fog. If the light scatters more, or more accurately, then there’s a higher probability of the light being scattered out of the volume, hence less light is left to continue on through the fog. This option can make the fog seem denser.
Determines in what direction the light is scattered. A value of 0 produces uniform – or isotropic – scattering, meaning all directions have equal probability. A value greater than 0, causes “forward scattering”, meaning the light is scattered more into the direction of the light rays. This is similar to what happens with water droplets in clouds. A value smaller than 0 produces “back scattering”, where the light is more scattered back towards the original light source.
Defines the colour that is transmitted through the fog. Light that doesn’t get scattered out, will tend towards this colour. It is a multiplier though, so if you have red light, but blue transmission, you won’t see any blue.
Changes the intensity of the light that is scattered out. It can be used to modify the overall color before Emission is added. This will be combined with the color channels of the volume texture, and then used to scale the values. The color options and the color channels of the volume texture are multiplied together, so if the volume texture was red, setting the Reflection color options to blue would not make the result blue. In such a case they will multiply together to produce black
This adds a bit of “glowing” to the fog, or adding energy/light back into the calculation. In fact, if there are no lights in the scene, and the fog emission is set to be 1.0, the results are similar to no lighting, like turning off the ‘Do Lighting’ option. Glowing can also be done while producing a different kind of look, by having a ‘Transmission’ greater than 1. This however would never actually happen in the real world.
Tips for VolumeFog (edit)
| The contents of this page are copyright by eyeon Software. |


