Eyeon:Manual/Fusion 6/Day Sky
From VFXPedia
[ Main Manual Page ]
- Background
- Day Sky
- Fast Noise
- Mandelbrot
- Plasma
- TextPlus
Contents |
Controls Tab
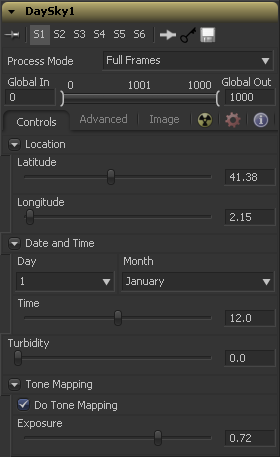
Use these sliders to specify the Latitude and Longitude used to create the Day Sky simulation.
Use these controls to specify the Day, Month and Time for the DaySky simulation.
Turbidity causes light to be scattered and absorbed rather than transmitted in straight lines through the simulation. Increasing the turbidity will give the sky simulation a murky feeling, as if smoke or atmospheric haze were present.
Deselect this checkbox to disable any tone mapping applied to the simulation. Since the simulation is calculated in 32 bit floating point color space, it generates color values well above 1.0 and well below 0.0. Tone Mapping is a process that takes the full dynamic range of the resulting simulation and compresses the data into the desired exposure range while attempting to preserve as much detail from the highlights and shadows as possible.
Generally this option should only be deselected if the resulting image will later be color corrected as part of a floating point color pipeline.
Use this control to select the exposure used for Tone Mapping.
Advanced Tab
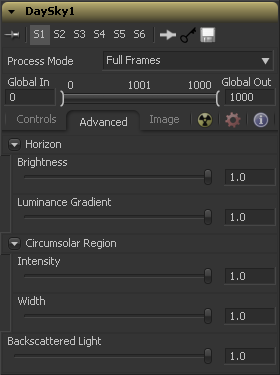
Use this control to adjust the brightness of the horizon relative to the sky.
Use this control to adjust the width of the gradient seperating the horizon from the sky.
Use this control to adjust the intensity or brightness of the sky nearest to the sun.
Use this control to adjust the width or size of the area in the sky affected by the sun.
Use this control to increase or decrease the amount of backscatter light in the simulation.
Image Tab
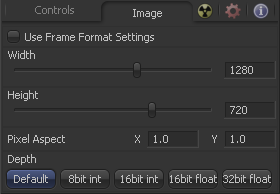
The controls in this tab are used to set the resolution, color depth and pixel aspect of the image produced by the tool.
Use this menu control to select the fields processing mode used by Fusion to render changes to the image. The default option is determined by the Has Fields checkbox control in the Frame Format Preferences. For more information on fields processing, consult the Frame Formats chapter.
Use this control to specify the position of this tool within the project. Use Global In to specify on which frame that the clip starts and Global Out to specify on which frame this clip ends (inclusive) within the project's Global Range.
The tool will not produce an image on frames outside of this range.
When this checkbox is selected, the width, height and pixel aspect of the image created by the tool will be locked to values defined in the composition's Frame Format preferences. If the Frame Format preferences change, the resolution of the image produced by the tool will change to match. Disabling this option can be useful to build a composition at a different resolution than the eventual target resolution for the final render.
This pair of controls is used to set the Width and Height dimensions of the image to be created by the tool.
This controls is used to specify the Pixel Aspect ratio of the created images. An aspect ratio of 1:1 would generate a square pixel with the same dimensions on either side (like a computer display monitor) and an aspect of 0.9:1 would create a slightly rectangular pixel (like an NTSC monitor).
The Depth button array is used to set the pixel color depth of the image created by the creator tool. 32bit pixels require 4 times the memory of 8bit pixels, but have far greater color accuracy. Float pixels allow high dynamic range values outside the normal 0..1 range, for representing colours that are brighter than white or darker than black. See the Frame Format chapter for more details.
Tips for Day Sky (edit)
EyeonTips:Manual/Fusion 6/Day Sky
| The contents of this page are copyright by eyeon Software. |


