Eyeon:Manual/Display View/Look Up Tables (LUTS)
From VFXPedia
Contents |
Look Up Tables (LUT)
Look Up Tables (LUT) are used to help match the appearance of a view to its eventual output medium. It is essentially a color modification tool that affects only the view, not the image data used for image processing.
In Fusion, different display views can have different LUT values, ensuring that what is seen is what will be output.
Opening The LUT Editor
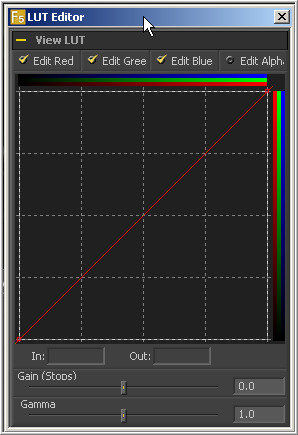
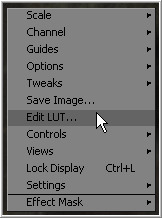
To access the Look Up Table editor, select LUT>Edit LUT from the view's context menu.
The views are the primary area where color correction is assessed. It is, therefore, crucial that the view is an accurate representation of what the footage will look like when it is back on film.
As with the Color Curves tool, the LUT editor uses spline-based color correction. The splines in this editor can be manipulated and shaped like other splines in Fusion.
Since the purpose of the display LUT is to provide an unchanging correction for the monitor or the file's color space, however, these splines cannot be animated.
In addition to the ability to modify the separate color channels, the LUT has Gain and Gamma sliders. The Gain slider is helpful for temporarily brightening or darkening the viewed image, allowing easier examination of shadow or highlight detail. The Gamma and Alpha Gamma sliders are used to duplicate the gamma values of the eventual output device. Video monitors, for example, commonly have a gamma of 1.7, while computer monitors can range anywhere from 1.6 to 2.2. Alpha Gamma is only applied when viewing the alpha channel of an image, or when viewing masks.
Managing LUTs
There are a variety of ways to create and use different display LUTs in Fusion.
Display Settings
Choosing Settings>Save New from the display view's context menu will save all the view's settings, including all LUT curves and gain/gamma values. You can save these under different names, and each set of settings can be reloaded at any time by choosing Settings>name. Save Default will make these settings the standard for all new comps.
LUT curves
The display LUT edit window can be used to import and export LUT curves for reuse. Right-click on the LUT curve editor and choose Export LUT to get a file browser. Currently it is possible to export the LUT curves as either ASCII or Saved format. The ASCII (.alut) file format is useful for sharing LUT curves with other software, whereas the Saved (.lut) file format is preferred for Fusion, as it is more compact, accurate, and allows further editing. For details on the ASCII LUT file format, see the ASCII Import Appendix.
The Import LUT option will load these files (and other formats) back into the curve editor, or alternatively, if the file has been saved in Fusion's LUTs: folder (as specified in Prefs>Global>Paths>LUTS:), it will appear in the LUT file menu list, as described below. LUTs can be exported and imported in this way between views, or to & from the Color Curves tool or any other LUT editor in Fusion.
LUT files
Any supported LUT files in the LUTs: folder can be used by choosing it from the display view toolbar's LUT popup, or the view's LUT context submenu. This includes 1D and 3D LUTs such as Fusion's .lut, .alut and .alut3 formats, as well as .shlut, .look, .3dl and .itx formats. This is a convenient way to access standard-format LUT files for different projects.
Settings & Macros
Fusion can also use any tool, macro or group of tools as a view LUT, by selecting the tool(s), right-clicking on them and choosing Save Settings. A file browser will appear, and a .setting file describing the tools can be saved in the LUTs: folder. This is the most flexible approach, as it allows almost any combination of tools to be used as a display LUT, but is also the slowest. This is because the LUT tools must be rendered solely on the CPU, whereas the other methods are GPU-accelerated when using modern graphics cards.
LUT Preferences
The View Preferences can be used to manage saved display view settings, as well as specifying color and depth defaults for each display view. See the Preferences appendix later in this manual for details.


