Eyeon:Manual/Tool Reference/3D/Shape 3D
From VFXPedia
Contents |
Shape 3D Controls Tab
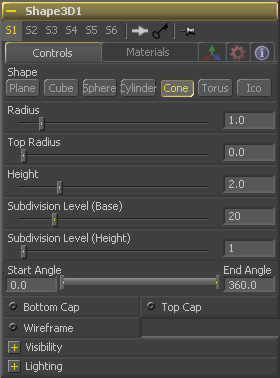
Select one of these options to determine which geometry primitive will be produced by the Shape 3D tool. The controls below will change to match the selected shape.
(Plane, Cube) If this checkbox is selected, the Width, Height and Depth controls are locked together as a single Size slider. Otherwise, individual control over the size of the shape along each axis is provided.
(Plane, Cube) Used to control the size of the shape.
(Cube) Uses cube mapping to apply the Shape tool's texture (a 2D image connected to the texture input).
(Sphere, Cylinder, Cone, Torus) Sets the radius of the selected shape.
(Cone) This control is used to define a radius for the top of a Cone, making it possible to create truncated cones.
(Sphere, Cylinder, Cone, Torus) This range control determines how much of the sweep of the shape is drawn. A start angle of 180 and end angle of 360 would only draw half of the shape.
(Sphere, Torus) This range control determines is used to slice the object by defining a latitudinal sub-section of the object.
(Cylinder, Cone) Used for Cylinder and Cone shapes only, the Bottom Cap and Top Cap checkboxes are used to determine if the end caps of these shapes are created or if the shape is left open.
(Torus) Used for Torus only, Section controls the thickness of the tube making up the torus.
(All Shapes) Used for all shapes, the Subdivision controls are used to determine the tesselation of the mesh composing the object. The higher the subdivision, the more vertices each shape will have.
(All Shapes) Used for all Shapes, enable the Wireframe checkbox to render only the wireframe of the shape's mesh.
Visibility Options
If the visibility checkbox is not selected, the object will not visible in the display views, nor will it be rendered into the output image by the Renderer 3D tool. A non-visible object does not cast shadows.
If the Unseen by Cameras checkbox is selected, the object will be visible in the display views (unless the Visible checkbox is turned off), except when viewed through a camera. The object will not be rendered into the output image by the Renderer 3D tool. Shadows cast by an Unseen object will still be visible when rendered by the software renderer, though not by the OpenGL renderer.
Use these options to cull (eliminate) rendering and display of certain polygons in the geometry. If Cull Back Face is selected, all polygons facing away from the camera not be rendered, and will not cast shadows. If Cull Front Face is selected, all polygons facing towards the camera will likewise be dropped. Selecting both checkboxes has the same effect as deselecting the Visible checkbox.
Lighting Options
If this checkbox is not selected, lights in the scene will not affect the object, it will not receive nor cast shadows, and it will be shown at the full brightness of its colour, texture or material.
If this checkbox is not enabled, the object will not cast shadows on other objects in the scene.
If this checkbox is not enabled, the object will not receive shadows cast by other objects in the scene.
Materials Tab
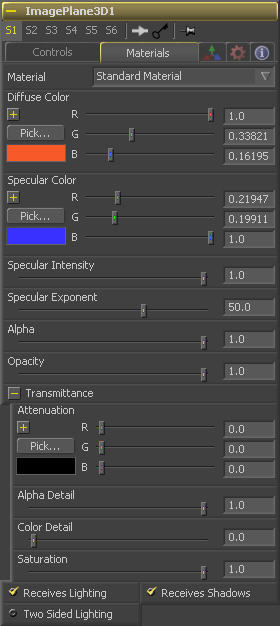
This menu is reserved for future use. At the time of writing the Material drop down box contains only a Standard Material. Additional materials are being added in Fusion 6.
Diffuse Color is the basic color of an object when lit indirectly, without specularity (highlights).
Specular Color determines the color of light that reflects from a shiny surface. The more specular a material is, the glossier it appears. Surfaces like plastics and glass tend to have white specular highlights, whereas metallic surfaces like gold have specular highlights that tend to inherit their color from the material color.
Specular Intensity controls how hot or large the specular highlight is.
Specular Exponent controls the falloff of the specular highlight. The smaller the value, the sharper the falloff, and the smoother & glossier the material appears.
This slider sets the material's Alpha channel value. This affects diffuse and specular colors equally, and affects the alpha value of the material in the rendered output.
Reducing the material's Opacity will decrease the color and alpha values of the specular and diffuse colors equally, making the material transparent and allowing hidden objects to be seen through the material.
Transmittance controls the way light passes through a material. For example, a solid blue pitcher will cast a black shadow, but one made of translucent blue plastic would cast a much lower density blue shadow.
There is a separate opacity option. Opacity determines how transparent the actual surface is when it is rendered. Fusion allows for adjusting both opacity and transmittance separately. This might be a bit counter-intuitive to artists who are unfamiliar with 3D software at first. It is possible to have a surface that is fully opaque but transmits 100% of the light arriving upon it (so, in a sense, it is actually a luminous/emissive surface).
When the Alpha Detail slider is set to 0, the alpha channel of the object is ignored and the entire object casts a shadow. If it is set to 1, the alpha channel detemines what portions of the object cast a shadow.
The Color Detail slider modulates light passing through the surface by the diffuse color + texture colors. Use this to throw a shadow that contains color details of the texture applied to the object. Increasing the slider from 0 to 1 brings in more of diffuse color + texture color into the shadow. Note that the alpha and opacity of the object is ignored when transmitting color, allowing an object with a solid alpha to still transmit its color to the shadow.
Transmission Color determines how much color is passed through the object. For an object to have transmissive shadows, set the transmittance color to (1, 1, 1), which means 100% of green, blue, red light pass through the object. Setting this color to RGB (1, 0, 0) means that the material will transmit 100% of the red arriving at the surface but none of the green or blue light. This allows for 'stained glass' shadows.
The Saturation slider controls the saturation of the color component transmitted to the shadow. Setting this to 0.0 will result in monochrome shadows.
These checkboxes control whether the material is affected by lighting and shadows in the scene. If turned off, the object will always be fully lit and/or unshadowed.
This makes the surface effectively two-sided by adding a second set of normals facing the opposite direction on the back side of the surface. This is normally off, to increase rendering speed, but can be turned on for 2D surfaces or for objects that are not fully enclosed, to allow the reverse or interior surfaces to be visible as well.
Normally, in a 3D application only the front face of a surface is visible and the back face is culled, so that if a camera were to revolve around a plane in a 3D application when it reached the backside, the plane would become invisible. Making a plane two sided in a 3D application is equivalent to adding another plane ontop of the first but rotated by 180 degrees so the normals are facing the opposite direction on the backside. Thus, when you revolve around the back, you see the second image plane which has its normals facing the opposite way.
Fusion does exactly the same thing as 3D applications when you make a surface two sided. The confusion about what two-sided does arises because Fusion does not cull backfacing polygons by default. If you revolve around a one-sided plane in Fusion you will still see it from the backside (but you are seeing the frontside bits duplicated through to the backside as if it were transparent). Making the plane two sided effectively adds a second set of normals to the backside of the plane.
Note this can become rather confusing once you make the surface transparent, as the same rules still apply and produce a result which is counterintuitive. If you view from the frontside a transparent two-sided surface illuminated from the backside, it will look unlit.
In Fusion 5.1 and earlier this control was called "Two Sided Lighting" but this confused users so the name was changed.
3D Transformation Tab
On Screen : Transformation Widget
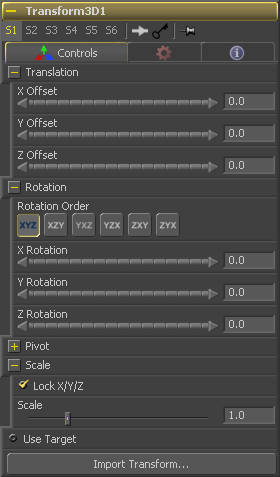
Most of the controls in this tab are represented in the display view by a Transformation Widget with modes for transformation, rotation and scaling. To change the mode of the widget, select one of the three buttons in the toolbar along the side of the view, or press the `q' key for translation mode, `w' for rotation and `e' for scaling. In all three modes, individual axes of the control may be dragged to affect just that axis, or the center of the control may be dragged to affect all three axes. Note: In order to scale in a single dimension, the Lock X/Y/Z Scale checkbox must be unchecked.
These controls can be used to position the 3D element.
Use these buttons to select which order is used to apply the Rotation along each axis of the object. For example, XYZ would apply the rotation to the X axis first, followed by the Y axis and then followed by the Z axis.
Use these control to rotate the object around its pivot point. If the Use Target checkbox is selected then the rotation is relative to the position of the target, otherwise the global axis is used.
A Pivot point is the point around which an object rotates. Normally, an object will rotate around its own center, which is considered to be a pivot of 0,0,0. These controls can be used to offset the pivot from the center.
If the Lock X/Y/Z checkbox is checked, a single Scale slider will be shown. This adjusts the overall size of the object. If the Lock checkbox is unchecked, individual X, Y and Z sliders will be displayed to allow scaling in any dimension. Note: If the Lock checkbox is checked, scaling of individual dimensions is not possible, even when dragging specific axes of the Transformation Widget in scale mode.
Selecting the Use Target checkbox enables a set of controls for positioning an XYZ target. When target is enabled, the object will always rotate to face the target. The rotation of the object becomes relative to the target.
| The contents of this page are copyright by eyeon Software. |


