Eyeon:Manual/Fusion 6/Ultra Keyer
From VFXPedia
[ Main Manual Page ]
Contents |
Pre Matte Tab
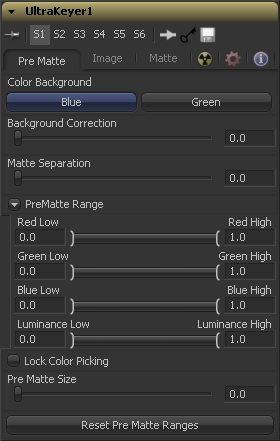
The Ultra Keyer is optimized for the removal of blue or green backgrounds. Select the color that matches the image's background using these buttons.
Depending on the Background Color selected above the Keyer will iteratively merge the pre-keyed image over either a blue or green background before processing it further. In certain cases this leads to better, more subtle edges.
Matte Seperation performs a pre-process on the image to help separate the foreground from the background before color selection. Generally, increase this control while viewing the alpha to eliminate the bulk of the background, but stop just before it starts cutting holes in the subject or eroding fine detail on the edges of the matte.
These range controls update automatically to represent the current color selection. Generally, the reveal control does not have to be opened to display these controls.
Colors are selected by selecting the Ultra Keyer tool's tile in the flow and click-dragging in the display view to select the colors to be used to create the matte. These range controls can be used to tweak the selection slightly, although generally selecting colors in the displays is all that is required.
When this checkbox is selected, Fusion will prevent accidental growing of the selected range by selecting more colors from the view. It is a good idea to select this checkbox once the color selection is made for the matte. All other controls in the tool remain editable.
The Pre Matte Size control can be used to soften the general area around the keyed image. This is used to close holes in the matte often caused by spill in semi-transparent areas of the subject. This generally will also cause a small halo around the subject, which can be removed using the matte contract tools found later in the tool.
This discards all color selection by resetting the ranges but maintains all other slider and control values.
Image Tab
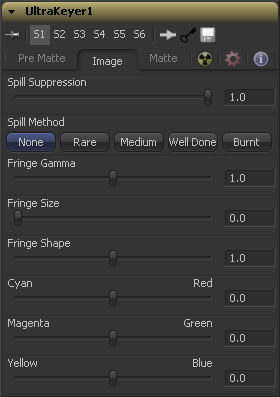
Spill is generally caused by the transmission of the color of the background through the semitransparent areas of the alpha channel. In the case of blue or green screen keying, this usually causes the color of the background to become apparent in the fringe of the foreground element.
Spill suppression attempts to remove color from the fringe. The process used is optimized for either Blue or Green screens, and you select which color is used as the base from the control above.
When this slider is set to 0, no spill suppression is applied to the image.
This selects the strength of the algorithm used to apply spill suppression to the image.
None is selected when no spill suppression is required.
This removes very little of the spill color, the lightest of all methods.
This works best for green screens.
This medium works best for blue screens
This works best for blue. Use this mode only for very troublesome shots.
This control can be used to adjust the brightness of the fringe or halo that surrounds the keyed image.
This expands and contracts the size of the fringe or halo surrounding the keyed image.
Fringe Shape forces the fringe to be pressed toward the external edge of the image or pulled toward the inner edge of the fringe. Its effect is most noticeable while the Fringe Size sliders value is large.
Use these three controls to color correct the fringe of the image. This is useful for correcting semi-transparent pixels that still contain color from the original background to match the new background.
Matte Tab
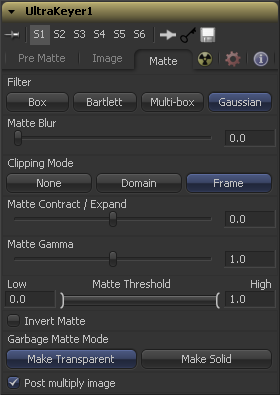
Selection of the Filter that is used when blurring the matte.
This option applies a Box Blur effect to the whole image. This method is faster than the Gaussian blur but produces a lower quality result.
Bartlett applies a more subtle, anti-aliased blur filter.
Multi-Box uses a box filter layered in multiple passes to approximate a Gaussian shape. With a moderate number of passes (e.g. 4), a high quality blur can be obtained, often faster than the Gaussian filter, and without any ringing.
Gaussian applies a smooth, symmetrical blur filter, using a sophisticated constant-time Gaussian approximation algorithm. In extreme cases, this algorithm may exhibit ringing; see below for a discussion of this. This mode is the default filter method.
Matte Blur blurs the edge of the matte using a standard constant speed gaussian blur. A value of zero results in a sharp, cutout-like hard edge. The higher the value, the more blur applied to the matte.
This slider shrinks or grows the semi-transparent areas of the matte. Values above 0.0 expand the matte while values below 0.0 contract it.
This control is usually used in conjuction with the Matte Blur to take the hard edge of a matte and reduce fringing. Since this control only affects semi-transparent areas, it will have no affect on a hard edge's matte.
Matte Gamma raises or lowers the values of the matte in the semi-transparent areas. Higher values cause the gray areas to become more opaque and lower values cause the gray areas to become more transparent. Completely black or white regions of the matte remain unaffected.
Since this control only affects semi-transparent areas it will have no affect on a hard edge's matte.
Any value below the lower threshold becomes black or transparent in the matte. Any value above the upper threshold becomes white or opaque in the matte. All values within the range maintain their relative transparency values.
This control is often used to reject salt and pepper noise in the matte.
When this checkbox is selected, the alpha channel created by the keyer is inverted, causing all transparent areas to be opaque and all opaque areas to be transparent.
Garbage mattes are mask tools or images connected to the Garbage Matte input on the tool's tile. The garbage matte is applied directly to the alpha channel of the image. Generally, garbage mattes are used to remove unwanted elements that cannot be keyed, such as microphones and booms. They are also used to fill in areas that contain the color being keyed, but that the artist wishes to maintain.
Garbage mattes of different modes cannot be mixed within a single tool. A matte control tool is often used after a keyer tool to add a garbage matte with the opposite effect of the matte applied to the keyer.
Select this button to make the Garbage Matte transparent.
Select this button to make the Garbage Matte solid.
Select this option to cause the keyer to multiply the color channels of the image against the alpha channel it creates for the image. This option is usually enabled, and is on by default.
Deselect this checkbox and the image can no longer be considered pre-multiplied for purposes of merging it with other images. Use the Subtractive option of the Merge tool instead of the Additive option.
For more information, see the Merge tools documentation.
Tips for Ultra Keyer (edit)
EyeonTips:Manual/Fusion 6/Ultra Keyer
| The contents of this page are copyright by eyeon Software. |


