Eyeon:Manual/Fusion 6/Fast Noise
From VFXPedia
[ Main Manual Page ]
- Background
- Day Sky
- Fast Noise
- Mandelbrot
- Plasma
- TextPlus
Contents |
Noise Tab
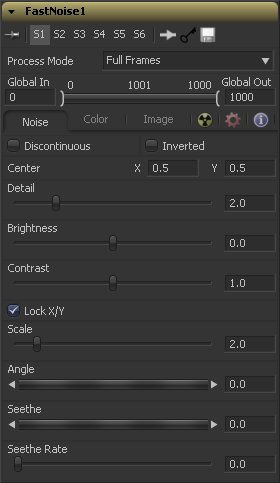
Normally the noise function interpolates between values to create a smooth continuous gradient of results. Enable this checkbox to create hard discontinuity lines along some of the noise contours. The result will be a dramatically different effect.
Select this checkbox to invert the noise, creating a negative image of the original pattern. This is most effective when Discontinuous is also enabled.
Use the center coordinate control to pan & move the noise pattern.
Increase the value of this slider to produce a greater level of detail in the noise result. Larger values add more layers of increasingly detailed noise without affecting the overall pattern. High values take longer to render but can produce a more natural result.
This control adjusts the overall brightness of the noise map, before any gradient color mapping is applied. In Gradient mode, this has a similar effect to the Offset control.
This control increases or decreases the overall contrast of the noise map, prior to any gradient colour mapping. It can exaggerate the effect of the noise, and widen the range of colors applied in Gradient mode.
The size of the noise map can be adjusted using the Scale slider, changing it from gentle variations over the whole image to a tighter overall texture effect. The scale slider can be separated into independent X and Y axis scale sliders by clicking on the Lock X/Y checkbox immediately above, which can be useful for a brushed-metal effect.
Use the Angle control to rotate the noise pattern.
Adjust this thumbwheel control to interpolate the noise map against a different noise map. This will cause a crawling shift in the noise, like it was drifting or flowing. This control must be animated to affect the gradient over time, or you can use the Seethe Rate control below.
As with the Seethe control above, the Seethe Rate also causes the noise map to evolve and change. The Seethe Rate defines the rate at which the noise changes each frame, causing an animated drift in the noise automatically, without the need for spline animation.
Color Tab
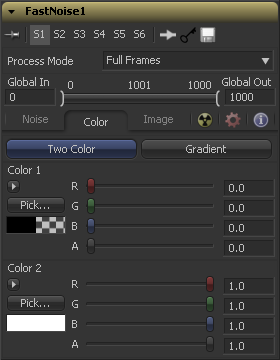
A simple two color gradient is used to color the noise map. The noise function will smoothly transition from the first color into the second.
The advanced gradient control in Fusion is used to provide much more control over the color gradient used with the noise map. The controls that appear are when this mode is selected are described in depth in the Tool Controls chapter of this manual. Consult this chapter for details on setting up a custom gradient for use in the Fast Noise tool.
Image Tab
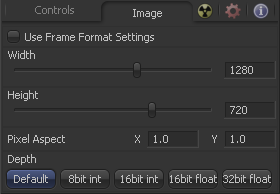
The controls in this tab are used to set the resolution, color depth and pixel aspect of the image produced by the tool.
Use this menu control to select the fields processing mode used by Fusion to render changes to the image. The default option is determined by the Has Fields checkbox control in the Frame Format Preferences. For more information on fields processing, consult the Frame Formats chapter.
Use this control to specify the position of this tool within the project. Use Global In to specify on which frame that the clip starts and Global Out to specify on which frame this clip ends (inclusive) within the project's Global Range.
The tool will not produce an image on frames outside of this range.
When this checkbox is selected, the width, height and pixel aspect of the image created by the tool will be locked to values defined in the composition's Frame Format preferences. If the Frame Format preferences change, the resolution of the image produced by the tool will change to match. Disabling this option can be useful to build a composition at a different resolution than the eventual target resolution for the final render.
This pair of controls is used to set the Width and Height dimensions of the image to be created by the tool.
This controls is used to specify the Pixel Aspect ratio of the created images. An aspect ratio of 1:1 would generate a square pixel with the same dimensions on either side (like a computer display monitor) and an aspect of 0.9:1 would create a slightly rectangular pixel (like an NTSC monitor).
The Depth button array is used to set the pixel color depth of the image created by the creator tool. 32bit pixels require 4 times the memory of 8bit pixels, but have far greater color accuracy. Float pixels allow high dynamic range values outside the normal 0..1 range, for representing colours that are brighter than white or darker than black. See the Frame Format chapter for more details.
Mask map inputs
These external connections allow you to use masks to control the value of the noise Detail and Brightness controls individually for each pixel. This can allow some interesting and creative effects.
A soft-edged mask connected to the Noise Detail Map will give a flat noise map (zero detail) where the mask is black, and full detail where it is white, with intermediate values smoothly reducing in detail. It is applied before any gradient color mapping. This can be very helpful for applying maximum noise detail in a specific area, while smoothly falling off elsewhere.
A mask connected to this input can be used to control the noise map completely, such as boosting it in certain areas, combining it with other textures, or if Detail is set to 0, replacing the perlin noise map altogether.
Tips for Fast Noise (edit)
Gradient mapping
You can use the Fast Noise tool to do gradient mapping (changing a pixel's color based on its brightness), with a Bitmap Mask connected to the Noise Brightness input.
Connect your source tool to the Bitmap Mask (set to Luminance), connect that to the FN's Noise Brightness Map input, set Noise Detail to 0, turn up Brightness, and start playing with the Gradient color controls. There's more info and a macro to download here.
| The contents of this page are copyright by eyeon Software. |


