Settings and Macros/KAK Description
From VFXPedia
[ Main Manual Page ]
- Other macro tools in this category:
- [3D Keyer]
- [Blurred Edges Restoration]
- [Kick Ass Keyer]
- [Spill Merge]
| KAK_v2.5 | Download |
KAK, the Kick Ass Keyer for Eyeon Fusion.
KAK started as an exercise to mimic the functionality of a well known and much discussed keyer featured in an alternative compositing application. As of v2.0, it has grown considerably beyond that into a much more well-rounded keying solution and is much easier to use. It is suitable for quick and dirty prototyping of shots, as well as pulling beautifully detailed and accurate keys, especially retaining soft and transparent details such as hair, defocused edges and transparent surfaces. It sucks less.
KAK has already been put to the test on some pretty challenging footage and to my delight (not to blow my own trumpet, as I don't want to risk raising expectations too much) the results were at least as good if not better than with many other keying solutions out there, both with the matte pull as the color results. But by all means don't take my word for it, so please read on and give it a go yourself!
Best thing of all though? KAK is open and totally free. Did I mention easy to use?
KAK is a two stage keyer. In the first stage you use KAK to generate a clean plate from the colors found in the backing screen, and in the second stage a matte is pulled with the KAK keyer, using the clean plate, rather than a single color, for more accurate results. KAK is capable of dealing with very uneven backing screens and footage which large exposure variations over time. As that goes for basically every single piece of backing screen footage out there, that's pretty darn great... :)
KAK is a work in progress. However, it is built on nothing but tools known to be stable, it's fast enough to be pleasant to work with, and since it is completely open there is no reason why you should be discouraged from using it, even on the most demanding jobs.
Some features are a little bit experimental and might change or disappear in future version if they prove less useful. More features might be added. I'll do my best to not break things in the process.
Should you find an issue with KAK 2.5, you can still find the tried and tested - albeit much simpler - KAK 1.3, and the arguably more difficult to use KAK 2.2 here:
http://www.vfxpedia.com/images/KAK_v1.3.setting
http://www.vfxpedia.com/images/KAK_v2.2.setting
Inputs And Outputs
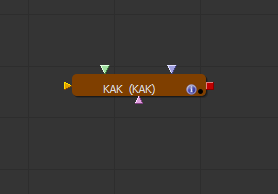
KAK will take in a background image (optional but recommended), a foreground image (that's the one to be keyed), and a clean plate (optional). It will output either a Kick Ass Key, Clean Plate or a variety of intermediate stages by using the Helpers buttons. (1)
As of version 2.0, there is now an extra input called OpenKAK. It allows you to insert a Core Matte, Garbage Matte, Edge Matte or even an Alpha Channel for your footage, extracted in an external keyer, into the KAK process.
- Input

- Foreground image. Required.
- Input

- Clean Plate. Optional.
- Input

- Background Image. Optional.
- Input

- OpenKAK Image. Optional.
Controls Tab
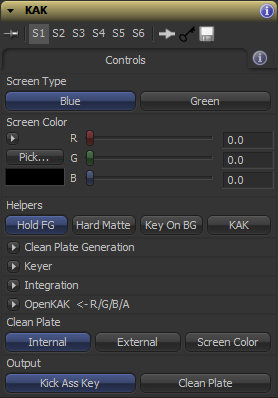
Select either Blue or Green. Choose wisely.
Pick your screen color. This largely replaces the previous (and rather tedious) method of selecting a color by adjusting the low and high ranges of the separate RGB channels.
These four settings will help you in your quest for getting the best possible results. Hold FG will hold the foreground image. Hard Matte will overlay the internally generated hard matte over your image. Key On BG previews your key on whichever background is fed into the Background Image input, or black otherwise. KAK will bypass the helpers and get you your keys.
A drop down menu for the Clean Plate Generation parameters. See below.
A drop down menu for the Keyer parameters. See below.
A drop down menu for the Integration parameters. See below.
A drop down menu for the OpenKAK parameters. See below.
KAK has the ability to be split out in two stages; the Clean Plate Generation, and the Keyer. Often you will find that there isn't a one-tool-wonder for keying. This one is no different. A good key is often built up from several different layers generated with as many different keyers. On the other hand is it less likely you will want to generate just as many clean plates for your key. When Clean Plate is set to External, you can feed in a clean plate generated by another KAK, and keep your comps cleaner, more efficient and faster. (2) Lastly, KAK can also use the Screen Color as your Clean Plate. When used in this way, the final results will likely be less sophisticated, but much faster to achieve. If you need to prototype dozens of shots in an afternoon, Screen Color mode is your ass kicking friend!
Standard output is the Kick Ass Key, which is a pre-multiplied image to be merged on your background of choice. Just imagine the possibilities! Clean Plate outputs the internally generated clean plate, or shows the one piped into the external input when the Color Weight parameter is set to External
Clean Plate Generation Controls
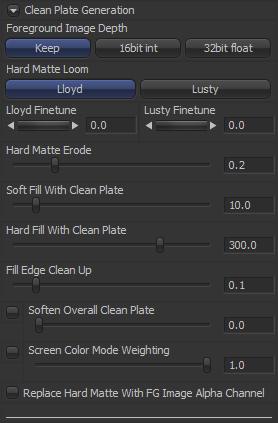
Clean Plate generation in KAK works by first separating the screen colors (blue or green) from the foreground colors. This selection is represented by the Hard Matte. (3)
KAK works best with 16 bit images or higher. In case your source should only be in an 8 bit format, this setting can convert it to a higher setting. Keep retains whatever bit depth your source material came in.
"Hard Matte Looms" called Lloyd and Lusty, are 2 different ways of generating the Hard Matte. A quick explanation of the difference between the two: Lloyd works like a conventional keyer, in that it performs a high contrast difference key against the selected Screen Color. Lusty is different, in that it is a setup which has a pre-set keyer, but you color correct its input until the screen colours fall into the goldilocks-zone where the keyer works best. Lloyd method is the easiest and most intuitive to use as it is tied more directly to the picked Screen Color, but try both to see which one works best for your footage.
Erodes the Hard Matte into the backing screen. Use Erode in conjunction with Bleed Size to get rid of any colors that are not colors from the screen, but don't expand too far, you want to keep as much of the screen detail and color variation as possible. Colors you don't want to keep are leftovers from the foreground edges, or tracking markers, or whatever else might not have been picked up by the hard matte key.
Erodes the screen color into the black area which is determined by the hard matte generated earlier. Start with this and gently "bleed" the map out a bit using this slider. Try less rather than more, for starters.
Fills the remaining black areas in with colors from the color map edges. Once you are satisfied with Bleed Size and Erode, Patch Black will allow you to extend your result and fill up the entire image.
Extends or contracts the edge where the black matte and the backing screen meet. You will typically find some strange ringing and other nasties in the edges at the different areas of the color weight. Edge Erode can help you clean those up a little.
Performs a post-blur on the Clean Plate.
This button works in conjunction with the Screen Color mode in the main settings. It will weight the Screen Color to better deal with uneven screens and exposure variations. It will still not be as good as generating a full Color Weight, but capable of very decent results.
When using this setting, KAK will use the alpha channel of the Foreground Image as the Hard Matte. This allows you, for example, to generate a Clean Plate from a (rough) roto instead of the method used by the Hard Matte Loom.
Keyer Controls
Welcome to stage two. This is where the fun starts. Tons of options and most of them can help you make your key even better!
Pretty much all of these options will work with any flavor of keying available in KAK, including solid color and, of course, external clean plate modes.
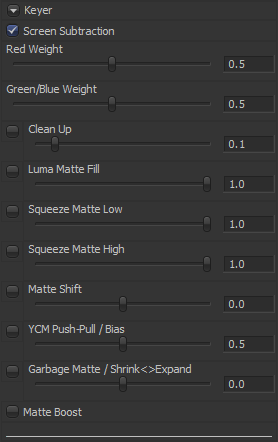
Screen Subtraction creates the color and matte results using a subtractive process, after the clean plate and foreground plates have been combined. You almost always will want to leave this on, unless you want to process the original image outside of KAK for all your de-spilling, color correction and edge work. When turned off, the weights have no influence on the color any more. Instead, the original plate is multiplied by the matte result. Any change perceived in color is due to transparency in the alpha channel and the multiplication process. This button is also handy when cross-checking your original colours with your de-spilled results.
Controls the weighting of the red component in the processing of the key.
Controls the weighting of either the green or blue component in the processing of the key, depending on whether you are dealing with a blue or green screen process.
These have the greatest influence on both the color and the matte results. It's often a good idea to combine a few stage two KAKs with different weight settings and construct a key with a solid inside matte and nice soft edges and transparencies, while also having a nice de-spilled RGB.
This performs a color correction before pulling the key causing the matte pull to be harder and can help with residue of noise from the backing screen. Use sparingly, as the effect can be somewhat heavy. Furthermore, using Clean Up can render other settings less predictable. Alternatively, consider using the Garbage Matte option described below.
This setting separates transparent elements (preferably not picked up by the hard matte in stage one) that are brighter than the backing screen, and adds them to the matte. One thing to note is that this might not work well when Clean Up is active.
Pushes the low end values of the matte slightly to black.
Pushes the high end values of the matte slightly to white.
The previous two settings apply a gentle squeeze on either the low or the high end of the matte, pushing them in a little. Might be enough to get a bit more opacity into that alpha, but without necessarily causing horrendous black edges. It's a subtle, but brute force approach, applied post-key so use carefully. It's added here for ease of use as it is a very common thing to do.
Matte Shift is an experimental feature which is based on rotating the hue of the source image before pulling the key. It is not sure yet if it is at all useful, but it sure does things that are completely unintuitive, so in that sense it's interesting at least. Who knows, it might do something worthwile for someone one day, and that someone could be you!
YCM Push-Pull is another experimental parameter. This one does a different color correction before pulling the key, boosting or suppressing yellow, cyan and magenta. In some cases and in conjunction with Matte Shift you can get some impressive results even with Screen Subtraction turned off, but again much less predictable than most of the other parameters. Just give it a shot when all else fails (so this one won't break much more anyway).
Turning this on causes the Hard Matte to be used as a garbage matte for your key. Use Shrink/Expand for a quick and dirty way of making the garbage matte smaller or larger. These option also work for any garbage matte fed into the OpenKAK input.
An experimental setting which calculates the matte in a slightly different way, often resulting in a harsher matte. The edges however will suffer. This can be countered slightly by using the Matte Shift and YCM Push-Pull/Bias parameters.
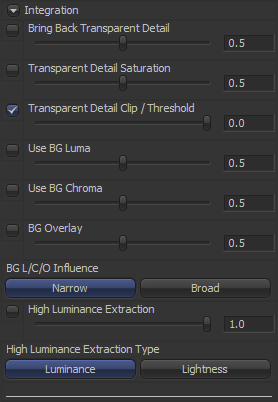
Integration Controls
KAK's integration settings work best (if not only) when a background image is fed into the Background input. These settings work on the RGB data only and will not influence the matte.
Allows you to get even more soft edges and trasparent detail into the image, by performing an additional additive key. Can work wonders when you are losing a lot of fine detail over bright backgrounds! Feel free to push this over 1. Bring Back Transparent Detail also needs a relevant Clean Plate, be it a generated one or a selected Screen Color.
Controls the saturation of any transparent detail, added using the Bring Back Transparent Detail option.
This threshold is particularly useful when merging your key over a bright background. By default the added transparent detail is clipped at zero as it is the safest way to make sure to avoid negative ot strange looking colors in your results. However, by bringing the clip value down, your key result will start to subtract colors from your background. This makes fine edge detail appear less blown-out by the background image. This setting only works when working in floating point color depth. To avoid having negative values in your result, clip with a low threshold, rather than turn clipping off (although turning clipping off can be handy as a quick first step, for checking the difference clipping makes).
When a background is fed into KAK, this settings allows you to better match the edges of the key to the luminosity of the background.
When a background is fed into KAK, this settings allows you to better match the edges of the key to the hue of the background.
When a background is fed into KAK, this settings will overlay the background onto the edges of the key.
Choose between Narrow and Broad to determine the range of influence the BG Luma/Chroma/Overlay settings have.
This one adds transparent elements that are brighter than the backing screen, to the RGB result. One thing to note is that this might not work well when Clean Up is turned on in the Keyer.
Bases the extraction of the bright transparent elements on either the Luminance or Lightness of your image. The Lightness setting has also been spotted softening clipped foreground color values.
OpenKAK Controls
As of v2.0, KAK has and extra input called OpenKAK, allowing you to insert external data into the KAK process at different points. This allows for much greater flexibility. Imagine you have a wonderful matte, pulled with Primatte, but you would like to have all the integration settings of KAK? You have pulled a great soft matte with KAK but you can't get rid of some pesky matte holes? Now you can! OpenKAK takes in a single image and picks separate channels from that image to be used for different purposes. At the moment, RGBA is used as follows:
Turning this on will take the red channel of an image fed into the OpenKAK input and combine the values with the alpha channel generated by KAK.
Turning this on will take the green channel of an image fed into the OpenKAK input and use it as a garbage matte for the key. Activate the garbage matte using the Garbage Matte / Shrink<>Expand settings in the Keyer parameters.
Turning this on will take the blue channel of an image fed into the OpenKAK input and use it as an edge matte which influences Use BG Luma, Use BG Chroma and BG Overlay.
Turning this on will take the alpha channel of an image fed into the OpenKAK input and completely replace the alpha channel generated by KAK for any further processing.
As it can be a bit of a hassle prepping four different images for use by KAK, there is now this handy little helper: http://www.vfxpedia.com/index.php?title=Settings_and_Macros/OKShuffler_Description
Known Issues
- In builds of Fusion earlier than 1101, when swiching between the S1, S2, S... settings, bits of KAK are exposed, impossible to be deleted and very likely to make Fusion hang. This has now been fixed by the good people at Eyeon. If you insist on using an earlier version of Fusion, stay away from those :)
Tips And Tricks
(1) When no image is fed into the background input, KAK will assume a black background for certain color operations in the keyer stage.
(2) KAK will accept any image you like to be used as a color weight. You can feed in a solid color, a pre-comped clean plate, or a gradient.
(3) The hard matte can also be output from KAK when the output is set to Color Weight. You will find the hard matte in the alpha channel.
- Should you see a strange banding effect in the result, make sure your foreground image's bit depth is at least 16 bit per channel (int16), even if your source material is not.
- Think you can't pull a hard matte with KAK? Think again. As with most parameters in Fusion, you can supercharge the ones in KAK too. Try setting the Red and Green/Blue Weights to something like 5, and do the same with Squeeze Matte Low and High and see what happens!
Changelog
v2.5 - 19.nov.2012
Main
- cleanup of code so the macro is smaller in size, yet has more features. Crossed the 100 node count!
- default Helper is now Hold FG, for quicker setup (you can immediately pick a screen color) and less confusion by KAK's default output when Screen Type and Color are not set.
Clean Plate Generation
- the term Color Weight has been replaced by Clean Plate throughout, as it's a more intuitive term.
- massively improved hard matting!
- new "Hard Matte Looms" called Lloyd and Lusty, which are 2 different ways of generating the Hard Matte. They both are more intuitive to use and fine-tune than the previous method, with only one single fine-tuning parameter each. Lusty method yields results closest to those seen in previous versions of KAK.
- added Replace Hard Matte With FG Image Alpha Channel.
- added Soften Overall Color Weight.
- renamed/reordered some color weight parameters to something more meaningful.
Keyer
- fixed Matte Shift toggle button.
- fixed Use BG chroma/Use BG Luma don't work properly when BG alpha is transparent/zero.
- garbage matte now works with an external KAK color weight too.
- Clean Up now has a default value of 0.1, which is generally a more sensible value to use.
v2.2 - 09.oct.2012
Integration:
- Fixed a bug causing the size of the internal edge matte to default to the frame format of the comp instead of the image to be keyed.
v2.1 - 08.oct.2012
Integration:
- Fixed BG L/C/O Influence selection would internally always be set to "Narrow".
- BG L/C/O Influence now defaults to "Broad" which is equal to the range in v1.3.
v2.0 - 07.oct.2012
Main:
- Interface changes to speed up work-flow.
- Optimisations throughout to keep same speed while adding more features.
- KAK now works by first picking a screen color instead of all the Low/High values making it almost a one-click solution in many cases. The earlier type controls are still available for fine-tuning.
- Added Screen Color as Color Weight mode. This replaces "Override With Solid Color" featured in previous versions of KAK.
- Separated Keyer and Integration settings. The main difference between the two is that all Keyer settings have an influence on the matte, and the Integration settings do not.
- Grouped all preview modes under "Helpers"
- "KickAssKey" is now visible as the active tool in the viewer (instead of "OUTPUT").
- Toggle buttons for virtually every operation for easy referencing and gives an indication of hits on render time. The more you turn on, the longer your render times :)
- Toggling between the Output and Preview options now work more intuitively and get less in each other's way.
- Output type Pass Through has been removed, as it is now practically the same as Hold BG.
Color Weight Generation
- Added Fine-Tune Screen Color switch and values are now adjusted with RangeControls instead of SliderControls.
- Added Solid Color Weighting for better processing of uneven screens in Override Weight With Solid Color mode. This makes Solid Color keying much better in a variety of cases and can do wonders for heavy motion blur.
Keyer:
- Auto Gain now does something a bit more sensible and is renamed as Clean Up (it didn't auto gain anything anyway).
- Added Luma Matte Fill, a luminance based additional key - will help fix matte "holes" in super bright areas.
- Added Garbage Matte / Shrink<>Expand, which uses the internal hard matte as a garbage matte. An external garbage matte can now be used too, and will also be controlled by these parameters.
- Added "Matte Boost". This adjusts the key so it typically yields more opaque results in the matte, but at the cost of edge quality. Believe it or not, but using this creates a case where Matte Shift and YCM Push/Pull are actually helpful! It's rather unpredictable so use with care.
- fixed Autogain (now Clean Up) and Matte Shift would influence RGB on non-screensubtracted key.
- fixed Autogain (now Clean Up) would influence Color Weight output.
Integration: **new!**
- Added Bring Back Transparent Detail for even better soft key results. This does not affect the alpha channel and will work best with a relevant background input available.
- Added Transparent Detail Saturation.
- Added Transparent Detail Clip / Threshold.
- BG Bleed has changed and is now called BG Overlay.
- Added BG L/C/O Influence, changing the range of Use BG Luma, Use BG Chroma and BG Overlay.
- Improved luminance factor, now called High Luminance Extraction.
- Added new Luminance Extraction Type called Lightness, which can also have nice color clip suppression results. Luminance Extraction set to Luminance equals Luminance Factor in previous versions of KAK.
OpenKAK: **new!**
- Introduced OpenKAK <- R/G/B/A, which allows for inserting an external Core Matte (red channel of the image input), Garbage Matte (green channel of the image input), Edge Matte (blue channel of the image input) and Alpha Channel (alpha channel of the image input) into the KAK process.
v1.3 - 24.sep.2012
Color Weight Generation:
- Override With Solid Color mode is now much faster.
Keyer:
- RGB results of Use BG Luma, Use BG Chroma and BG Bleed will now yield sensible results instead of over-bright edges.
- Squeeze Matte controls no longer generate negative and +1 matte values when overshooting them.
v1.2 - 18.sep.2012
Keyer:
- Use BG Luma, Use BG Chroma and BG Bleed fixed and now work as they should (i.e. do not influence the matte).
- Use BG Chroma influences both the hue and saturation of the edges again, now that the issue causing strange results has been resolved.
v1.1 - 17.sep.2012
Color Weight Generation:
- Added bit depth conversion button for the foreground image.
- Set default values for Erode and Edge Erode for a better out-of-the-box result.
- Adjusted Erode and Edge Erode sliders to a more sensible range.
- When using Preview Hard Matte On FG, the hard matte itself is now output in the alpha channel as well.
- Added Hold FG option for color picking.
Keyer:
- Added Preview Key On BG option.
- Use BG Chroma now influences just the hue instead of the hue and saturation of the edges, which should give nicer results in general.
- Added BG Bleed to complement Use BG Chroma where results are less than satisfying.
v1.0 - 13.sep.2012
- first public release of KAK
Development History and Discussion on PigsFly
KAK is useful? Happy with KAK? Want to see KAK improve or have some ideas? Perhaps you found a bug in KAK? Drop me a line at pieter[at]secondman[dot]com.
