Eyeon:Manual/Tool Reference/Color/Color Corrector
From VFXPedia
|
Color Tools |
|
Color Corrector
|
Contents |
Correction Tab
Controls in the color correction tool are separated into four separate categories; colors, levels, histogram and suppress. Selecting one of the category buttons from the array at the top of the Correction Tab will cause that category's controls to appear. Each category is described in detail below.
Colors Mode
This array of buttons determines the range of colors affected by the controls in this tab. For example, when the Shadows range is selected, any color adjustments made will affect only the darker pixels of the image.
The selected state of this button is maintained throughout the Colors, Levels and Suppress sections of the Color Corrector tool.
Note that the controls are independent for each color range. For example, adjusting the Gamma control while in Shadows mode will not change or affect the value of the Gamma control for the Highlights mode. Each control is independent and applied separately.
Adjustments made to the image in the Master channel are applied to the image after any changes made to the Highlight, Midtone and Shadow ranges.
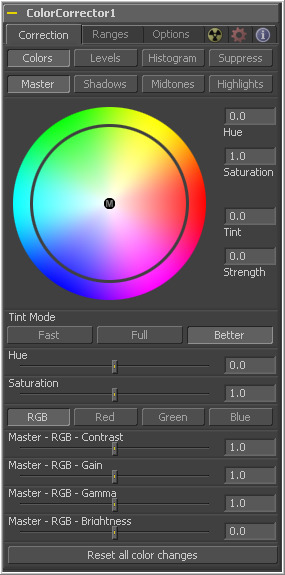
The Color Wheel display provides a visual representation of adjustments made to Hue and Saturation, as well as any tinting applied to the image. Adjustments can be made directly on the display, or by entering values in the text boxes to the right of the Color Wheel.
The Hue control provides a method of shifting the Hue of the image (or selected color range) through the color spectrum. The control value has an effective range between 0.0 and 1.0, which represents the angle of rotation in a clockwise direction. A value of 0.25 would be 90 degrees (90/360) and would have the effect of shifting red toward blue, green to red and so on.
The degree of hue shifting can be entered directly into the text control, or by placing the mouse above the outer ring of the color control and dragging the mouse up or down. The outer ring will always show the shifted colors compared to the original colors shown in the center of the control.
The Saturation control is used to adjust the intensity of the color values. A Saturation of 0 produces grey pixels without any chroma or color component, whereas a value of 1.0 produces no change in the chroma component of the input image. Higher values will generate over-saturated values with a high color component.
Saturation values can be entered directly into the text control, or by click-dragging the mouse to the left and right on the outer ring of the color wheel control.
The Tint control is used to tint an image or selected color range. The values in this control go from 0 to 1.0, which indicate the angle of the tint color on the color wheel. A value of.25 would indicate 90 degrees, which would be midway between green and yellow on the color wheel.
The Strength control determines how much tint is applied to the selected range of colors.
The tinting is represented in the Color Wheel control by small circles that show the color and strength of the tint. The Highlight Ranges marker is a black outline of a circle. The Midtones are represented by a grey circle, and the Shadows by a grey one. The Master Tint Marker is also black, but it has a white M in the center to distinguish it from the others.
The marker for each range can be positioned by the mouse only when the appropriate range is selected. For example, the Highlight Marker cannot be moved when the Master range is selected.
Hold down the Ctrl key while dragging this control will allow you to make finer adjustments by reducing the controls sensitivity to mouse movements. Holding the Shift key down will limit the movement of the marker to a single axis, allowing you to restrict the affect to either tint or strength.
- Fast/Full/Better
- These three buttons are used to select the speed and quality of the algorithm used to apply the tint, hue and saturation adjustments. The default is Better, but for working with larger images, it may be desirable to use a lesser, faster method.
This slider is a clone of the Hue control shown in the color wheel above. The slider makes it easier to make small adjustments to the value with the mouse.
This slider is a clone of the Saturation control shown in the color wheel above. The slider makes it easier to make small adjustments to the value with the mouse.
These buttons are the same buttons seen in the Histogram, Color and Levels sections of the Color Corrector tool. When the Red channel is selected, the controls in this tab will affect the Red channel only, and so on.
The controls are independent, so switching to Blue will not remove or eliminate any changes made to Red, Green or Master. The animation and adjustments made to each channel are separate. These buttons simply determine what controls to display.
Contrast is the range of difference between the light to dark areas. Increasing the value of this slider will increase the contrast, pushing color from the midrange towards black and white. Reducing the contrast will cause the colors in the image to move towards midrange, reducing the difference between the darkest and brightest pixels in the image.
The pixel values are multiplied by the value of this control. A gain of 1.2 will make a pixel which is R0.5 G0.5 B0.4 into R0.6 G0.6, B0.48 (i.e. 0.4 * 1.2 = 0.48). Gain affects higher values more than it affects lower values, so the effect will be strongest in the midrange and toprange of your image.
Values higher than 1.0 will raise the gamma (mid gray) while lower values will decrease it. The affect of this tool is not linear, and existing black or white levels will not be affected at all. Pure grey's will be affected the most.
The value of the brightness slider is added to the value of each pixel in your image. This control's affect on an image is linear, so the effect will be applied identically to all pixels regardless of value.
Selecting this button will return all color controls in this section to their default values.
Levels Mode
This array is described in the colors mode above.
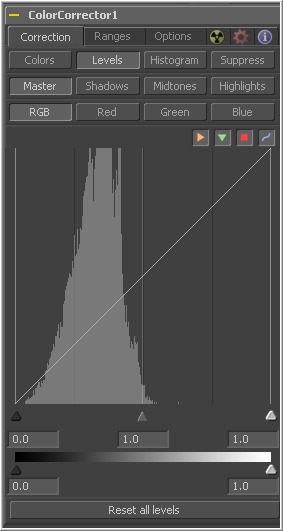
A Histogram is a chart that represents the distribution of color values in the scene. The chart reads from left to right, with the leftmost values representing the darkest colors in the scene and the rightmost values representing the brightest. The more pixels in an image with the same or similar value, the higher that portion of the chart will be.
Luminance is calculated per channel, therefore, the Red, Green and Blue channels all have their own histogram and the combined result of these comprise the Master Histogram.
To scale the histogram vertically, place the mouse pointer inside the control and click-drag the pointer up to zoom in or down to zoom out.
These buttons are used to select and display the histogram for each color channel or for the master channel.
The Display Selector Toolbar provides a method of enabling and disabling components of the histogram display. Hold the mouse pointer over the button to display a tooltip that describes the button's function.
- Input Histogram
- This enables or disables the display of the Input image's histogram.
- Reference Histogram
- This enables or disables the display of the Reference image's histogram.
- Output Histogram
- This enables or disables the display of the histogram from the post color corrected image.
- Corrective Curve
- This toggles the display of a spline used to visualize exactly how auto color corrections applied using a reference image are affecting the image. This can be useful when equalizing luminance between the input and reference images.
These controls are used to adjust the input image's histogram, compressing or shifting the ranges of the selected color channel.
The controls can be adjusted by click-dragging the triangles beneath the histogram display to the left and right.
Shifting the high value toward the left (decreasing the value) will cause the histogram to slant toward white, shifting the image distribution toward white. The low value will have a similar affect in the opposite direction, pushing the image distribution toward black.
The Threshold control can apply clipping to the image, compressing the histogram. Decreasing the level of the High control will reduce the value of pixels in the image, sliding white pixels down toward grey and grey pixels toward black.
Adjusting the Low control toward high will do the opposite, sliding the darkest pixels toward white.
If the low value were set to 0.1, pixels with a value of 0.0 would be set to 0.1 instead, and all other values would increase to accommodate the change. The best way to visualize the effect is to observe the change to the output histogram displayed above.
Clicking on this button will reset all of the controls in the Levels section to their defaults.
Histogram Mode
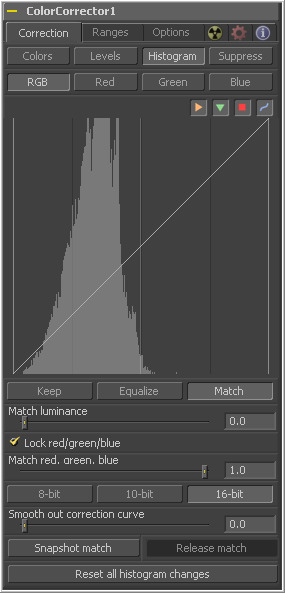
This color corrector mode produces a Histogram display of the input image. If a reference image is also provided, the histogram for the reference image is also displayed. The controls in this tab are primarily used to match one image to another, using either the Equalize or Match modes of the Color Corrector.
- Float Images And Histogram Equalization Or Matching
- Use the histogram matching or equalization methods on a float image and the color depth of the output image will be converted to 16 bit integer. Two dimensional histograms are not well suited to working with the extreme dynamic range of float images so these operations will always revert to 16 bit integer processing.
The Histogram Control is described in detail earlier in this tool documentation, under the heading of the Levels Mode.
Each of these buttons enables a different type of color correction operation.
- Keep
- Keep produces no change to the image and the reference histogram is ignored.
- Equalize
- Selecting Equalize adjusts the source image so that all of the color values in the image are equally represented, in essence, flattening the histogram so that the distribution of colors in the image becomes more even.
The Match mode modifies the source image based on the histogram from the reference image. It is used to match two shots with different lighting conditions and exposures so that they will appear similar.
When selected, the Equalize and Match modes reveal the following controls.
This slider affects the degree to which the Color Corrector tool will attempt to affect the image based on its luminance distribution. When this control is zero (the default), matching and equalization are applied to each color channel independently and the luminance, or combined value of the three color channels, is not affected.
If this control has a positive value when Equalizing the image, the input image's luminance distribution will be flattened before any color equalization is applied.
If this control has a positive value when the correction mode is set to Match, the luminance values of the input are matched to the reference before any correction is applied to the R, G and B channels.
The luminance and RGB controls can have a cumulative effect, and generally they are not both set to full (1.0) at the same time.
When this checkbox is selected, color matching will be applied to all color channels equally. When the checkbox is not selected, individual controls for each channel will appear.
The name of this control changes depending on whether the Equalize or Match modes have been selected. The slider can be used to reduce the amount of correction applied to the image to equalize or match it. A value of 1.0 causes the full effect of the equalize or match to be applied, whereas lower values moderate the result.
This array of buttons determines the level of color fidelity used when sampling the image to produce the histogram. 10 Bit produces higher fidelity than 8 Bit, and 16 Bit produces higher fidelity than 10 bit.
Often, color equalization and matching operations will introduce posterization in an image, which occurs because gradients in the image have been expanded or compressed so that the dynamic range between colors is not sufficient to display a smooth transition. This control can be used to smooth the correction curve, blending some of the original histogram back into the result for a more even transition.
Click this button to take a freeze the current reference histogram, storing its current state as a Snapshot in memory. If the reference histogram is not shapshot, the reference histogram is updated from frame to frame. This can cause flickering and phasing of the correction as the tool tries to match a changing source to a changing reference.
Click on this button to Release the current snapshot of the histogram and return to using the live reference input.
Selecting this button will remove all changes made to the histogram, returning the controls to default and setting the mode back to keep.
Suppress Mode
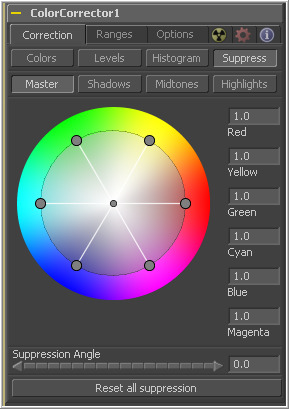
Color Suppression provides a mechanism for removing an unwanted color component from the image. The color wheel control is similar to that shown in the Colors section of the tool, but this one is surrounded by six controls, each representing a specific color along the wheel.
To suppress a color in the selected range, click-drag the control that represents that color toward the center of the color wheel. The closer the control is to the center, the more that color will be suppressed from the image.
Use the Suppression Angle control to rotate the controls on the suppression wheel and zero in on a specific color.
Clicking on this control resets the suppression colors to 1.0, the default value.
Ranges Tab
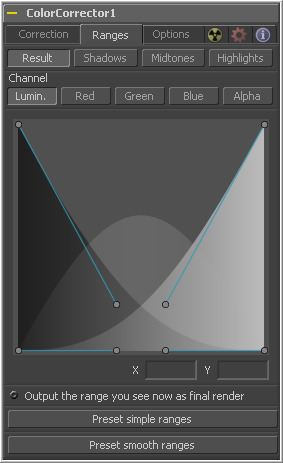
The Ranges Tab contains the controls used to specify which pixels in an image are considered to be shadows and which are considered to be highlights. The midrange is always calculated as any pixels not already included in either the shadows or the highlights.
These buttons are used to select the color range displayed in the views. They help to visualize the actual pixels that will be included in the range. When the Result button is selected, the image displayed by the color corrector in the views will be that of the color corrected image. This is the default.
Selecting one of the other buttons will switch the display to a greyscale image showing which pixels are part of the selected range. White pixels represent pixels that are considered to be part of the range and black pixels are not included in the range. For example, choosing Shadows would show pixels considered to be shadows as white and pixels that are not shadows as black. Mid grey pixels are only partly in the range and will not receive the full effect of any color adjustments to that range.
The extent of the ranges is selected by manipulating the spline handles. There are four spline points, each with one Bezier handle. The two handles at the top represent the start of the shadow and highlight ranges, whereas the two at the bottom represent the end of the range. The Bezier handles are used to control the falloff.
The midtones range has no specific controls since its range is understood to be the space between the shadow and the highlight ranges.
The X and Y text controls below the Spline Display can be used to enter precise positions for the selected Bezier point or handle.
The Channel selection buttons shown in this tab can be used to examine the range of a specific color channel. By default, Fusion displays the luminance channel when the color ranges are examined.
Selecting this checkbox will cause the monochrome display of the range shown in the display views to be output as the final render. Normally, the color tool will output the full RGBA image, even if the tool was left to display one of the color ranges in the view instead. This control makes it possible to use the color corrector tool to generate a range's matte for use as an effect mask in other tools.
These two buttons can be used to return the spline ranges to either Smooth (default) or Simple (linear) settings.
Options Tab
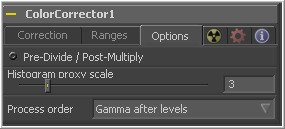
Selecting this option will divide the color channels by the value of the alpha before applying the color correction. After the color correction, the color values are re-multiplied by the alpha to produce a properly additive image. This is crucial when performing an additive merge or when working with CG images generated against black.
The Histogram Proxy Scale determines the level of precision used when creating and calculating histograms. Lower values represent higher precision and higher values produce a rougher, generalized histogram.
This menu is used to select whether adjustments to the image's gamma are applied before or after any changes made to the images levels.
| The contents of this page are copyright by eyeon Software. |
