Eyeon:Manual/Fusion 6/Saver
From VFXPedia
[ Main Manual Page ]
- Loader
- Saver
Contents |
File Tab
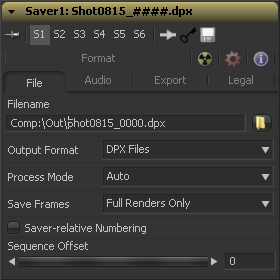
Use the Filename dialog to select the name and path of the rendered image output. Click on the yellow folder icon to display a file browser to select a folder and filename to be used for output.
Sequence numbering is automatically added to the filename when rendered. For example, if c\renders\image.tga is entered as the filename and 30 frames of output is rendered, the files will automatically be numbered as image0000.tga, image0001.tga, image0003.tga...and so on. Four digit padding is automatically used for numbers lower than 10000.
Specify the number of digits to use padding the sequence number by explicitly entering the digits into the filename. For example, image000000.tga would apply 6 digit padding to the numeric sequence, image.001.tga would use 3 digit padding and image1.tga would use none.
It is possible to save to an IFL file if more control is required over the filenames written to disk than specified here. To create an IFL, create a text file with the extension .ifl. Each line of the text file specifies the name for one frame of the output. For example, to render using roman numerals instead of decimals for the file sequence numbering would create the following file.
image.i.tga
image.ii.tga
image.iii.tga
image.iv.tga
image.v.tga
The render will fail if there are not enough lines to match the number of frames rendered. In the above example, the render would fail after the fifth frame.
Format options cannot be specified when using image file lists to save to disk. The defaults will be used instead.
Use this control to select the image format to be saved. Selecting a new format from this menu does not change the extension used in the filename to match. Modify the filename manually to match the expected extension for that format to avoid a mismatch between name and image format.
For a list of file formats supported for saving by Fusion, see Appendix A.
The Process Mode menu is used to set the method of field processing used by Fusion when the flow is rendered.
The default option is Auto. This will render the flow using the field ordering set in the process mode of the most background Loader or Creator tool in the flow.
To force a flow to render individual fields or full frames regardless of the settings of other tools in the flow, change this menu's setting to one of the other listed options.
For example, if the saver's process mode is set to NTSC fields, a loader set to process full frames will still load a full frame from disk, but animation applied to that layer will be applied with field level accuracy. In all cases, footage will be reinterlaced if necessary and saved as frames on disk.
See the Frame Formats chapter for additional details on frame and fields processing in Fusion.
This control selects between two modes
Images are only saved to disk when a final render is started using the Start Render button in the Time Ruler.
This render mode is designed for real-time rendering when painting and rotoscoping. Fusion will save each frame to disk as it is processed interactively.
When used correctly, this feature can completely eliminate the need to perform a final render after rotoscoping. It can cause tremendous confusion when used in conjunction with a flow that contains spline animated parameters.
If these splines are modified in such a way that frames already saved interactively are changed, the frames already on the disk will not automatically be re-rendered. Either step through each frame again or perform a final render to make certain that the result is correct.
Normally, Fusion will use the render range of a composition to determine the numeric sequence used when rendering a file sequence to disk. Enable this checkbox to reveal the Sequence Start Frame control to adjust the starting number in the sequence to a custom value.
This thumbwheel control can be used to set an explicit start frame for the number sequence applied to the rendered filenames. For example, if Global Start is set to 1 and frames 1 - 30 are rendered, files will normally be numbered 0001 - 0030. If the Sequence Start Frame is set to 100, the rendered output would be numbered from 100-131.
Audio Tab
The audio functionality is included in Fusion for scratch track (aligning effects to audio and clip timing) purposes only. Final renders should almost always be performed without audio. The smallest possible audio files should be used, as Fusion will load the entire audio file into memory for efficient display of the waveform in the timeline.
The audio track will be included in the saved image if an AVI file format is selected. Fusion currently supports playback of WAV audio, and dpsReality DVA files.
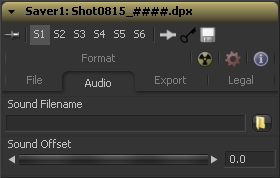
Select the optional audio scratch track to be used. Select the*.WAV file of choice, then expand the Saver bar in the timeline layout to view the audio waveform. Drag the pointer over the audio wave in the timeline layout to hear the track.
Drag the control left or right to create an offset in time between the audio and images of the flow.
Export Tab
This menu is used to apply a SMPTE standard 32 pulldown to the footage as it is saved to disk, converting the footage from 24fps to 30 fps.
First Frame determines the cadence of the 32 pulldown by choosing what frames are combined from the 24fps source to create the first frame in the 30fps pulldown result. Normally, this should be left to AA. When saving a clip that originally had pulldown that was removed to apply effects and it needs to be reinserted into an existing edit, the cadence of the original clip may need to be matched.
These radiobuttons define how the edges of image should be treated. This can also be called source image clipping.
They default to Frame, which will provide the same behaviour as previous versions of Fusion. Since this option will clip to the parts of the image visible within its visible dimensions, it will break any infinite-workspace behaviour. If the upstream DOD is smaller than the frame, the remaining area in the frame will be treated as black/transparent.
None does not perform any source image clipping at all. This means that any data that would normally be needed outside the upstream DOD will be treated as black/transparent. Be aware that this might create humongous images which can consume a huge amount of diskspace. So you should use this option only if really needed.
For more information about ROI, DOD and Infinite Workspace please see the dedicated chapter.
When selected, this control will cause the alpha channel to be saved into the color channels as a grayscale image. This will completely overwrite any existing color information.
Legal Tab
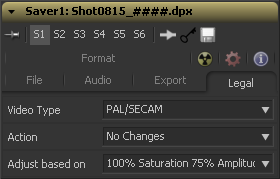
Select the standard to be used for broadcast legal color correction. NTSC, NHK or PAL/SECAM can be chosen.
Use this menu to choose how Fusion will treat illegal colors in the image.
This will cause the images to be saved with legal colors relevant to the Video Type selected.
This causes the illegal colors to be displayed as black in the views.
This causes the illegal colors to be displayed as white in the views.
This causes the images to be saved unaffected.
This menu is used to choose whether Fusion will legalize the image to 75% or 100% amplitude. Very few broadcast markets permit 100% amplitude, but for the most part this should be left to 75%.
Format Tab
The Format Tab contains information, options and settings specific to the image format being saved. The controls for a TGA sequence will be entirely different from the ones displayed when a DPX file is saved. TGA and DPX are displayed on the right for reference.
There are a tremendous amount of options available for each of the different file formats and it is beyond the scope of this manual to describe them all. Please contact eyeon Software's technical support if you have questions about any of the format options and we will be pleased to assist you.
The magic "Comp:" variable
- As you can see in the screenshots the pathnames in this examples start with "Comp:\".
- The Comp-variable in Fusion works for Loaders and Savers and helps you to keep your work organized.
- "Comp:\" stands for the folder your actual composition is stored in.
- So as long as all your source footage is stored in subfolders of your comp-folder Fusion will find that footage regardless of the actual hard-drive or network share name.
- You could e.g. copy an entire shot from the network to your local drive,
- set up your loaders and savers to use the Comp:-variable,
- work all your magic locally (i.e. set up your composition)
- and then copy just the composition back to the server and issue a net-render.
- All render slaves will automatically find the source-footage.
- Some examples:
- Your Composition is stored in "X:\Project\Shot0815\Fusion\Shot0815.comp"
- Your source footage sits in "X:\Project\Shot0815\Fusion\Greenscreen\0815Green_0000.dpx"
- The relative path in the loader would then be: "Comp:\Greenscreen\0815Green_0000.dpx"
- If your source footage is stored in "X:\Project\Shot0815\Footage\Greenscreen\0815Green_0000.dpx"
- The relative path in the loader would then be: "Comp:\..\Footage\Greenscreen\0815Green_0000.dpx"
- Observe how the two dots ".." set the directory to go up one folder.
- Pretty much the same like "CD .." in a command shell window.
Tips for Saver (edit)
EyeonTips:Manual/Fusion 6/Saver
| The contents of this page are copyright by eyeon Software. |


