Eyeon:Manual/Tool Reference/Warp/Grid Warp
From VFXPedia
|
Warp Tools |
|
Grid Warp |
Grid Warp [Grd] | |
|
The Grid Warp tool is a simple 2D deformation grid with flexible vertices. The image will be deformed so that the Source Grid matches the Destination Grid. See the Grid Warp tools chapter for additional information. | |
Contents |
Controls Tab
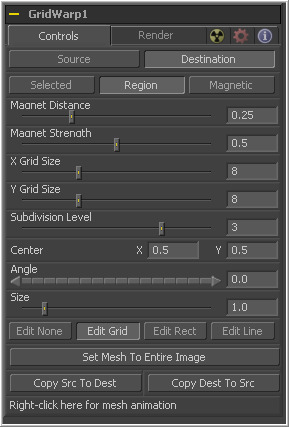
The Source and Destination buttons determine whether the Source grid or Destination grid is currently active. Only one grid can be displayed or manipulated at a time. The selected button will be highlighted to indicate that is the active grid at the moment.
All of the other controls in this tab affect the grid selected by this control.
These three buttons determine the selection types used for manipulating the points. There are three options available.
- Selected
- When in selected mode adjustments to the grid will be applied only to the currently selected points. This mode is identical to normal polyline operation.
- Region
- In region mode, all points within the area around the mouse pointer when the left mouse button is clicked will move. New points that enter the region during the move will be ignored. Choosing this option will expose Magnet Distance and Magnet Strength controls to determine the size and falloff of the area.
- Magnetic
- In Magnetic mode, all points within the area around the mouse pointer when the left mouse button is clicked will move. New points that enter the region during the move will be affected as well. Choosing this option will expose Magnet Distance and Magnet Strength controls to determine the size and falloff of the area.
The default tool for selecting and manipulating the grid is a magnet tool. The magnet is represented in the display view by a circle around the mouse pointer. The Magnet Distance slider controls how large the region of affect for the magnet is, as in the size of the circle. Click-drag on the grid and any vertex within the range of the slider will move.
To increase the size of the magnet, increase the value of this slider. Alternately, adjust the size of the magnet by holding down the D key while click-dragging the mouse.
The Magnet Strength slider will increase or decrease the falloff of the magnet cursor's effect. At a setting of 0.0, the magnetic cursor has no effect, and vertices will not move at all. As the values increase, the magnet causes a greater range of motion in the selected vertices. Use smaller values for a more sensitive adjustment and larger values for broad-sweeping changes to the grid.
The X and Y Grid Size sliders control the number of divisions in the grid. Where the X and Y divisions intersect, a control vertex is created.
- Note
- Be aware that changing either of these controls after applying changes in the grid will reset the entire grid. Set the X and Y grid sizes to the appropriate resolution before making serious detailed adjustments to the grid.
The Subdivision Level determines how many subdivisions there are between each set of divisions. Subdivisions do not generate vertices at intersections. The more subdivisions there are, the smoother the deformation is likely to be (and the slower it will be to render the deformation).
The Center coordinates determine the exact center of the grid. The onscreen center control is invisible while editing the grid. Select to Edit Rect mode and grid center becomes visible and available for editing.
Use the center control to move the grid through a scene without affecting the animation applied to the individual vertices. For example, while deforming lips on a face, track the motion of the face with a tracker and connect the grid center to the tracker. This matches the grid with slight movements of the head while focussing on the deformation of the lips.
This Angle control rotates the entire grid.
The Size control increases or decreases the scale of the grid.
There are four edit modes available, each of which can be selected by clicking on the appropriate button.
- Edit None
- Set the grid to Edit None mode to disable the display of all onscreen controls.
- Edit Grid
- The Edit Grid mode is the default mode. While this mode is enabled, the grid is drawn in the display view and the control vertices of the grid can be manipulated directly.
- Edit Rectangle
- When the grid is in Edit Rectangle mode, the onscreen controls display a rectangle that determines the dimensions of the grid. The sides of the rectangle can be adjusted to increase or decrease the grid's dimension. This mode also reveals the onscreen center control for the grid.
- Edit Line
- The Edit Line mode is extremely useful for creating grids around organic shapes. When this mode is enabled, all onscreen controls will disappear and a spline can be drawn around the shape or object to be deformed. While drawing the spline, a grid is automatically created that best represents that object. Additional controls for Tolerance, Over Size and Snap Distance appear when this mode is enabled. These controls are documented below.
The Set Mesh To Entire Image button automatically resets the size of the grid to the exact dimensions of the image. Any adjustments to vertices within the grid will be reset.
These two buttons provide a technique for copying the exact shape and dimensions of the source grid to the destination, or the destination grid to the source. This is particularly useful after setting the source grid to ensure that the destination grid's initial state matches the source grid before beginning a deformation.
This control is only visible when the edit line mode is enabled. The Point Tolerance slider determines how much tesselation the grid will apply to closely match the density of points in the spline. The lower this value, the less vertices there will be in the resulting grid and the more uniform the grid will appear. Higher values will start applying denser grids with variations to account for regions in the spline that require more detail.
This control is only visible when the edit line mode is enabled. The Oversize Amount slider is used to set how large an area around the spline should be included in the grid. Higher values create a larger border, which can be useful when blending a deformation back into the source image.
This control is only visible when the edit line mode is enabled. The Snap Distance slider dictates how strongly the drawn spline will attract surrounding vertices. If a vertex is close enough to a spline's edge, the vertex will move to line up with the spline. The higher the value, the further the reach of the spline.
The grids are static by default. Right-clicking on the Right-Click Here For Mesh Animation label will provide a context menu with options for animating the grid or connecting it to another grid in the composition.
The grid uses a polychange spline. Any adjustment to any of the control points will add or modify the keyframe for all points to the polychange spline.
This label only appears in the edit line mode. Right-clicking on the Right-Click Here For Shape Animation label will reveal a context menu that can be used to animate the shaping polyline or to connect it to other polylines in the composition.
Render Tab
The Render Method drop-down menu is used to select the rendering technique and quality applied to the mesh. The three settings are arranged in order of quality, with the first (wire frame) as the fastest and lowest of quality. The default mode is Render, which produces final resolution, full quality results.
The Anti-Aliasing control is a checkbox in wireframe render mode.
It is otherwise a drop-down menu with three levels of quality. Higher degrees of anti-aliasing improve image quality dramatically but vastly increase render times. The Low setting may be an appropriate option while setting up a large dense grid, or previewing a flow, but almost never for a final render.
The Area Sample control is only visible when the render mode is not set to Wireframe. Checked by default, disabling this checkbox prevents the grid from calculating area samples for each vertex in the grid. Area sampling vastly improves render quality at the cost of speed.
This control only appears when the Render Method is set to wireframe. It determines the width of the lines that make up the wireframe.
This control only appears when the Render Method is set to wireframe. Use this checkbox to enable/disable antialiasing for the lines that make up the wireframe.
The Black Background checkbox determines whether pixels outside of the grid in the source image will be set to black or if they will be preserved.
Enable the Object ID or Material ID checkboxes to have the grid output the proper ID channel in the final render.
Checkbox, Defaults to On.
Checkbox, Defaults to On.
Context Menu
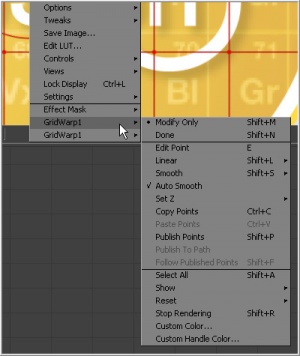
The grid warp tool places a submenu for both source and destination grids in the display view's Context Menu. Both menus have the exact same name, where only the menu for the active grid is populated with options. The other menu is empty. The context menu options are all available from the toolbar that appears in the display view.
These two options set the mesh to modify only and done modes, respectively. Select Modify Only to edit the mesh or Modify Done to prevent any further changes to a mesh.
Use Smooth and Linear to apply or remove smoothing from selected vertices.
When Auto Smooth Points is enabled, the vertices in the grid will automatically be smoothed whenever they are moved. This is generally on by default.
When two vertices in a grid overlap, one ends up getting clipped by the other. Z Under, Z Same and Z Over are used to select which vertices are rendered on top and which are rendered behind.
This option will Select All points in the mesh.
Use these four options to enable or disable the display of the grid, key points (vertices), Bezier handles and subdivisions in the display views.
Reset Selected Points (vertices) to their default positions.
This will Reset All Points (vertices) in the mesh to their default positions.
This option will enable Stop Rendering, which disables all rendering of the grid warp tool until the mode is turned off. This is frequently useful when making a series of fine adjustments to a complex grid.
Toolbar
Whenever the grid warp tool is selected and is in edit grid mode, the grid warp toolbar is displayed in the views. This toolbar provides a variety of options for manipulating and adjusting the grid. The Toolbar Buttons in this toolbar are described above in the context menu.
| The contents of this page are copyright by eyeon Software. |


