Eyeon:Manual/Fusion 6/Difference Keyer
From VFXPedia
[ Main Manual Page ]
- Alpha Divide
- Alpha Multiply
- Chroma Keyer
- Difference Keyer
- Luma Keyer
- Matte Control
- Ultra Keyer
Contents |
Controls Tab
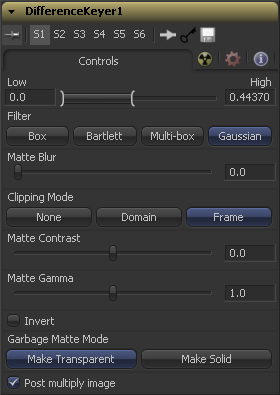
This slider works by defining a range of difference values between the images to create a matte. A difference below the lower threshold becomes black in the matte. Any difference above the upper threshold becomes white (solid) in the matte. The difference values in the range in between create a gray scale matte.
Selection of the Filter that is used when blurring the matte.
This option applies a Box Blur effect to the whole image. This method is faster than the Gaussian blur but produces a lower quality result.
Bartlett applies a more subtle, anti-aliased blur filter.
Multi-Box uses a box filter layered in multiple passes to approximate a Gaussian shape. With a moderate number of passes (e.g. 4), a high quality blur can be obtained, often faster than the Gaussian filter, and without any ringing.
Gaussian applies a smooth, symmetrical blur filter, using a sophisticated constant-time Gaussian approximation algorithm. In extreme cases, this algorithm may exhibit ringing; see below for a discussion of this. This mode is the default filter method.
This blurs the edge of the matte using a standard constant speed gaussian blur. A value of zero results in a sharp, cutout-like hard edge. The higher the value, the more blur.
The Matte Contrast slider changes the look up table curve of the matte's luminance values. This creates a soft cropping of the matte at the low end of the slider and a hard edge expansion of the matte at higher slider values.
Matte Gamma raises or lowers the values of the matte in the semi-transparent areas. Higher values cause the gray areas to be more opaque and lower values cause the gray areas to be more transparent. Completely black or white regions of the matte remain unaffected.
Selecting this checkbox inverts the matte, causing all transparent areas to be opaque and all opaque areas to be transparent.
Garbage mattes are mask tools or images connected to the Garbage Matte input on the tool's tile. The garbage matte is applied directly to the alpha channel of the image. Generally, garbage mattes are used to remove unwanted elements that cannot be keyed, such as microphones and booms. They are also used to fill in areas that contain the color being keyed, but that the artist wishes to maintain.
Garbage mattes of different modes cannot be mixed within a single tool. A matte control tool is often used after a keyer tool to add a garbage matte with the opposite effect of the matte applied to the keyer.
Select this button to make the Garbage Matte transparent.
Select this button to make the Garbage Matte solid.
Select this option to cause the keyer to multiply the color channels of the image against the alpha channel it creates for the image. This option is usually enabled, and is on by default.
Deselect this checkbox and the image can no longer be considered pre-multiplied for purposes of merging it with other images. Use the Subtractive option of the Merge tool instead of the Additive option.
For more information, see the Merge tools documentation.
Tips for Difference Keyer (edit)
EyeonTips:Manual/Fusion 6/Difference Keyer
| The contents of this page are copyright by eyeon Software. |

