Eyeon:Manual/Fusion 6/Texture
From VFXPedia
< Eyeon:Manual | Fusion 6(Redirected from Texture)
Texture
[ Main Manual Page ]
- Depth Blur
- Fog
- Shader
- Texture
Contents |
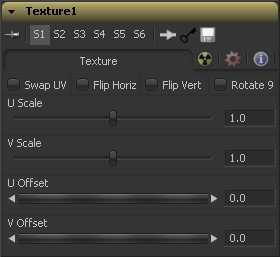
Texture Tab
Swap UV
When this checkbox is selected the U and V channels of the source image are swapped.
Flip Horizontal And Vertical
The texture-map image is flipped horizontally and/or vertically when this control is toggled on.
Rotate 90
The texture-map image is rotated 90 degrees when this checkbox is enabled.
U And V Scale
These controls change the scaling of the U and V coordinates used to map the texture. Changing these values effectively enlarges and shrinks the texture map as it is applied.
U And V Offset
Adjust these controls to offset the U and V coordinates. Changing the values causes the texture to appear to move along the geometry of the object.
Tips for Texture (edit)
- Make sure you judge your image with the HiQ switch turned on. Otherwise, the Texture tool won't do sub-pixel sampling on the texture and produce a pixelated result.
- UV-map image must be 32 bit float to avoid steps in texture distribution.
- If you want to have control over the sub-pixel filtering, you can scale the texture up using a Resize or Scale tool and choose your preferred filtering function there.
- Don't feed pre-multiplied UV channels into the tool as this will produce bad edge pixels. If your UV pass comes out pre-multiplied, divide it by the alpha channel using a ChannelBoolean.
- Alternatives to the texture tool are HoS_PixelMapper (a plugin by Sven Neve) and Gringo's UVPositioner Macro.
This is an example on how to use the Texture tool on a rendered UV Map to insert a picture into a beauty pass at comp stage.
| The contents of this page are copyright by eyeon Software. |


