Third Party Fuses/RollingShutter Description
From VFXPedia
[ Main Manual Page ]
| RollingShutter_v1_6 | Download |
This Fuse tries to remove the shearing distortion that appears in footage shot with a digital camera. While it doesn't require eyeon's Dimension plugin, it does require motion vectors in the input image, which can be pre-rendered by Dimension's OpticalFlow tool.
Watch a quick demo on YouTube.
To set up the required correction value - which differs between camera models, fps and resolutions - you need to film a vertical edge (wall, lamp post) with some horizontal movement/panning. Go to a frame that has no motion and align the overlay along vertical lines (which are probably not 100% vertical if you didn't hold the camera completely level but that's ok).
Then go to a frame where the rolling shutter is most apparent and adjust the correction slider until the slanted line in the footage is rectified. Take care: Don't adjust the slider until the edge is completely vertical in the viewport. Instead, adjust the slider until it is as slanted as the overlay!
All the auxiliary channels including the motion vectors will be removed from the output image as they would no longer line up with the rectified RGBA channels.
| Canon 5D Mark II (30fps) | 1.0 |
| iPhone 4 (30fps) | 0.9 |
Main Inputs
Controls Tab
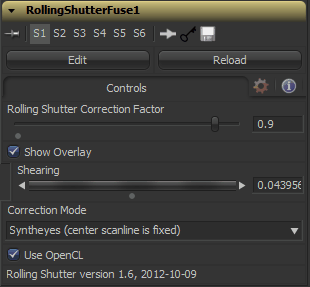
Defines how far the bottom edge of the frame will be shifted back in time compared to the top edge. A value of 1.0 means it will be shifted by a whole frame (e.g. 1/30th of a second for 30fps footage). After setting up the guides in a frame without camera motion, go to a frame with heavy rolling shutter artifacts and adjust this slider until the image is rectified.
Draws a couple of vertical bars on top of the image as a guide for adjusting the correction factor. Disable this checkbox for final output.
If there are no absolutely vertical lines in your footage even in frames without camera motion, you can shear the overlay to match slightly slanted but straight features in your footage.
This option allows you to select the kind of temporal distortion that will be applied to the image:
- Single Frame
- It's assumed that the topmost scanline was recorded at precisely the current time. All the other scanlines will be transformed back in time. This mode requires backward motion vectors.
- Blend Two Frames
- For better results with large correction values, you can enable this option which will sample from the previous frame if a scanline will be shifted more than half a frame back in time. This helps in situations where even though the distortion has been removed the bottom half of the image still has a different amount of motion blur than the upper half. This mode also requires backward motion vectors.
- Syntheyes
- In this mode, the algorithm assumes that the center scanline has been recorded at the current frame. The bottom half of the image will be transformed back in time as usual. The top half, however, will be transformed forward in time using the image's forward motion vectors. This mode thus requires both kinds of motion vectors.
If the "Blend Two Frames" option is selected, the Fuse will perform a smooth transition between the current and the previous frame. You can choose to output a blend map to the Coverage channel so you can re-apply grain to the region that has been softened by the blending. A value of zero indicates pixels from the current frame, a value of 1.0 indicates pixels from the previous frame.
This fuse can achieve real-time performance if executed on the GPU using OpenCL. If OpenCL is not available, it will fall back to the slower CPU algorithm which produces identical results.
Development History and Discussion on PigsFly
--Tilt


