< Previous | Contents | Next >
1 In the Timeline, drag the playhead to the area you want to scrub over.
![]()
2 Use the Left and Right Arrow keys to move one frame forward or backward.
Closing the Studio Player
After you have finished previewing in the Studio Player, you can return to the Bins to switch to a new clip or continue working in Fusion.
— Click the three-dot Options menu in the lower-left corner and choose Close.
Creating a Reel
A reel is a playlist or clip list that is viewed either as storyboard thumbnails or a timeline. In the bin, you create a new reel item to hold and play back multiple clips. The thumbnail for a reel appears with a multi-image border around it, making it easer to identify in the Bin window.
— Right-click in an empty area of the bin and choose New > Reel
— Click the Reel button along the bottom toolbar.
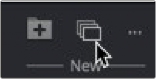
Use the New Reel button to create a reel in the current bin.
Once created and named, the reel appears in the current bin. Double-clicking the reel opens the Studio Player interface along the bottom of the Bin window. An empty Studio Player appears in the top half of the window.
1 Click the three-dot Options menu in the lower-left corner and choose Show Bins.
2 Drag a clip from one of the bins to the empty reel in the lower half of the window.
The toolbar across the bottom of the interface has various controls for setting a loop, showing and adjusting color, playback transport controls, collaboration sync, guide overlays, and frame number and playback speed in fps.
![]()
The toolbar along the bottom of the Studio Player includes controls to customize playback.
— Set Loop In/Out: Sets the start and end frame for playing a section of the Timeline in a loop.
![]()
— Shot: Sets the loop for the entire clip.
— Reset: Disables the loop mode.
— M: Shows Metadata of the image.
— RGB and alpha: Toggles between displaying the color and alpha of the clip.
— Brightness Gamma: Adjusts the brightness and gamma of the viewer and is applied to all clips. Individual clip color controls can also be applied using another menu.
— Video: Outputs the image to Blackmagic Design DeckLink and UltraStudio devices.
— Transport controls: Used to play forward, backward, fast forward, and fast backward, as well as go to the start and end of a clip.
— Sync: A three-way toggle allowing the Studio Player to be controlled or to control another player over a network. The Off setting disables this functionality.
— Guide buttons: These three buttons control the visibility of three customizable guide settings.
Inserting Shots
Clips or comps from the bin can be dragged to the storyboard area of the reel to add and organize a playlist.
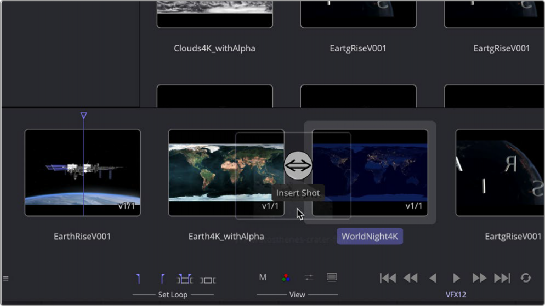
You can insert a shot between existing clips by positioning the new clip in between existing items in the reel.
1 Click the three-dot Options menu in the lower-left corner and choose Show Player.
2 Position the playhead where you want to begin playing and click the Play button.
Creating Versions
![]()
Alternatively, you can add a version to an existing clip by dragging the new item on top.
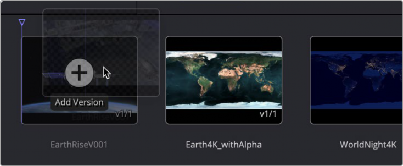
You can create a new version of a clip by dragging the same clip into the player on top of itself.
Versions of a shot will appear as stacked icons in the storyboard reel. The number of stacks in the icon indicate the number of versions included with that clip. The current version and the total versions are indicated by the number in the lower-right hand corner of the icon. In the example below, the first shot has three versions, the second shot has one version, and the last clip has two versions.

Clip versions are visible by the number in the lower right and graphically represented by the number of stacked icons.
Version Menu
You can choose which version to view by right-clicking over the clip in the storyboard and selecting it from the Version > Select menu.
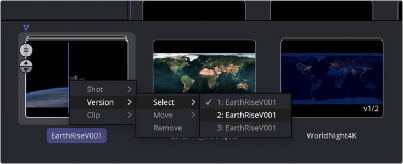
Clip versions can be chosen by right-clicking on the icon in the player.
The Version menu also includes options to move or rearrange the order of the clip versions as well as remove a version, thereby deleting it from the stack.
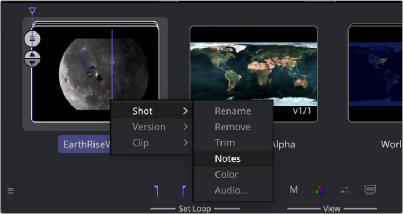
Shot Menu
![]()
The per-clip Shot menu includes functions to Rename the shot, Remove the shot, Trim the clip’s In and Out points, add notes, adjust the color, and add an audio soundtrack.
The Shot menu lets you modify the clip in the player.
— Rename: Allows you to change the name of the shot.
— Remove: Deletes the entire shot and all the versions from the project reel.
— Trim: Opens the Trim dialog to adjust the clip In point and Out point on the Timeline.
— Notes: Opens the Notes window to the right of the interface, allowing you to add a note to the specific shot.
— Color: Opens the Color Adjustments panel to perform Lift, Gamma, Gain, Brightness, and Contrast adjustments to clips.
— Audio: Allows you to attach an audio file to a clip in the Reel.
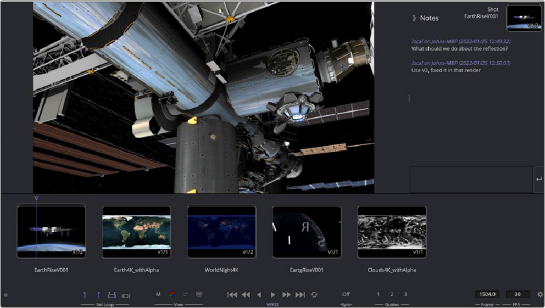
When notes are added, they are time and date stamped as well as name stamped. The naming is from the bin login name and computer name.
![]()
Selecting Color from the Shot menu allows you to make tonal adjustments per clip using Color Decision List (CDL) style controls.
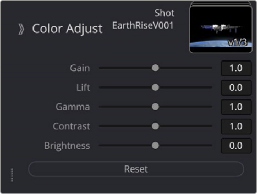
The Color Adjust controls from the Shot menu
The Audio menu option can import an audio .wav file that will play back along with the selected clip.
Options Menu
The three-dot Options menu in the lower left of the interface displays the menu that can be used to switch between viewer and the bin in the top half of the window. It is also used to clear the memory used in playback by selecting Purge Cache.
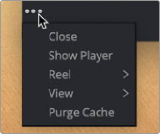
The Options menu includes options to switch the top half of the window between the viewer or bin contents.
Selecting Reel > Notes opens the Notes dialog to add annotations text to the entire reel project. The Reel > Export option saves the reel to disk as an ASCII readable format so it can be used elsewhere or archived.
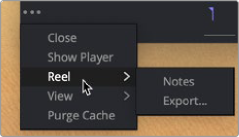
The Reel submenu opens an area for production notes on the entire reel.
The View menu is used when you want to switch between the reel storyboard layout and a Timeline layout.
![]()
Guides
You can assign customizable guide overlays to three Guide buttons along the bottom of the Studio Player. Fusion includes four guides to choose from, but you can add your own using the XML Guide format and style information provided at the end of this chapter. You assign a customizable guide to one of the three Guide buttons by right-clicking over a button and selecting a guide from the list. To display the guide, click the assigned button.
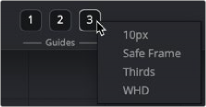
Three toolbar Guide buttons enable guide overlays in the viewer.
Guides can be customized and placed in the Guides folder:
— On macOS: Macintosh HD/Users/username/Library/Application Support/Blackmagic Design/ Fusion/Guides/
— On Windows: C:\Users\username\AppData\Roaming\Blackmagic Design\Fusion\Guides.
— On Linux: home/username/.fusion/BlackmagicDesign/Fusion/Guides.
Guides are a simple XML formatted text document saved with the .guide extension, as defined below. This makes it easy to create and share guides.
The guides are files that have drawing instructions a bit like code, like this:
Guide
{
Name = “10 Pixels”, Elements =
{
HLine | { | Y1=”10T” | }, | ||
HLine | { | Y1=”10B” | }, | ||
VLine | { | X1=”10L” | }, | ||
VLine | { | X1=”10R” | }, | ||
}, | |||||
} | |||||
Or an example of safe area:
Guide
{
![]()
Name = “Safe Frame”,
Elements =
{
HLine { Y1=”10%”, Pattern = 0xF0F0 }, HLine { Y1=”90%”, Pattern = 0xF0F0 }, HLine { Y1=”95%” },
HLine { Y1=”5%” },
VLine { X1=”10%”, Pattern = 0xF0F0 }, VLine { X1=”90%”, Pattern = 0xF0F0 }, VLine { X1=”95%” },
VLine { X1=”5%” },
HLine { Y1=”50%”, Pattern = 0xF0F0, Color = { R =
1.0, G = 0.75, B = 0.05, A=1.0 } },
VLine { X1=”50%”, Pattern = 0xF0F0, Color = { R = 1.0, G = 0.75, B = 0.05, A=1.0 } },
},
}
Guide Styles
The style of a guide is defined by a set of properties that appear in the format shown below:
<HLine Y1=“33%” Pattern=“C0C0” Color=“FFFFFFFF”/>
— HLine: Draws a horizontal line and requires a Y-value, which is measured from the top of the screen. The Y-value can be given either in percent (%) or in absolute pixels (px).
— Vline: Draws a vertical line and requires an X-value, which is measured from the left of the screen. The X-value can be given either in percent (%) or in absolute pixels (px).
— Pattern: The Pattern value is made up of four hex values and determines the visual appearance of the line.
Examples for such patterns include:
>>FFFF draws a solid line
>>EEEE a dashed line -------------------
>>ECEC dash-dot line -.-.-.-.-.-.-.-.-.-.-.
>>ECCC dash-dot-dot -..-..-..-..-..-..-..
>>AAAA dotted line ……………
— Color: The Color value is composed of four groups of two hex values each. The first three groups define the RGB colors; the last group defines the transparency. For instance, the hex value for pure red would be #FF000000, and pure lime green would be #00FF0000