< Previous | Contents | Next >
This panel shows a list of the available bin servers, with buttons below for entries to be added to or deleted from the list.
![]()
Adding a Remote Bin Entry
If you want to add another Remote bin to the list of available Remote bins, you can click the Add button in the bin servers Preferences panel. The text controls below the button will become enabled for editing. In the Server field, type the system name or IP address where the bin is hosted.
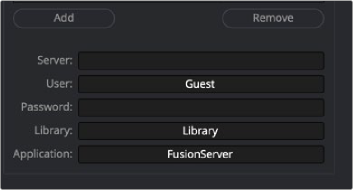
Add the IP address where the bin server is hosted.
Then add a User name and Password if one is needed to access the server.
The Library field lets you name the bins. So if you want to create a bin for individual projects, you would name it in the Library field, and each project would gets its own bin.
The Application field allows larger studios to specify some other program to serve out the bin requests.
Once you’ve finished setting up the bin server information and clicked Save in the Preferences window, you can open the Bins window to test your bin server. Opening the Bins window is the first time your connection to the server will be tested. If it cannot connect, the bin server will still be listed, with access denied or unavailable marked next to the name on the bins sidebar.
There is no practical limit to the number of bins that can be accessed.
Accessing Remote Bins
Bin servers behave just like a local bins. Any bin added in the preferences show in the Bins sidebar as another top-level item. The available bins are shown by name with a status and, if required, a password. Bins unavailable to you are marked as (unavailable).
Permissions
Unlike other directories on a server, your access to bins on a network is stored in the bin document. The bins themselves contain all the users and passwords in plain text, making it easy for someone to administer the bins.