< Previous | Contents | Next >
Below is a list of controls that are added beyond the controls that appear when a clip is added from the Edit or Cut page Timeline.
![]()
— Global In/Out: Use this control to specify the position of this node within the composition. For instance, when the clip is added to the comp from the Media Pool, it is added at frame 0. However, the MediaIn node from the Edit page Timeline may not start until a much later frame, based on where it is edited into the Timeline. Use Global In to specify the frame on which that the clip starts so that it aligned with media from the Edit page Timeline. It is easiest to view and change the alignment of different clips in the comp while viewing the Keyframes Editor.
To slide the clip in time or align it to other clips without changing its length, place the mouse pointer in the middle of the range control and drag it to the new location, or enter the value manually in the Global In value control.
If the Global In and Out values are decreased to the point where the range between the In and Out values is smaller than the n number of available frames in the clip, Fusion automatically trims the clip by adjusting the Clip Time range control. If the Global In/Out values are increased to
the point where the range between the In and Out values is larger than the number of available frames in the clip, Fusion automatically lengthens the clip by adjusting the Hold First/Last Frame controls. Extended frames are visually represented in the range control by changing the color of the held frames to purple in the control.
— Trim: The Trim range control is used to trim frames from the start or end of a clip. Adjust the Trim In to remove frames from the start and set Trim Out to specify the last frame of the clip. The values used here are offsets. A value of 5 in Trim In would use the 5th frame in the sequence as the start, ignoring the first four frames. A Trim Out value of 95 would stop loading frames after the 95th.
— Hold First Frame/Hold Last Frame: The Hold First Frame and Hold Last Frame controls will hold the first or last frame of the clip for the specified amount of frames. Held frames are included in a loop if the footage is looped.
— Reverse: Select this checkbox to reverse the footage so that the last frame is played first and the first frame is played last.
— Loop: Select this checkbox to loop the footage until the end of the project. Any lengthening of the clip using Hold First/Last Frame or shortening using Trim In/Out is included in the looped clip.
Using Loader and Saver Nodes in the Fusion Page
The Loader and Saver nodes in Fusion Page are specifically used for workflows that center around multi-channel EXR files. OpenEXR media can contain high-quality floating-point image data, multiple matte channels, as well as auxiliary channels rendered from 3D software. The Loader node lets you add OpenEXR files to a composition directly from the file system, retaining all the channels that are embedded within that file. Saver nodes enable you to render either all or part of a composition as EXR files directly to disk, bypassing the DaVinci Resolve Deliver page.
1 Open the Fusion page.
2 Open the Effects Library, and select the Tools > I/O category, and click the Loader node.
3 In the OS navigation window that opens, select the EXR image sequence you want to import, and click Open.
4 A Loader node linked to the EXR file will appear in the Fusion page, although a clip will not appear in the Media Pool.
Loader Node Parameters
The image tab of Loader nodes shares parameters with MediaIn nodes, as described previously in this chapter. However, when using a Loader node for EXR files, the Format tab selectively enables and disables the use of specific auxiliary channels contained in the file.

The Format tab in a Loader node Inspector displays Aux channels in EXR files.
Outputting Images Using Saver Nodes
![]()
Saver nodes render OpenEXR image sequences to disk directly from the Fusion page. Saver nodes can be added to any branch of a node tree, allowing you to export one or more subsets of nodes in a composition. You
can add as many Saver nodes as you like to whichever branches of your composition’s node tree you need to output, to export multiple parts of a composition. For example, if a particular composition is made up of one branch of nodes working together to create a complex background, and another branch of nodes creating a foreground character with
transparency, you could export the background and foreground branches as separate OpenEXR files using two Saver nodes.
To do this, simply create a Saver node after any set of nodes you want to output, and then open the Inspector and click Browse to choose a name and location for the rendered result.
When naming the file, you must add the .exr file extension. Fusion sets the output format accordingly. A four-digit frame number is automatically added before the filename extension. However, you can specify the frame padding by adding several zeroes to indicate the number of digits. For example, 000 signifies 001.
Once the Saver node is set up, output one or more Saver nodes, and choose Fusion > Render All Savers.
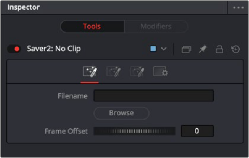
The Inspector parameters for a Saver node.