< Previous | Contents | Next >
The Controls tab includes a single slider that adjusts the exposure of the image.
When selected, the Lock RGBA control collapses control of all image channels into one slider. This selection is on by default. To manipulate the various color channels independently, deselect this checkbox.
This slider shifts the color in film, optical printing, and lab printing points. 8 points equals one stop of exposure.
Common Controls
The Settings tab controls are common to all Film nodes, so their descriptions can be found in “The Common Controls” section at the end of this chapter.
Remove Noise [RN]
The Remove Noise node
![]()
Remove Noise Node Introduction
The Remove Noise node provides simple noise management. The basic operation is that the node blurs the image channels, and then compares the blurred image to the original to extract the noise. A sharpness is then applied to the image, except where noise was detected.
To use this node, view the image and look at the red channel. Then increase the Red Softness until the grain appears to be gone. Next, increase the sharpness until the detail reappears, but stop before the grain reappears. Repeat for the green and blue channels.
Inputs
There are two inputs on the Remove Noise node: one for the 2D image and one for the effects mask.
— Input: The orange input is used for the primary 2D image that gets noise removed.
— Effect Mask: The blue input is for a mask shape created by polylines, basic primitive shapes, paint strokes, or bitmaps from other tools. Connecting a mask to this input limits the noise removal change to be within the pixels of the mask. An effects mask is applied to the tool after the tool
is processed.
Basic Node Setup
The Remove Noise node can be used on any clip with noise. For example, it is used below to remove noise prior to keying the clip using the DeltaKeyer.

A Remove Noise node used to remove noise prior to keying
Inspector
Remove Noise controls
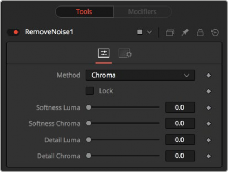
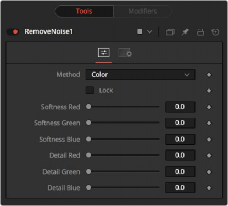
Controls Tab
![]()
The Controls tab switches the noise removal between two methods: Color and Chroma. When the Method is set to Color, the Controls tab adjusts the amount of blur and sharpness individually for each RGB channel. When the Method is set to Chroma, the blur and sharpness is adjusted based on Luma and Chroma controls.
This menu is used to choose whether the node processes color using the Color or Chroma method. This also gives you a different set of control sliders.
This checkbox links the Softness and Detail sliders of each channel together.
The Softness sliders determine the amount of blur applied to each channel of the image. In Chroma mode, you have sliders for the softness in the Luminance and Chrominance channels, respectively.
The Sharpness sliders determine how much detail is reintroduced into each channel after each channel is softened. In Chroma mode, you have sliders for Luminance and Chrominance channels, respectively.