< Previous | Contents | Next >
Audio from a clip brought in through the Media Pool is muted by default. Hearing the audio from a Media Pool clip is a two step process.
1 Select the clip in the Node Editor.
2 In the Inspector, click the Audio tab and select the clip name from the Audio Track drop-down menu.
If more than one MediaIn node exists in the comp, the audio last selected in the Inspector is heard. You can use the Speaker icon in the toolbar to switch between the MediaIn node audio files.
3 Right-click the Speaker icon in the toolbar, then choose the MediaIn for the clip you want to hear.
Purging the Audio Cache
The audio and its settings are cached for faster performance. If you change which audio tracks you want to play back in Fusion, or you use the Sound Offset wheel to slip the audio tracks, you need
to purge the audio cache. Also, if you return to the Edit, Cut, or Fairlight page and modify the audio levels, you need to purge the audio cache.
— Click the Purge Audio Cache button in the Inspector.
The audio will be updated when you next playback the composition.
![]()
MediaOut Node [MO]
The MediaOut node

NOTE: The MediaOut node is only available in DaVinci Resolve.
NOTE: The MediaOut node is only available in DaVinci Resolve.
NOTE: The MediaOut node is only available in DaVinci Resolve.
MediaOut Node Introduction
Every composition you create in DaVinci Resolve’s Fusion page must include a MediaOut node.
The MediaOut node sends the final output back to your Timeline on DaVinci Resolve’s Edit or Cut page. In most cases, it replaces the Saver node used in Fusion Studio for exporting clips.
The composition output by the Fusion page’s MediaOut node is propagated via the Color page’s source inputs, with the sole exception that if you’ve performed transforms or added plugins to that clip in the Edit or Cut page, then the handoff from the Fusion page to the Color page is as follows:
![]()
![]()

NOTE: Additional MediaOut nodes can be added to the Node Editor from the Effects Library. Additional MediaOut nodes are used to pass mattes to the Color page.
NOTE: Additional MediaOut nodes can be added to the Node Editor from the Effects Library. Additional MediaOut nodes are used to pass mattes to the Color page.
NOTE: Additional MediaOut nodes can be added to the Node Editor from the Effects Library. Additional MediaOut nodes are used to pass mattes to the Color page.


When using Resolve Color Management or ACES, each MediaOut node converts the output image back to the Timeline color space for handoff to the Color page.
Inputs
The single input on the MediaOut node is where you connect the final composite image you want rendered back into the Edit page.
— Input: The orange input is a required input. It accepts any 2D image that you want rendered back into the Edit page.
Basic Node Setup
![]()
Multiple MediaOut nodes can exist in a single comp. The first MediaOut node always renders the image back to the Edit page Timeline. Additional MediaOut nodes can be used to pass mattes to the Color page.
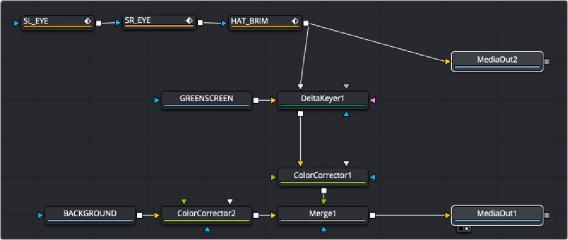
MediaOut1 node rendering to the Edit page, and MediaOut2 sending mattes to the Color page