< Previous | Contents | Next >
Introduction to Multicam Editing
If you’re working on a program where a performance, interview, or event was recorded using multiple simultaneous cameras, DaVinci Resolve has multi-camera editing tools; multicam editing for short.
Editing using these tools is a three part process:
— First, you have to create multicam clips from the individual camera angles (called “ISOs,” or isolated cameras).
— Second, you need to put the multicam clips you’ve created into a timeline.
— Third, you turn on the Multicam Viewer, and then you’re ready to start cutting and switching among angles, as if you were a live multi-camera director.
This section describes all of these steps, and the various options available for each of them.
Creating and Modifying Multicam Clips
Before you do anything else, you need to create one or more multicam clips.
![]()
1 Import all the ISO (isolated camera) clips that correspond to the multi-camera performance or event that you’ll be editing into the Media Pool.
2 Select all the clips that you need to sync together, right-click the selection, and choose “Create Multicam Clip Using Selected Clips.”
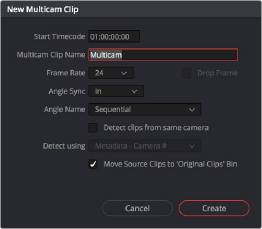
3 When the New Multicam Clip Properties dialog opens, choose from the following options:
New Multicam Clip Properties dialog
— Start Timecode: Presents the start timecode of the new multicam clip you’re about to create, which is determined by either the timecode value of the sync point if Angle Sync is defined by timecode, or by the sync point timecode value of the clip with the earliest timecode if Angle Sync is defined by waveform.
— Multicam Clip Name: Use to choose a more descriptive name than “Multicam 1” for the multicam clip you’re about to create.
— Frame Rate: Automatically lists the frame rate associated with the clips you selected.