< Previous | Contents | Next >
— Ripple: Shortens or lengthens the end of an outgoing clip or the beginning of an incoming clip, while simultaneously moving all clips either to the right in the Timeline (if you’re rippling to
lengthen a clip) or left in the Timeline (if you’re rippling to shorten a clip) to fill the gap or prevent overwriting that would otherwise occur if you were doing a resize operation. Ripple edits do change the duration of the overall Timeline and can alter the sync relation between different tracks if you’re not careful.
— Slip: Keeps a clip in the same place in the Timeline, while changing the range of media that appears in that spot. Slip edits do not change the duration of the overall Timeline.
— Slide: Keeps a clip’s range of media the same, but moves that clip to the left or right by either shortening the outgoing clip to its left while lengthening the incoming clip to its right, or vice versa.
Selection-Based Trimming Using the Trim Tool
![]()
Trim mode differs from Selection mode in that operations that would move clips with the Selection tool will either slip or slide clips with the Trim tool. Other operations that would resize edits with the Selection tool instead ripple the Timeline to automatically close gaps when using the Trim tool. The following sections describe the various trim operations that are available, both when using the mouse, and when using the keyboard.
— Click the Trim Edit button, or press the T key.
How the Trim Tool Differs From the Selection Tool
Aside from the actual trimming operations that are available, there are a few other important differences between the Trim tool and the Selection tool.
Selecting Edit Points
When the Trim tool is selected, dragging a bounding box over a series of clips in the Timeline selects the edit points to join clips together, instead of the clips themselves. This makes it fast and easy to select multiple edit points that you want to operate on simultaneously.
Selecting edit points in the Timeline using the Trim tool
Rippling the Timeline With Different Operations
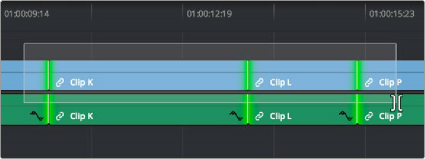
When the Trim tool is selected, other commands and controls that would ordinarily resize a clip or clips and leave gaps in the Timeline instead move (ripple) clips that are to the right of the clip or edit you’re trimming over to the left to prevent gaps whenever clips or edits are moved or resized.


Rippling the incoming edit point of Clip L to resize it and prevent a gap from appearing by moving all clips that are to the right (Clips P, L, and N) over to the left
![]()
For example, the Retime controls, the Extend and Trim Start/End commands, and the Nudge keyboard shortcuts all work differently depending on whether you’re using the Selection or Trim tools. This lets you use one set of tools to do different operations, depending on what you need to do.
Rippling Gap
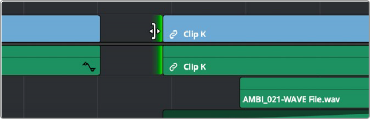
You can also use the Trim tool (or other trim operations described later in this chapter) to ripple the start and end of a gap in the Timeline. Rippling a gap lets you grow or shrink the gap while moving the portion of the Timeline to the right of the gap forward or backward in time. Whenever you ripple against gap, a 2-up display appears that lets you see both the clip you’re trimming and whatever superimposed clips may be showing through that gap.

TIP: You can temporarily toggle between the selection (A) and trim tools (T) while using these operators to see their effects. Releasing the key will return you to the originally selected mode.
TIP: You can temporarily toggle between the selection (A) and trim tools (T) while using these operators to see their effects. Releasing the key will return you to the originally selected mode.
TIP: You can temporarily toggle between the selection (A) and trim tools (T) while using these operators to see their effects. Releasing the key will return you to the originally selected mode.
Using the Trim tool to ripple the Out point of a gap to narrow it