< Previous | Contents | Next >
Using the Trim Tool With the Mouse
When trimming using the mouse, you can perform every kind of trim operation that’s available using a single tool, simply by clicking the Trim mode/tool button, and then dragging on the appropriate area of a clip in the Timeline.
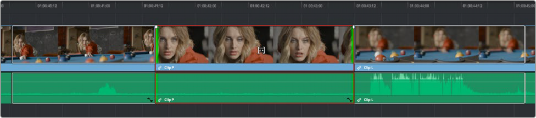
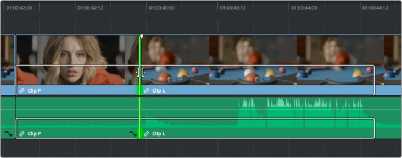
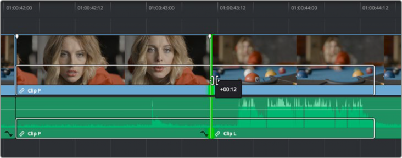
— To slip a clip: To slip a clip’s range of content without changing its position in the Timeline, click the middle top region of a clip, and then drag to the left or right to “slip” the clip to contain a different range of frames. A dashed overlay shows the total duration of media available for you to slip with, which moves left and right as you drag.
![]()
Clicking the top clip area before a slip, an overlay shows the clip’s available range of media
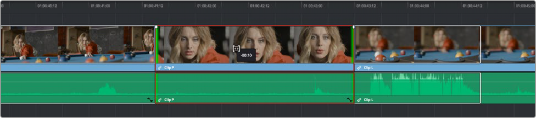
After dragging to slip, clips don’t move, but the slipped clip’s range of media has changed
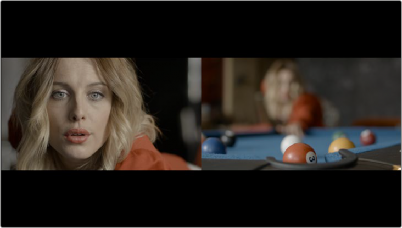
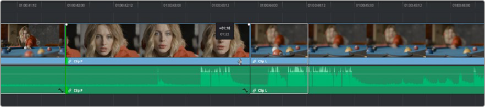
When slipping clips, a 4-up display shows all relevant outgoing and incoming frames, so you can compare the continuity of action from one clip to the next. During a slip, the top two frames update to show you the new incoming and outgoing frames of the clip being slipped, relative to

TIP: You can temporarily disable this four-up display by pressing the Shift key while you slip so that you only see the frame at the position of the playhead. This makes it possible for you to see which frame passes the playhead by as you ripple the Timeline. You can toggle this two-up display off completely by selecting View > Enable Multiview Edit Preview.
TIP: You can temporarily disable this four-up display by pressing the Shift key while you slip so that you only see the frame at the position of the playhead. This makes it possible for you to see which frame passes the playhead by as you ripple the Timeline. You can toggle this two-up display off completely by selecting View > Enable Multiview Edit Preview.
TIP: You can temporarily disable this four-up display by pressing the Shift key while you slip so that you only see the frame at the position of the playhead. This makes it possible for you to see which frame passes the playhead by as you ripple the Timeline. You can toggle this two-up display off completely by selecting View > Enable Multiview Edit Preview.
the unchanging outgoing frame of the clip to the left and incoming frame of the clip to the right.

Four-up display when slipping a clip
![]()
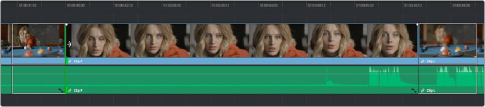
— To slide a clip: To slide a clip, moving it to another position in the Timeline while simultaneously adjusting the Out point of the previous clip and the In point of the next clip to accommodate the change in position of the current clip being dragged, click the bottom-middle name bar of the clip and drag it to another position.
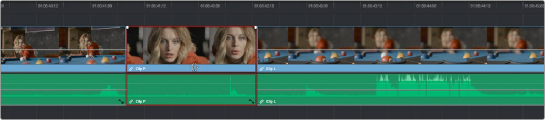
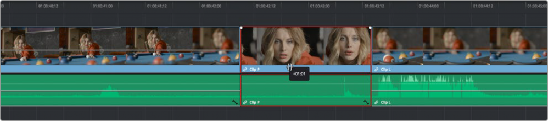
After dragging to slide, the selected clip is at a new location, surrounding clips filled the gap

TIP: You can temporarily disable this four-up display by pressing the Shift key while you slide so that you only see the frame at the position of the playhead. This makes it possible for you to see which frame passes the playhead by as you ripple the Timeline. You can toggle this two-up display off completely by choosing View > Enable Multiview Edit Preview.
TIP: You can temporarily disable this four-up display by pressing the Shift key while you slide so that you only see the frame at the position of the playhead. This makes it possible for you to see which frame passes the playhead by as you ripple the Timeline. You can toggle this two-up display off completely by choosing View > Enable Multiview Edit Preview.
TIP: You can temporarily disable this four-up display by pressing the Shift key while you slide so that you only see the frame at the position of the playhead. This makes it possible for you to see which frame passes the playhead by as you ripple the Timeline. You can toggle this two-up display off completely by choosing View > Enable Multiview Edit Preview.
When sliding clips, a 4-up display shows all relevant outgoing and incoming frames, so you can compare the continuity of action from one clip to the next. During a slide, the bottom two frames update to show you the new outgoing frame of the clip to the left, and the new incoming frame of the clip to the right of the clip being slid.

4-up display when sliding a clip
— To roll an edit point: To roll an edit, moving the Out point of the outgoing clip and the In point of the incoming clip at the same time, drag an edit point between two clips to the left or right. (Roll edits can also be done in Selection mode.)
![]()
Selected edit point before roll
Edit point moved farther to the right, both adjacent clips resized to prevent gap
When rolling an edit, a 2-up display shows the changing continuity of action from the outgoing frame of the clip to the left to the incoming frame of the clip to the right, and you will hear the audio scrubbing of the right clip.
Two-up display when rolling an edit
— Ripple edit: To ripple the outgoing or incoming part of an edit to add or remove media to a clip while simultaneously moving all other clips at the left in the Timeline to make room, click the Trim tool, and drag an edit point to a new position in the Timeline.
![]()
Selected outgoing half of an edit point before ripple
Rippled clip is shorter, the rest of the Timeline has moved left to fill the gap

TIP: You can temporarily disable this two-up display by pressing the Shift key while you ripple so that you only see the frame at the position of the playhead. This makes it possible for you to see which frame passes the playhead by as you ripple the Timeline. You can toggle this two-up display off completely by selecting View > Enable Multiview Edit Preview.
TIP: You can temporarily disable this two-up display by pressing the Shift key while you ripple so that you only see the frame at the position of the playhead. This makes it possible for you to see which frame passes the playhead by as you ripple the Timeline. You can toggle this two-up display off completely by selecting View > Enable Multiview Edit Preview.
TIP: You can temporarily disable this two-up display by pressing the Shift key while you ripple so that you only see the frame at the position of the playhead. This makes it possible for you to see which frame passes the playhead by as you ripple the Timeline. You can toggle this two-up display off completely by selecting View > Enable Multiview Edit Preview.
When rippling an edit, a 2-up display shows the continuity of action from the outgoing frame of the clip to the left to the incoming frame of the clip to the right. Which frame updates depends on which side of the edit you’re rippling.