< Previous | Contents | Next >
Using Manual Selections to Control Which Clips Are Trimmed
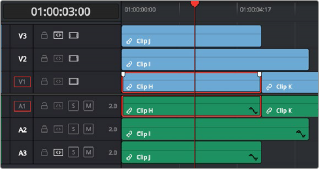
It’s important to know that manual selections you make in the Timeline that highlight specific clips always take precedence over whatever the Auto Select controls are set to. For example, if Auto Select is turned on for tracks V1, V2, and V3, but you’ve selected a clip on track V1, only the selected clip will be still be affected by whatever operation you decide to perform. For example, if you use Trim End, the clip on track V1 will be affected.
![]()
Manual selection of a clip on track V1 overrides the Auto Select controls on all tracks
Using Auto Select to Control Which Tracks Are Rippled
Each track’s Auto Select control is also used to control how trimming and editing operations that ripple the Timeline affect timelines with multiple tracks and superimposed clips. Using Auto Select controls, you can turn off rippling on specific tracks, while leaving it on for others.
For ease of use, you’ll typically want to leave Auto Select on for all tracks when rippling clips, to ensure that all the parts of your timeline stay in sync with one another. However, when the occasion requires, the Auto Select controls provide the option to suspend rippling on specific tracks while allowing rippling on others.
The rules are simple:
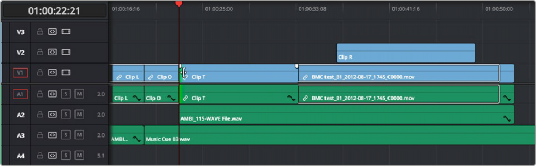
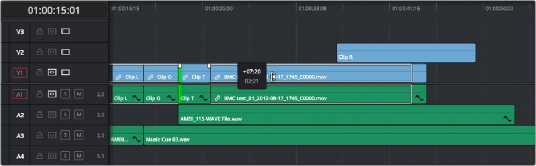
— Tracks with Auto Select enabled: Ripple editing or ripple deleting affects all clips to the right of the clip or clips on that track being trimmed.
![]()
Before and After, clip to the right of Clip T on tracks V2, V1, A1, and A2 are rippling because those tracks’ Auto Select controls are enabled
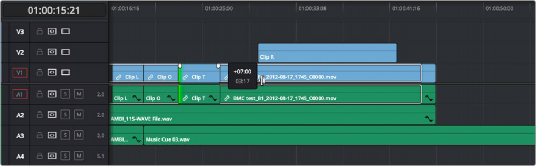
— Tracks with Auto Select disabled: Rippling is disabled on these tracks.

Before and After, clip to the right of Clip T on tracks V1 and A1 are rippling because those tracks’ Auto Select controls are enabled, but clips on tracks V2 and A2
aren’t rippling because those tracks’ Auto Select controls are disabled