
< Previous | Contents | Next >
2 To ripple, slip, or slide the entire selection at once, choose Trim mode. To resize or move each selected item at once, continue using Selection mode.
3 Use the mouse, keyboard shortcuts, or timecode entry to execute the trimming operation, just as you would if a single edit point or clip were selected.
The following sections describe each of the special-case multi-selection trim operations that are possible, along with each one’s special rules and limitations.
Resizing and Rolling Multiple Edit Points
You can resize or roll multiple edit selections at once. In this way, you can adjust the edit points of multiple superimposed clips all together. Trimming multiple edit points essentially lets you “gang” them so that all selected edits move together as one.
— To resize multiple clips at once, select the left (outgoing) or right (incoming) half of each edit point you need to adjust, then use the Selection tool to drag those edit points to resize them all.
NOTE: You cannot combine ripple and roll operations at the same time.
NOTE: You cannot combine ripple and roll operations at the same time.
NOTE: You cannot combine ripple and roll operations at the same time.
— To roll multiple clips at once, select every edit point you need to adjust right at the center, so that both the incoming and outgoing halves of each edit point are selected, then use either the Selection or Trim tools to drag those edit points to roll them all.
![]()
Rippling Multiple Edit Points
It’s also possible to select multiple incoming or outgoing edit points on either superimposed video tracks, or on the same video track, in order to ripple them all at once. A good example of when you’d want to ripple multiple clips on the same track is if you’ve got an end credit sequence of 14 text generators, and you’d like to shorten the entire sequence by a particular amount. This example can be seen below.
When you ripple trim multiple edits on the same track, how many frames are trimmed in a particular trim depends on what method you use to do your trimming.
— If you use use the Trim tool via dragging in the Timeline, then you can choose to ripple the entire selection of edits by an arbitrary duration, for example, shortening or lengthening the entire selection by eight frames. To do this, DaVinci Resolve performs your multi-selection trim operation one edit at a time, removing a frame at a time from each selected edit from the left to the right
as you trim, until either you stop the operation, or every single selected edit has had a frame removed, at which point DaVinci Resolve begins trimming the second frame from each selected edit from the left to the right, and then the third, and so on, until you stop trimming. Working this way, you can use the mouse to trim any number of clips to fit into any duration.
— You can also choose to ripple each selected edit by the same amount, for example removing three frames from each of the selected edits, all at once. To do so, hold the Command key down while dragging selected edits with the Trim tool, or use Dynamic JKL trimming, or trim by entering relative timecode values, or use the nudge keys (Period and Comma).
1 Click the Trim tool, and drag a bounding box in the Timeline to select all 14 edits.
2 Press the U key to select the incoming half of each selected edit.
3 Use whichever trimming method you prefer to ripple the sequence to be shorter or longer. Dragging using the Trim tool lets you trim by an arbitrary number of frames, while holding the Command key down while dragging with the Trim tool, using timecode entry to trim, using the Comma and Period nudge keys, or using Dynamic JKL trimming lets you trim every selected edit by the same number of frames.


(Before) Selecting 14 incoming credits edit points, (After) Trimming them all at once
![]()
In the following example, the incoming edit of three clips in the following montage are selected and simultaneously rippled using the Trim tool. Notice that each overlapping clip ripples along with the nearest selected edit that’s to the left of it; this means that the superimposed clip in track V2 and the audio clip in track A4 ripples along with the third selected edit, while the audio clip in track A2 ripples along with the second selected edit. Since the audio clip in track A3 starts to the left of the first selected edit, it does not ripple.
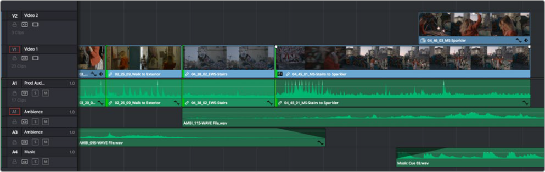
Selecting three incoming edit points,
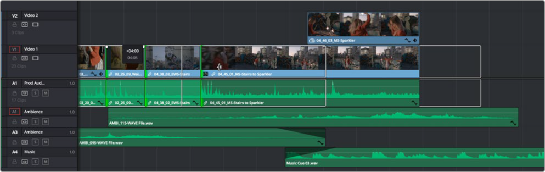
Trimming them all at once