< Previous | Contents | Next >
Audio in the Edit vs. Fairlight Pages
While the Fairlight page provides dedicated audio editing and mixing capabilities that are suitable for sweetening the audio of your program once it’s been edited, the Edit page has extensive audio capabilities of its own. This enables editors to edit and refine audio clips, set levels, and do simple mixes as they assemble the program in the first place. However, once things have been edited together, you’re meant to go freely back and forth between the Edit and Fairlight page as you refine your work, using whichever environment is most suitable for the task at hand.
Compatible Audio Formats
DaVinci Resolve is compatible with WAVE, Broadcast WAVE, AIFF, MP3, AAC (M4A), CAF, iOS Voice Memo (macOS only), both MTS and QuickTime containers that use the AC3 audio format, and Enhanced AC-3 (macOS and Windows only). DaVinci Resolve is compatible with audio at sample rates including 32, 44.1, 48, 88.2, 96, and 192 kHz.
![]()
Assigning Audio Channels in the Media Pool
When you first import audio into the Media Pool, it’s a good idea to make sure that whatever channels those files contain are assigned correctly before you start editing clips into the Timeline. In other words, you want to make sure that stereo files are set to be stereo clips, that 5.1 and 7.1 files are set to be surround clips, and that multi-channel files are set to expose however many tracks you want
to edit separately in your program. Clip channel assignments are made in the Audio panel of the Clip Attributes window.
This is particularly important when clips have more than two channels of audio. For example, production sound recordists might record three, six, or even more audio channels, corresponding to multiple microphones used on set to simultaneously record different actors plus a mixdown track. In this case, you need to define how many of these channels you want to play (or mute), and how many audio items you want to appear in the Edit and Fairlight page Timelines.
Mono, stereo, 5.1, and 7.1 clips are handled automatically, but multi-channel clips needing custom assignments in the Media Pool should be remapped as necessary using Clip Attributes, so that DaVinci Resolve can more easily place incoming audio clips into the correct track of the Timeline. You can alter the clip attributes for clips one at a time, or for multiple selected clips at once. For more information on these settings, see Chapter 22, “Modifying Clips and Clip Attributes.”
How to Assign Audio Channels
Each clip with audio has the following options in the Audio panel of the Clip Attributes window:

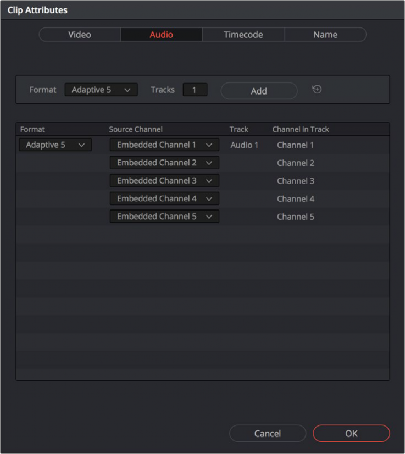
The controls available for adding tracks with which to remap channels
A set of controls at the top of the Track/Channel list lets you add additional tracks to a clip. Adding additional tracks to a clip let you remap that clip’s available channels to appear as additional items in the timeline when you edit it, one item per track with an unmuted channel.
![]()
How you handle audio in your timeline is up to you. In the case of production audio consisting of five channels, four for different microphones plus one mixdown channel, you might use Clip Attributes to map all channels to a single track.
The Audio panel of the Clip Attributes window for a single-track clip with four channels
With this mapping, this audio clip exposes only one item on one track in the Edit page Timeline, or five lanes within a single track in the Fairlight page Timeline. Either way, this mapping exposes a single editable unit.

A single audio channel exposed in the Timeline
![]()
Optionally, you could choose to mute the four individual microphone channels and only monitor the top mixdown channel. This can be accomplished by setting channels 2-5 to mute. Muted channels are always retained, just not heard, and you can turn them back on whenever you like using by right-clicking a clip in the Timeline and choosing Clip Attributes to get back to these controls for the specific timeline clip you’ve edited.
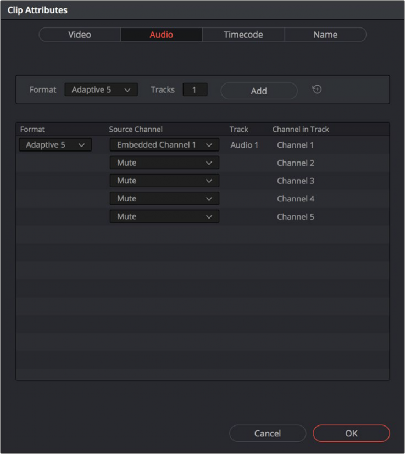
The Audio panel of the Clip Attributes window for a clip with four channels muted

NOTE: If you export audio clips with muted tracks to Pro Tools in the Deliver page, the muted channels are exported as well.
NOTE: If you export audio clips with muted tracks to Pro Tools in the Deliver page, the muted channels are exported as well.
NOTE: If you export audio clips with muted tracks to Pro Tools in the Deliver page, the muted channels are exported as well.
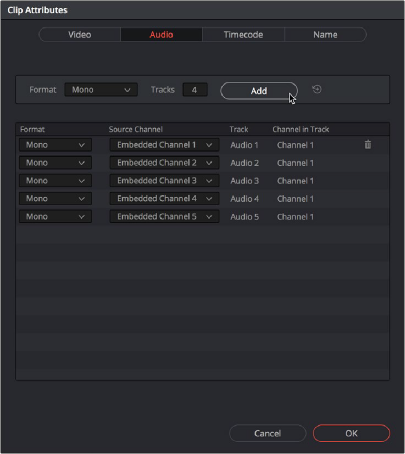
Alternately, you might elect to set these clips up with five separate audio tracks with a single audio channel each, in order to expose each channel separately in the Timeline for independent editing. First, set the top track to be Mono using Embedded Channel 1. Then, using the Add channel controls at the top of the channels list, you can set Tracks to 4, format to Mono, and click Add to create four
additional tracks in addition to the one track that clip had originally. Remapping channels 2-5 to these new tracks will result in the track mapping seen in the following screenshot.
![]()
The Audio panel of the Clip Attributes window after adding four channels
Editing such a clip into the Timeline results in five linked audio items appearing on five separate audio tracks, each of which can be edited separately in the Timeline.
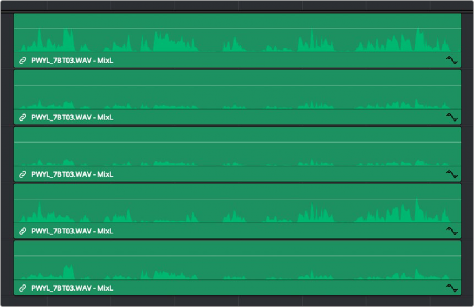
Each channel exposed as a separately editable clip in the Timeline