< Previous | Contents | Next >
The Audio Waveform display option (circled in red) in
the Timeline View drop- down. Audio View Options are (L-R) Non-Rectified Waveforms, Full Waveform, and Waveform Border.
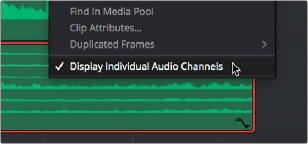
While a single averaged audio waveform representing all the channels in that clip is shown by default, you can switch any clip to seeing each individual waveform in a vertical stack by right- clicking any audio clip and choosing Display Individual Audio Channels.
![]()
Whenever you cut an audio clip, you cut all audio channels with it. Audio channels that are embedded within a single track cannot be individually edited.
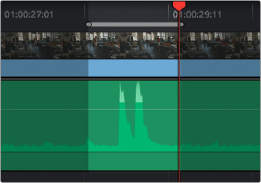
Enabling the display of multiple channel waveforms in the Timeline
Editing Audio In the Timeline Using In and Out Points
Audio clips can be edited using all of the commands and tools available for video clips. However, it’s good to know that one of the most common techniques of editing audio in other environments is available in DaVinci Resolve, and that is the ability to identify a range of audio to cut, copy, or delete using Timeline In and Out points, so that you can easily eliminate, move, or duplicate partial sections of audio without having to use the Razor Edit or Split Clip commands.
1 Set In and Out points in the Timeline to identify the range of audio you want to eliminate. If necessary, turn off the Auto Select controls of tracks to omit overlapping audio clips you don’t want to delete from this operation.
2 Press the Backspace key to delete the section of audio and leave a gap, or press the Forward Delete key to delete the section of audio and ripple the Timeline to close the gap.
Setting In and Out points to identify a range of audio to delete
Deleting the audio using the Backspace key to leave a gap
![]()
1 Set In and Out points in the Timeline to identify the range of audio you want to copy.
If necessary, turn off the Auto Select controls of tracks with overlapping audio you don’t want to copy; you can Option-click the Auto Select control of the audio track you’re copying from to solo it, and you can Shift-click any video track’s Auto Select control to turn them all off. In this example, we’re copying some background ambience to continue building an ambience track.
Setting In and Out points to identify a range of audio to copy
2 Press Command-C to copy that section of audio.
3 Press Option-X to clear the Timeline In and Out points, and move the playhead to where you want to paste the copied section of audio.
4 Press Command-V to paste the copied audio. If you’re looping a section of audio, you can paste many times to loop what you’ve copied.
