
< Previous | Contents | Next >
NOTE: When you use Collaborative Workflow to enable multiple artists to work together in the same project, Live Save is automatically turned on and cannot be disabled.
NOTE: When you use Collaborative Workflow to enable multiple artists to work together in the same project, Live Save is automatically turned on and cannot be disabled.
NOTE: When you use Collaborative Workflow to enable multiple artists to work together in the same project, Live Save is automatically turned on and cannot be disabled.
Enabling Live Save sets DaVinci Resolve to incrementally save changes as you make changes to your project, with no user intervention required. Disabling Live Save puts DaVinci Resolve back into a state where you have to manually save by pressing Command-S (this can be useful when doing demos when you don’t want to save your changes to a project). Using Live Save is turned on by default and highly recommended to prevent the loss of work in the event you have a problem. It even works for previously unsaved projects that you’ve forgotten to save if anything goes wrong.
![]()
Project Backups
Turning on the Project Backups checkbox in the Project Save and Load panel of the User Preferences enables DaVinci Resolve to save multiple backup project files at periodic intervals, using a method that’s analogous to a GFS (grandfather father son) backup scheme. This can be done regardless of whether or not Live Save is turned on. Each project backup that’s saved is a complete project file, excluding stills and LUTs, which are omitted in order to save storage space.
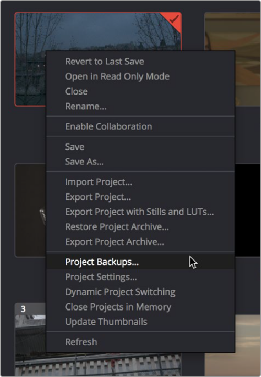
Once you’ve enabled Project Backups for a long enough time, whatever saved project backups have been created are retrievable in the Project Manager via the contextual menu that appears when you right-click a project, by choosing Project Backups to open the backups list dialog.
The backups list dialog shows you all backups that are available for a particular project, and has controls for sorting the list via different columns, deleting some or all of the backups in the list, and loading backups that you want to retrieve. Opening a project backup does not overwrite the original project; project backups are always opened as independent projects.
1 Choose DaVinci Resolve > Preferences > User, and open the Project Save and Load panel.
2 Turn on the Project Backups checkbox.
3 Choose the settings that determine how many Project Backups will be maintained. Project Backups are saved on a first in, first out basis. Three fields let you specify how often to save new backups and how many backups to maintain, while the fourth lets you choose where the backups will be saved.
— Perform backups every X minutes: The first field specifies how often to save a new backup within the last hour you’ve worked. By default, a new backup is saved every 10 minutes, resulting in six backups within the last hour. Once an hour of working has passed, an hourly backup is saved and the per-minute backups begin to be discarded on a “first in, first out” basis.” By default, this means that you’ll only ever have six backups at a time that represent the last hour’s worth of work.
— Hourly backups for the past X hours: The second field specifies how many hourly backups you want to save. By default, 8 hourly backups will be saved for the current day you’re working, which assumes you’re working an eight hour day (wouldn’t that be nice). Past that number, hourly backups will begin to be discarded on a “first in, first out” basis.
— Daily backups for the past X days: The third field specifies for how many days you want to save backups. The very last project backup saved on any given day is preserved as the daily backup for that day, and by default daily backups are only saved for five days (these are not necessarily consecutive if you take some days off from editing for part of the week). Past that number, daily backups will begin to be discarded on a “first in, first out” basis. If you’re working on a project over a longer stretch of time, you can always raise this number.
![]()
— Project backup location: Click the Browse button to choose a location for these project backups to be saved. By default they’re saved to a “ProjectBackup” directory on your scratch disk, although you could change this to a volume that better fits into your data backup methodology.

NOTE: When using this feature, the very first backup that’s saved for a given day may be a bit slow, but all subsequent backups should be unnoticeable.
NOTE: When using this feature, the very first backup that’s saved for a given day may be a bit slow, but all subsequent backups should be unnoticeable.
NOTE: When using this feature, the very first backup that’s saved for a given day may be a bit slow, but all subsequent backups should be unnoticeable.
4 Click Save to confirm your change, and then close the Preferences window.
Once one or more Project Backups have been saved, you can access them in the Project Browser.
1 Open the Project Manager.
2 Right-click a project, and choose Project Backups from the contextual menu.
Restoring a project backup in the Project Browser
![]()
3 Select a backup that you want to restore from the Auto Backups list. If you don’t see the particular backup you want, you can click the Refresh button to update the list, or you can try sorting by one of the columns (Auto Backup, Date Modified, Width, Height) to better navigate the list.
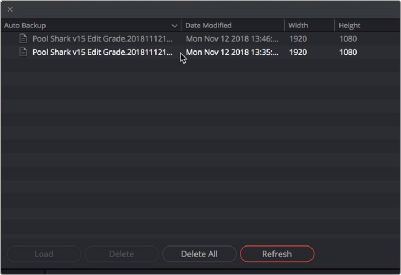
Selecting a backup that you want to restore
4 Once you’ve selected the backup you want to restore, you can click Load to open that backup as a new project. If the project it was saved from is already open, it won’t be overwritten.
Timeline Backups
Turning on the Timeline Backups checkbox in the Project Save and Load panel of the User Preferences enables DaVinci Resolve to save multiple backups of a timeline at periodic intervals, using a method that’s analogous to a GFS (grandfather-father-son) backup scheme. This can be done regardless of whether or not Live Save is turned on.
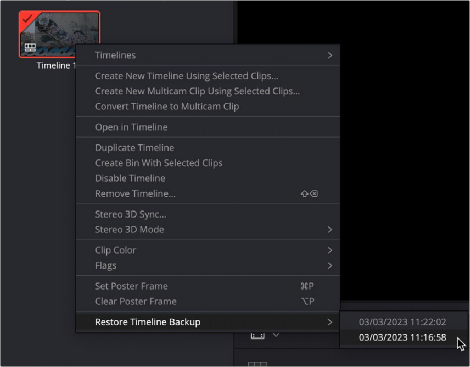
If you want to revert to a previous backup of a timeline, simply right-click on the timeline in the Media Pool, select Restore Timeline Backup from the contextual menu, and choose the backup from the list of options. Backups are organized by date and time, making it easy to find the specific timeline you want to restore.
Restoring a timeline backup does not overwrite your current timeline. Instead the selected backup will be brought into the Media Pool as a new timeline, with the name “Backup” appended to it.
![]()
Restoring a timeline backup in the Media Pool
Timeline backups are only saved when changes have been made to a project. If DaVinci Resolve sits idle for any period of time, such as when your smart watch tells you to go outside and walk around the block, no additional project backups are saved, preventing DaVinci Resolve from overwriting useful backups with unnecessary ones.
Three fields let you specify how often to save a new backup, while the fourth lets you choose where the backups will be saved. These settings apply to both Project and Timeline backups.
— Perform backups every X minutes: The first field specifies how often to save a new backup within the last hour you’ve worked. By default, a new backup is saved every 10 minutes, resulting in six backups within the last hour. Once an hour of working has passed, an hourly backup is saved and the per-minute backups begin to be discarded on a first in, first out basis. By default, this means that you’ll only ever have six backups at a time that represent the last hour’s worth of work.
— Hourly backups for the past X hours: The second field specifies how many hourly project backups you want to save. By default, two hourly backups will be saved for the current day. Past that number, hourly backups will begin to be discarded on a first in, first out basis.
— Daily backups for the past X days: The third field specifies for how many days you want to save backups. The very last backup saved on any given day is preserved as the daily backup for that day, and by default daily backups are only saved for two days. Past that number, daily backups will begin to be discarded on a first in, first out basis. If you’re working on a project over a longer stretch of time, you can always raise this number.
— -Project backup location: Click the Browse button to choose a location for these backups to be saved. By default they’re saved to a “ProjectBackup” directory on your scratch disk, although you could change this to a volume that better fits into your data backup methodology. This folder contains both Project and Timeline backups.