< Previous | Contents | Next >
1 Right-click one of the selected clips and choose Normalize Audio Levels. The Normalize Audio Level dialog appears.
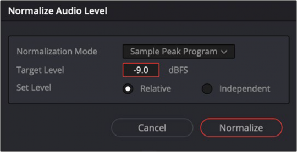
The Normalize Dialog in the Edit page
2 Choose the Normalization Mode you want to use. You can choose among a variety of standardized loudness measurement algorithms, or Sample Peak, or True Peak.
3 Choose the reference level that you want to set the peak volume of the selected clips to match.
4 Choose how you want to set the level of multiple selected clips:
![]()
— When Set Level is set to Relative, all selected clips are treated as if they’re one clip, so that the highest peak level of all selected clips is used to define the adjustment, and the volume of all selected clips is adjusted by the same amount. This is good if you have a series of clips, such as a dialog recording, where the levels are consistent with one another, and you want to normalize all of them together.
— When Set Level is set to Independent, the peak level of each clip is used to define the adjustment to that clip, so that the volume of every selected clip is adjusted by an amount specific to that clip. The end result may be a set of very different volume adjustments intended to make the peak levels of each audio clip match one another. This is good if, for example, you’re trying to balance a series of different sound effects with one another that have very different starting levels.
For more information about loudness normalization, see Chapter 178, “Audio Meters and Audio Monitoring.”
Pan
Each audio clip in the Timeline has a simple stereo Pan control that lets you pan that clip. While most professional mixes will restrict panning to the more robust panner found in the Fairlight page Mixer, this simple clip-based Pan control is useful for editors of visuals working in the Edit page to quickly create simple panning effects to aid in a craft edit. Dragging the slider lets you pan audio left to right. This control is centered at 0 by default.
![]()
Clip Pan Control