< Previous | Contents | Next >
There are two ways you can keyframe audio in the Edit page. You can use each audio clip’s volume curve in the Timeline, or you can use the keyframe controls in the Inspector to animate the Volume parameter of individual clips as you would any other clip attribute, fading the level up or down, panning from left to right, or dynamically changing any one of a host of filter controls, in subframe increments, if necessary.
For more information on keyframing in the Inspector, see Chapter 53, “Keyframing Effects in the Edit Page.” Any keyframes you create using the Keyframe controls of the Inspector automatically appear on the volume curve of that audio clip in the Timeline.
Overlay Controls for Volume
![]()
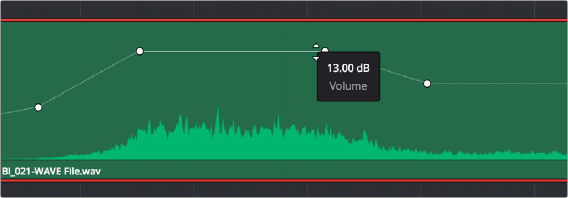
Each audio clip in the Timeline appears with a Volume overlay control on top of it, that by default starts out completely flat. Similar to such controls found in other applications, the level curve lets you alter each clip’s levels, either overall, or dynamically using keyframes.

Volume curves adjusting the level of a clip’s audio in the Timeline
Additionally, you can click any clip’s Audio Curve Editor button, at the bottom right-hand corner of each audio clip, to open an audio-specific Curve Editor in which you can also keyframe volume.

The button for opening an audio clip’s Curve Editor
How to Add and Adjust Volume Keyframes
Mixing audio by adding and adjusting individual keyframes can be a fast and effective way of balancing clip levels with one another, fixing level problems within a particular clip, or even creating simple mixes (although the mixing capabilities of the Fairlight page are considerably more robust). When manually editing any audio parameter curve, you can use the following procedures.
— To add keyframes to the Volume curve: Hold the Option key down and click the curve to place a keyframe at that frame. You must add at least two keyframes to create an automated change in Volume.
— To select one or more keyframes: Click any keyframe to select it.
— To select multiple discontiguous keyframes: Command-click all keyframes you want to select, whether they’re next to one another or not.
— To select multiple contiguous keyframes: Click the first keyframe you want to select, and then shift-click the last keyframe you want to select, and all keyframes between will also be selected.
— To adjust any curve segment: Position the pointer over the overall segment for clips with no keyframes, or position it between any two keyframes, directly on top of the curve segment you want to raise or lower. When the Move cursor is displayed, click and drag up to raise the volume, or down to reduce the volume.
— To adjust a keyframe in any direction: Move the pointer over a keyframe so that the four- way cursor appears, and then click and drag up or down to change the volume, or side
to side to change its timing. The timing of audio keyframes can be adjusted in subframe increments, for precision mixing.
![]()
— To adjust a keyframe in only one direction: Move the pointer over a keyframe so that the four- way cursor appears, press Shift, and click and drag in the intended direction of adjustment, either vertically to change the volume of the clip at that frame, or horizontally to move the keyframe to
a different point in time. Once you start dragging a keyframe into a particular direction, keyframe movement is constrained in that direction until you release that keyframe. The timing of audio keyframes can be adjusted in subframe increments, for precision mixing.
— To change one or more Linear keyframe to Ease In or Ease Out: Eased keyframes create animated changes that begin slowly and accelerate to full speed, or slow down gradually to decelerate to a stop. This only works when you have two or more keyframes creating an animated effect. Select one or more keyframes, then right-click one of the selected keyframes and choose Ease In, Ease Out, or Ease In and Out, depending on which keyframe you’re editing and the effect you want to create.
— To change one or more eased keyframes to Linear: Select one or more keyframes, then right- click one of the selected keyframes and choose Linear.
— To cut or copy, and paste one or more keyframes: Make a selection of keyframes, and use the Cut (Command-X) or Copy (Command-C) key shortcuts. Then, move the playhead to where you want the first of the copied keyframes to start, and press Paste (Command-V).
— To delete one or more control points from a curve: Select the keyframe(s) you want to delete and press Backspace.