< Previous | Contents | Next >
File Formats That Are Compatible With Media Management
No matter what you use if for, Media Management is designed to work with all video formats that are have decode support within DaVinci Resolve, and is capable of outputting a few more formats than the Deliver page can. Compatible formats include but are not limited to:
— QuickTime
— MXF
— R3D
— Image-based raw media formats including Blackmagic RAW
and Alexa raw
— DPX, EXR, JPEG 2000, TIFF, Cineon, and
other compatible image sequence formats
— AVI
— H.264
— XAVC
— AVC-Intra
In addition, the “trim unused media” options of the Copy or Move operations are now compatible with clips that use codecs employing temporal compression, such as H.264, XAVC, and AVC-Intra, enabling you to eliminate unused media for these formats during media management without recompressing or transcoding.
![]()
Using Media Management
Using Media Management is simple.
1 Select the items you want to media manage, either clips or one or more Timelines.
2 Choose File > Media Management, and the Media Management window appears.
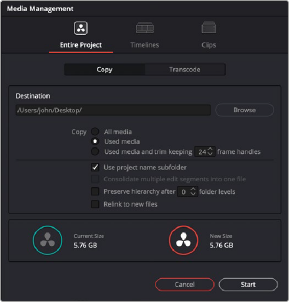
Media Management window
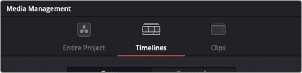
3 Choose the scope of the Media Management operation, shown at the top of the window. You can choose to affect the Entire Project, only one or more Timelines, or only Clips. What you had
selected prior to opening the Media Management window affects the scope that is selected when you open this window, but it doesn’t limit to operation to only the selected items. So, if nothing was selected in the Media Pool, then “Entire Project” is automatically highlighted. If any clips were selected, then “Clips” is highlighted automatically. If any Timelines were selected, then “Timelines” is highlighted. However, if for whatever reason the wrong option is highlighted, you need only click the option you want to select it instead.
Media Management scope options
4 Next, choose which operation you want to perform:
— Copy: Creates duplicates of all media associated with clips or timelines at the destination.
![]()
— Transcode: Creates duplicates of all media associated with clips or timelines in a new format that you specify; all transcoded clips are written to the same destination.

Media Management operations
5 Click the Browse button and use the File Destination dialog to choose a location for the managed media to be written. The file path of this location appears in the Media Destination field.
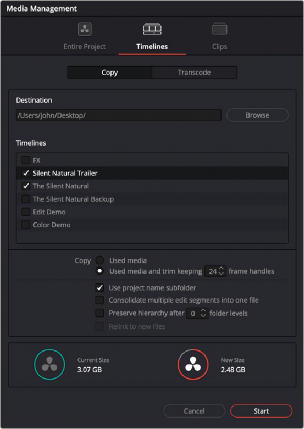
6 Choose the options associated with the operation you selected. If you choose to media manage Timelines, then a Timeline Selection option lets you choose which Timelines you want to include in this operation. The current size of the selected media is listed below, alongside an estimate of the size of the media after the operation you’ve selected. Depending on which options you select, the estimate may be larger or smaller, but this will show you if you need to change the selected options to achieve a more desirable final size.
![]()
Media Management options shown for copying trimmed media from a specific timeline
7 When you’ve finished choosing options, click Start. A progress bar appears showing you how long the operation will take.
The following workflow illustrates how you can use Media Management to cut down the amount of media you need to deal with when you’re conforming a project imported from elsewhere, and you’ve been given far more media then you actually need, because you only need what’s actually in the timeline you’re importing.
1 Connect the portable drive containing the media to be conformed to your workstation.
2 Import the AAF or XML project file you were given into the Edit page, and conform it to the media on the portable drive you connected in step 1. You’re only doing this to identify what clips you need to media manage, not because you’ll be working off that volume.
3 Choose File > Media Management. The Media Management window appears.
4 Choose Timelines at the top of the window, and then open the Timeline selection section and turn on the checkbox of the timeline you want to consolidate the media for.
5 Click the Browse button and choose the volume you want to write the consolidated media to.
6 Choose the following options for consolidating the media. For this operation, you’ll want to enable:
— Click the Browse button, and choose the accelerated storage volume you’re using for all media you’re using with DaVinci Resolve.
— Choose the “Timelines” Media Management scope, if it’s not selected already, to manage all media from the selected timeline.
— Choose “Copy” to make a duplicate of the media from the portable storage volume to your accelerated storage.
— Choose “Copy and trim used media keeping 12 frame handles” if you’re comfortable with 12 frame handles.
— Turn on “Consolidate multiple edit segments into one media file” if you don’t mind having larger media files that preserve the relationship of what clips come from which single media files. This can make grading simpler later on.
![]()
— Turn on “Relink to new files” to automatically relink the timeline you’ve selected to the new media that’s being generated.

The Consolidate dialog lets you choose how and where to copy the trimmed media.
7 When you’re done choosing these settings, click Start. A progress bar appears showing you how long the operation will take.
A subset of media used by that timeline is copied to the specified directory, and a DaVinci Resolve Timeline (.drt) is automatically generated that is relinked to the timeline and clips in the Media Pool. You are now ready to continue working on the project.