< Previous | Contents | Next >
— Copy a node’s settings from one project and paste them to a node in another project.
You can also copy and paste clips, timelines, and node settings from one project to another without using dynamic project switching, but using switching makes this process faster.
Archiving and Restoring Projects
![]()
DaVinci Resolve has a convenient feature for quickly archiving every single media file used by
a project, including subtitle files, along with the project itself, to a single location. This can be done to hand a project off to another DaVinci Resolve user, or to bundle a project and its media up for either short- or long-term archiving using the backup methodology of your choice. The process is simple.
1 Open the Project Manager.
2 Locate and right-click the project you want to archive, and choose Archive.
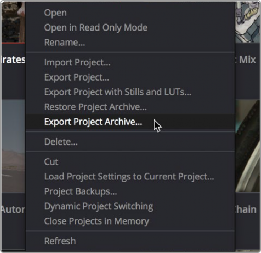
The contextual menu command for archiving projects
3 When the Archive Project window appears, choose a location to save the archive. Make sure you choose a volume that’s large enough to accommodate the size of all the media from the project you’re archiving, and click Save.
4 When the Archive dialog appears, verify the location the archive will be saved to, and choose which optional media you want to save within the archive. You can optionally save Optimized media and/or Render Cache media associated with a project.
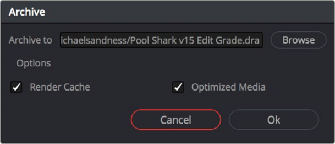
A dialog letting you choose whether to save Optimized and/or Render Cache media
5 Click Ok, and a dialog with a progress bar will show you how long the archive operation will take to finish. If any errors come up, resulting from missing or offline media, they’ll be presented at the end of the process.
![]()
The resulting archive that is written is a directory with the .dra file extension. Inside this folder are a series of subdirectories containing all of the media that’s used by the archived project. Each directory of media files used is saved within a directory path that mirrors the exact path it came from, so you have a reference for where each clip came from originally.
1 Copy the .dra archive directory you want to restore to the volume where you want those media files to be. Restoring doesn’t move this directory, it only adds the project file within to the Project Manager, so you should make sure the .dra archive directory is located on a storage volume with suitable performance for you to work.
2 Open the Project Manager, right-click anywhere, and choose Restore from the contextual menu. Choose the .dra archive directory you just copied, and click Open.
3 At the prompt, enter a unique project name for the restored project, and click OK. The project is restored to the Project Manager, and remains linked to the media located inside the .dra archive.
4 Alternatively you can simply drag the .dra folder from your file system directly into the Project Manager.
If, after restoring an archive, you want to move its media to another location, you can use Media Management to do a move operation for all clips in that project. For more information on Media Management, see Chapter 45, “Media Management.”