< Previous | Contents | Next >
Adding and Editing Transitions
The following procedures describe how to work with add and edit transitions in the Timeline using both the mouse and keyboard shortcuts.
— To add a transition by dragging it from the Effects Library: Drag a video transition from the Effects Library to an edit point in the Timeline so that it’s centered at, ends at, or starts at the edit point. If there is no overlap between the heads and tails of the two clips, you may not be able to add a transition where you want.
— To add a transition by double-clicking its icon in the Effects Library: Double click a transition’s icon in the Effects Library to apply that transition to the edit point indicated by the smart indicator (Cut page), or at the end of the clip that is currently under the playhead (Edit page).
— To add a transition by clicking the Transition Alignment icons: In the Cut page, at the bottom of the Transitions Library, are three Transition Alignment icons. Clicking any of these icons applies the selected transition to the edit point indicated by the smart indicator, with the specified alignment.
![]()
— To add a transition using the Effects Library contextual menu: Select one or more edit points (one per track), then right-click a video transition in the Effects Library and choose Add to Selected Edit Points. That transition will be added to every selected edit point at once.
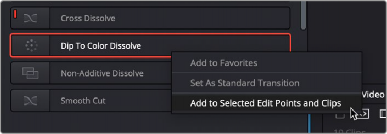
The Transition contextual menu in the Effects Library
— To add a transition using the Edit Point contextual menu: In the Edit page, right-click any edit point between clips with overlapping handles, and choose one of the four durations available for the standard transition; the available choices are quarter-second, half-second, one second, and two seconds, expressed in frames at whatever the current frame rate of the Timeline is.
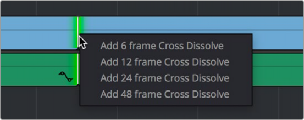
The Transition contextual menu for an edit in the Timeline
— To add a video+audio transition using the keyboard: Select one or more edit points using the Selection tool, or move the playhead near an edit you want to select and press V to select it, then press Command-T (Timeline > Add Transition) to add the standard transition. Transitions are added using the “Standard transition duration” as specified in the Editing panel of the User Preferences, which defaults to one second, or however long the overlapping handles of the selected edit point allow.
— To add a video or audio-only transition using the keyboard: Select one or more edit points, and press Option-T (Timeline > Add Video Only Transition) to add only a video transition, or Shift-T (Timeline > Add Audio Only Transition) to add only an audio transition. Transitions are added using the “Standard transition duration” as specified in the Editing panel of the User Preferences, which defaults to one second, or however long the overlapping handles of the selected edit point allow.
— To add a transition with specific alignment using the keyboard: Select an edit, press the U key to choose the start, center, or end of the edit, then press Command-T. The standard transition will be added with its alignment based on the edit selection; selecting the start of the edit places a transition that ends on the edit; selecting the end of the edit places a transition that starts on the edit, and choosing the center of the edit places a transition that is similarly centered.
— To move a transition from one edit to another: Select a transition, then drag it to another edit point.
![]()
— To copy a transition from one edit to another: Select a transition, then option-drag it to another edit point.
— Copying a transition from one edit to multiple edit points:
— Right-Click on the transition you want to duplicate, and select copy (or hit Command-C).
— Hold down the Command-Key, and select all the edit points in the Timeline you want to copy the transition to, so they’re highlighted green. Release the Command-Key.
— Right-Click on any one of the green highlighted edit points, and select Paste (or hit Command-V) to duplicate the selected transition to all selected edit points.
— To change a transition’s type: Drag a different transition from the Effects Library onto the current one in the Timeline.
— To change a transition’s duration: Drag the beginning or end of the transition in the Timeline to be longer or shorter symmetrically about the current edit. Alternately, you can do one
of the following:
— Right-click any transition and select Change Transition Duration, or select the transition and press Command-D, then alter the duration in the dialog that appears, and click Change.
— Double-click any transition to open it in the Inspector, and set a new duration in seconds or frames.
— Click and drag a transition’s edge on the Timeline to alter its duration. Holding down the Command key while you drag allows you to adjust the duration of just one side of the transition.
— To change a transition’s alignment: Right-click a transition in the Timeline and choose a new method of alignment from the contextual menu. Alternately, you can double-click any transition to open it in the Inspector, and choose a new option from the Alignment drop-down.
— To remove a transition: Select a transition in the Timeline and press the Delete key. Or, right-click a transition in the Timeline and choose Delete from the contextual menu.