< Previous | Contents | Next >
— GPU processing mode: Lets you set DaVinci Resolve to use the OpenCL, CUDA, or Metal GPU computing APIs for doing effects processing. Which is best depends on the GPUs that are installed in your computer. Most users can leave this set to Auto to let DaVinci Resolve choose what’s appropriate. Otherwise, here are specific recommendations. If you have a macOS system, you should use Metal. Linux and Windows users with AMD GPUs should use OpenCL. Linux and Windows users with Nvidia GPUs should use CUDA, but make sure you have the correct drivers for your system, and that you have the latest update to CUDA installed. Additionally, when you manually choose an option from this drop-down menu, the GPU selection mode drop-down also appears.
![]()
— Use Apple Neural Engine when possible: Lets you toggle the use of Apple Silicon’s Neural Engine in compute tasks.
— GPU selection mode: Lets you choose between Auto, which lets DaVinci Resolve choose which of the available GPUs on your computer to use for processing, and Manual, which lets you choose which GPUs to enable or disable for processing from a list that appears below. This can be useful in instances where you have multiple GPUs installed on a machine and you want to choose only the most powerful GPUs for processing. This can also be useful in instances where an external eGPU is connected to a laptop or all-in-one with a weaker GPU, so you can choose the more powerful eGPU for processing.
— Use Display GPU For Compute: By default, a single GPU system uses the same GPU for the DaVinci user interface and also for image processing. As greater processing speeds are achievable with two or more GPUs, if two GPUs are installed for image processing, this checkbox enables the shared use of the display GPU instead of dedicating it to just the DaVinci user interface. Users of the non-studio version of DaVinci Resolve are restricted to the use of a single GPU.
— GPU selection list: This list only appears when GPU processing mode is set to either OpenCL, CUDA, or Metal, and when GPU selection mode is set to Manual. A list of every GPU installed in your computer appears, and you can use checkboxes to the left of each GPU to enable or disable specific GPUs from being used for processing.
— Optimized Viewer Updates: This only appears on multi-GPU macOS and Windows systems or on single- and multi-GPU Linux systems; enables faster viewer update performance.
Media Storage
This panel lets you define the scratch disk and other media storage locations used by DaVinci Resolve, as well as proxy locations, and the default cache directories locations to be used when creating
new projects.
— Media Storage Locations: This list lets you define the scratch disk of the system. The first volume in this list is where Gallery stills and cache files are stored, so you want to make sure that you choose the fastest storage volume to which you have access.
— Mapped Mount: This column allows you to specify translatable media path mapping between Mac, Linux, and Windows file system conventions.
— Direct I/O: This option allows DaVinci Resolve to write directly to the drive using the kernel buffers, bypassing the normal storage cache in RAM. This allows access to the full performance of the drive.
— Automatically display attached local and network storage locations: This checkbox lets DaVinci Resolve access media on all temporarily and permanently mounted volumes, including SATA and eSATA, SAS, USB, FireWire, Thunderbolt, Gigabit Ethernet (GbE or GigE), Fibre Channel, and otherwise connected hard drives, without having to add them to this list. This is on by default.
If you’re using the Apple App store version of DaVinci Resolve, turning on “Automatically display attached local and network storage locations” automatically prompts you via a dialog to add “Macintosh HD” as a storage location. Clicking Add Location prompts you to select the Macintosh HD volume with another dialog, and clicking Open then adds that volume to the Media Storage Volumes list. After you click Save to close the Preference windows, Resolve should now
![]()
auto-mount any volumes attached to your computer in the Media Storage browser of the Media page. Don’t do this until after you’ve added a fast storage volume to the Media Storage Locations list, because you don’t want Macintosh HD as the first volume in this list – the very first volume in this list should always be reserved for your fast scratch volume.
— Proxy Generation Location: These options let you define where any proxy media you create will be rendered to.
— Proxy subfolders in media file locations: The proxy media is generated inside a subfolder named “Proxy” at the same level in the file hierarchy as the original media file. This means that if your original media is all in the same folder, you will have one “Proxy” folder containing all of the proxy clips. If your original media is all contained in separate folders (i.e., one folder for each video clip), you will have multiple “Proxy” folders, one inside every clip folder and containing one proxy clip each.
— Use project settings: Uses the “Proxy generation location” destination, found in the Working Folders section of the Master Settings of the Project Settings.
— Ask when creating: Opens a filesystem dialog, allowing you to select a specific folder for the proxy generation.
Adding Storage Locations Manually
Some versions of DaVinci Resolve do not allow automatic display of attached volumes. In this case, you can right-click anywhere in the background of the Media Storage panel’s volumes list on the Media page and choose “Add New Location” to open a dialog you can use to choose a volume you want to add.
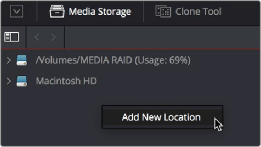
Manually adding a volume to the Media Storage panel’s volumes list
Using Path Mapping to Access Volumes From Other Operating Systems
Shared media path mapping support for Mac, Linux and Windows makes it easier for multi-system shops to share Resolve projects among different platforms that use different file path conventions.
1 Open the Media Storage panel of the Resolve Preferences window.
2 Add the volume you want to map to the Scratch Disks list.
3 Double-click the Mapped Mount column of the drive you added to edit it.

NOTE: If the volume you’ve selected to use for the cache becomes unavailable, DaVinci Resolve will warn you with a dialog.
NOTE: If the volume you’ve selected to use for the cache becomes unavailable, DaVinci Resolve will warn you with a dialog.
NOTE: If the volume you’ve selected to use for the cache becomes unavailable, DaVinci Resolve will warn you with a dialog.