< Previous | Contents | Next >
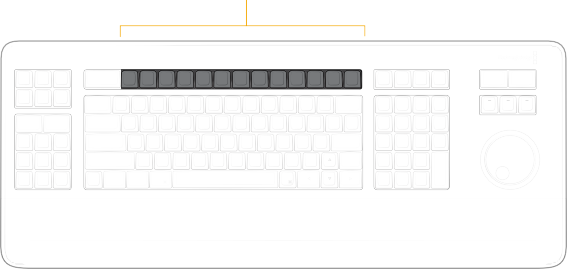
The function keys of the DaVinci Resolve Editing Keyboard are by default mapped directly to their DaVinci Resolve commands. If you wish to use them as regular function keys (f1, f2, f3, etc.) you can hold the Fn key down and press the appropriate function key.
F1
SYNC BIN
F1
SYNC BIN
F1
SYNC BIN
F2 F3 F4 F5 F6 F7 F8
INSRT
F2 F3 F4 F5 F6 F7 F8
INSRT
F2 F3 F4 F5 F6 F7 F8
INSRT
BLACK
BLACK
BLACK
FREEZ TRANS SWAP
FREEZ TRANS SWAP
FREEZ TRANS SWAP
PIIC IIN VIDEO AUDIIO
PIIC IIN VIDEO AUDIIO
PIIC IIN VIDEO AUDIIO
PIC ONLY ONLY
PIC ONLY ONLY
PIC ONLY ONLY
F9
INSERT
F9
INSERT
F9
INSERT
F10
O/WR
F10
O/WR
F10
O/WR
F11 F12
F11 F12
F11 F12
REPL
REPL
REPL
FIIT TO RIPL
FIIT TO RIPL
FIIT TO RIPL
FIILL DEL
FIILL DEL
FIILL DEL
DAVINCI RESOLVE EDITOR KEYBOARD
DAVINCI RESOLVE EDITOR KEYBOARD
DAVINCI RESOLVE EDITOR KEYBOARD
SMART INSRT
SMART INSRT
SMART INSRT
APPND
APPND
APPND
RIPL O/WR
RIPL O/WR
RIPL O/WR
ESC
ESC
ESC
TIME CODE
TIME CODE
TIME CODE
CAM
CAM
CAM
DATE CLIP
TIME NAME
DATE CLIP
TIME NAME
DATE CLIP
TIME NAME
SOURCE
SOURCE
SOURCE
TIMELINE
TIMELINE
TIMELINE
CLOSE PLACE SRC
UP ON TOP O/WR
CLOSE PLACE SRC
UP ON TOP O/WR
CLOSE PLACE SRC
UP ON TOP O/WR
~
~
~
!
!
!
@
1 2
@
1 2
@
1 2
#
#
#
$
$
$
%
%
%
^
^
^
&
&
&
*
*
*
(
(
(
)
)
)
–
–
–
+
+
+
UNDO
UNDO
UNDO
3
3
3
4
4
4
5
5
5
6
6
6
7
7
7
8
8
8
9
9
9
0
0
0
-
-
-
=
=
=
DELETE
DELETE
DELETE
TRIM
E
TRIM
E
TRIM
E
DITOR
DITOR
DITOR
HOME
HOME
HOME
F/TC
F/TC
F/TC
DUR ENTER
DUR ENTER
DUR ENTER
SHTL JOG SCRL
SHTL JOG SCRL
SHTL JOG SCRL
TAB
TAB
TAB
Q
Q
Q
W E
W E
W E
R
R
R
SRC/ TL
SRC/ TL
SRC/ TL
DYNAM
DYNAM
DYNAM
TRIM EDIT
TRIM EDIT
TRIM EDIT
T
EXTND RETIME TRIM
T
EXTND RETIME TRIM
T
EXTND RETIME TRIM
Y
S/CLP AFTER
Y
S/CLP AFTER
Y
S/CLP AFTER
U
EDT PT TYPE
U
EDT PT TYPE
U
EDT PT TYPE
I
I
I
O P [ { ] } \ |
O P [ { ] } \ |
O P [ { ] } \ |
IN
IN
IN
OUT
OUT
OUT
IN OUT
IN OUT
IN OUT
FULL PREV NEXT
VIEW KEY KEY
FULL PREV NEXT
VIEW KEY KEY
FULL PREV NEXT
VIEW KEY KEY
7 8 9 –
7 8 9 –
7 8 9 –
CAPS LOCK
CAPS LOCK
CAPS LOCK
TRIM OUT
TRIM OUT
TRIM OUT
ROLL
ROLL
ROLL
A
NORML
A
NORML
A
NORML
S D F
S D F
S D F
G
G
G
H
H
H
J
J
J
K L ; : ‘ “ RETURN
K L ; : ‘ “ RETURN
K L ; : ‘ “ RETURN
TRIM IN
TRIM IN
TRIM IN
SLIP MATCH
SLIP MATCH
SLIP MATCH
SLIDE FRAME
SLIDE FRAME
SLIDE FRAME
ENABL
ENABL
ENABL
FLAG HAND
FLAG HAND
FLAG HAND
REV
REV
REV
STOP FWD FIRST
STOP FWD FIRST
STOP FWD FIRST
FRAME
FRAME
FRAME
LAST FRAME
LAST FRAME
LAST FRAME
4 5 6 +
4 5 6 +
4 5 6 +
SHIFT
SHIFT
SHIFT
SLIP TRANS
SEXT DUR
SLIP TRANS
SEXT DUR
SLIP TRANS
SEXT DUR
Z X C
ZOOM MARK AUTO
CLIP COLOR
Z X C
ZOOM MARK AUTO
CLIP COLOR
Z X C
ZOOM MARK AUTO
CLIP COLOR
V
NRST EDIT
V
NRST EDIT
V
NRST EDIT
B
BLADE
B
BLADE
B
BLADE
N
SNAP
N
SNAP
N
SNAP
M
M
M
, < . >
, < . >
, < . >
SLIP SRC
SLIP SRC
SLIP SRC
MARKR NUDGE NUDGE
MARKR NUDGE NUDGE
MARKR NUDGE NUDGE
LEFT RIGHT
LEFT RIGHT
LEFT RIGHT
/ ?
PLAY ARND
/ ?
PLAY ARND
/ ?
PLAY ARND
SHIFT
SHIFT
SHIFT
1 2
1 2
1 2
3
3
3
ENTER
ENTER
ENTER
Fn
Fn
Fn
CRTL
CRTL
CRTL
OPT ALT
OPT ALT
OPT ALT
COMMAND
COMMAND
COMMAND
CMD
CMD
CMD
CUT
CUT
CUT
DIS
DIS
DIS
SMTH CUT
SMTH CUT
SMTH CUT
STOP PLAY
STOP PLAY
STOP PLAY
0 00 .
0 00 .
0 00 .
The mapped Function keys
![]()
SYNC BIN (F1)
This key opens the Sync Bin in the Cut Page. This key does not function in the Edit page.
INSRT BLACK (Insert Black) (F2)
Pressing this key will add two seconds of black (via the solid color generator) to the selected track. This is used as filler for transitions where you want to replace the “nothing” of the empty timeline with an actual media clip.
FREEZ (Freeze Frame) (F3)
Pressing this key will freeze the exact frame of the clip that is under the playhead for the remaining duration of that clip.
TRANS (Transition) (F4)
In the Cut Page, holding down this key brings up a drop-down menu of your available transitions in alphabetical order and an icon describing their shape. Rotating the Search dial left and right will
navigate you through the list. When you find the transition that you want, simply release this key and it will be placed at the Timeline edit point as shown by the Smart Indicator.
This key does not function in the Edit page.
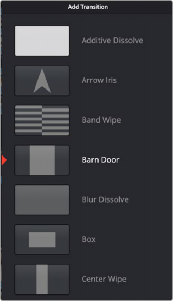
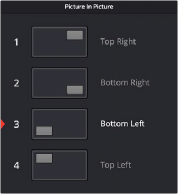
Drop-down Transition menu Picture-in-Picture options
PIC IN PIC (Picture in Picture) (F5)
![]()
In the Cut Page, holding this button down will open a drop-down menu that displays four picture- in-picture placement options that you can navigate using the Search dial or numeric keyboard. This function will take the media that is in the Source Viewer, scale it to 1/8 size and place it on top of the
original clip in the position that was selected in the drop-down menu. If you wish to change the drop- down position, navigate over the clips, hold down this button and select another position.
SWAP (F6)

TIP You can easily move entire scenes back and forth in your timeline by Command Selecting the all clips in the scene, holding down the Swap key (f6), and rotating the Search Dial. When the scene is in its correct place, release the key. (Edit page only).
TIP You can easily move entire scenes back and forth in your timeline by Command Selecting the all clips in the scene, holding down the Swap key (f6), and rotating the Search Dial. When the scene is in its correct place, release the key. (Edit page only).
TIP You can easily move entire scenes back and forth in your timeline by Command Selecting the all clips in the scene, holding down the Swap key (f6), and rotating the Search Dial. When the scene is in its correct place, release the key. (Edit page only).
Press and hold the Swap key, and using the Search dial, move the clip under the playhead earlier or later in the Timeline, effectively swapping the moving clip with the one you are scrolling over.
VIDEO ONLY (F7)
In the Cut Page, press this key to only allow the video from your source clip into a video track on the Timeline. Press this key again to deactivate.
This key is inactive in the Edit Page.
AUDIO ONLY (F8)
In the Cut Page press this key to only allow the audio from your source clip into an audio track the Timeline. Press this key again to deactivate.
This key is inactive in the Edit Page.
INSERT (F9)
An Insert edit splits whatever media is already in the Timeline at the position of the playhead and pushes that media to the right to make room for the incoming clip.
O/WR (Overwrite) (F10)
You can use the F10 key to perform an Overwrite edit, which overwrites a section of the Timeline with the incoming clip, without moving other clips in any way. The frame the incoming clip aligns with depends on the following:
— The incoming clip aligns with the playhead if no timeline In or Out points have been defined.
— The incoming clip aligns with a timeline In point if one has been set.
— The incoming clip’s Out point will align with a timeline Out point if one has been set without an In point. This “backtimes” the clip.
REPL (Replace) (F11)
Replace edits are a unique three-point edit type that aligns the frame at the Source Viewer playhead with the frame at the Timeline playhead when the edit is executed. This is the fastest edit type to use when you need to align an action at a specific frame of video, or a sound at a specific frame of audio, to a particular frame’s action or sound in the video or audio of the Timeline.
![]()
The fastest way of using the Replace edit is to not bother setting either In or Out points in the Source Viewer, and to either use the duration of an existing clip intersecting the Timeline to define the edit, or a pair of timeline In/Out points specifying either a section of a clip you want to overwrite, or an empty section of the Timeline to which you want to edit.
Replace edits do not ripple the Timeline.
FIT TO FILL (F12)
Fit to fill edits are the only edit type that actually use all four edit points, and it’s the only edit type that retimes clips at the same time as they’re being edited. By setting In and Out points in the incoming source clip, and another pair of In and Out points in the Timeline, you can stretch or compress the timing of the specified range of source media to cover the entire specified range of the Timeline. In the process, the speed ratio of the clip changes so the clip plays in either fast or slow motion.
Fit to fill edits are especially valuable when you have a source clip in which the action is slightly slow, and you just want to speed it up by squeezing it into a shorter duration of the Timeline. They’re also incredibly handy in situations when you have a gap in an edited sequence of clips to fill with a source clip that’s just not long enough, but in which slightly slower motion won’t be noticeable.
Fit to fill edits do not ripple the Timeline.
RIPL DEL (Ripple Delete)
Pressing this key will delete the selected clip or clips, and then close any gaps that occur by rippling the Timeline to the left.